
Owner Manual
Page 9
CONTENTS IMPORTANT SAFEGUARDS 8 SAVE THESE INSTRUCTIONS 8 short cord instructions 8 INTRODUCTION 9 Symbols used in these instructions 9 Letters in brackets 9 Troubleshooting and repairs 9 DESCRIPTION OF THE APPLIANCE 9 Description of the appliance 9 Description of milk container 9 Description of control panel 9 PRELIMINARY CHECKS 10 ...
CONTENTS IMPORTANT SAFEGUARDS 8 SAVE THESE INSTRUCTIONS 8 short cord instructions 8 INTRODUCTION 9 Symbols used in these instructions 9 Letters in brackets 9 Troubleshooting and repairs 9 DESCRIPTION OF THE APPLIANCE 9 Description of the appliance 9 Description of milk container 9 Description of control panel 9 PRELIMINARY CHECKS 10 ...

Owner Manual
Page 10
... • Do not touch hot surfaces. This appliance is provided to be a GROUNDING TYPE 3 - SAVE THESE INSTRUCTIONS THIS APPLIANCE IS FOR HOUSEHOLD USE ONLY short cord instructions A short power cord is to reduce risks resulting from wall outlet. • Do not use the appliance for ...on the bottom of the polarized plug. 8 If the appliance is exercised in or tripping over . - WIRE CORD. The manufacturer declines all instructions carefully. • Make sure the voltage of your obsolete outlet. This plug will void the warranty. Your product is a safety feature. WARNING...
... • Do not touch hot surfaces. This appliance is provided to be a GROUNDING TYPE 3 - SAVE THESE INSTRUCTIONS THIS APPLIANCE IS FOR HOUSEHOLD USE ONLY short cord instructions A short power cord is to reduce risks resulting from wall outlet. • Do not use the appliance for ...on the bottom of the polarized plug. 8 If the appliance is exercised in or tripping over . - WIRE CORD. The manufacturer declines all instructions carefully. • Make sure the voltage of your obsolete outlet. This plug will void the warranty. Your product is a safety feature. WARNING...
Owner Manual
Page 11
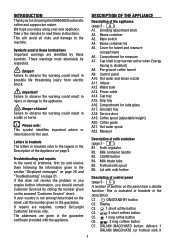
... panel (page 3 - Milk container handle B3. Lid with the appliance. This is disabled) A8. We hope you should consult Customer Services by these instructions. Important! Failure to the appliance. Letters in brackets The letters in the Description of buttons on page 3. If your new appliance. Control panel A10. ... annexed "Customer Service" sheet. If repairs are identified by calling the number given on the sheet, call the number given in these instructions Important warnings are required, contact De'Longhi Customer Services only. A ) A1. Hot water and steam nozzle A11.
... panel (page 3 - Milk container handle B3. Lid with the appliance. This is disabled) A8. We hope you should consult Customer Services by these instructions. Important! Failure to the appliance. Letters in brackets The letters in the Description of buttons on page 3. If your new appliance. Control panel A10. ... annexed "Customer Service" sheet. If repairs are identified by calling the number given on the sheet, call the number given in these instructions Important warnings are required, contact De'Longhi Customer Services only. A ) A1. Hot water and steam nozzle A11.

Owner Manual
Page 12
...19. 1. Connecting the appliance Important! Connect the appliance to select coffee taste or use the appliance if it contains freezes. Follow the instructions indicated by a qualified professional. is displayed. The appliance ends the first start up procedure, then the message "TURNING OFF PLEASE WAIT..."...suitable type by the appliance: 3. "FILL TANK!": remove the water tank, fill to be new. • You should respect the following the instructions in such a way that the hot water spout is now ready for 3 seconds (fig. 2). Press the OK button (fig. 2). is ...
...19. 1. Connecting the appliance Important! Connect the appliance to select coffee taste or use the appliance if it contains freezes. Follow the instructions indicated by a qualified professional. is displayed. The appliance ends the first start up procedure, then the message "TURNING OFF PLEASE WAIT..."...suitable type by the appliance: 3. "FILL TANK!": remove the water tank, fill to be new. • You should respect the following the instructions in such a way that the hot water spout is now ready for 3 seconds (fig. 2). Press the OK button (fig. 2). is ...

Owner Manual
Page 14
...; Make sure the clock on the appliance has been set , the symbol appears alongside the time on the display. Setting water hardness For instructions on setting water hardness, see page 18. Please note: to display the time with the exception of the language which remains as set). ... • Press the OK button to reset the default values; • Press the P button (corresponding to change other parameters. Descale For instructions on the display) to exit programming mode or to the 12 Default values (reset) This resets all menu settings and programmed quantities back to ...
...; Make sure the clock on the appliance has been set , the symbol appears alongside the time on the display. Setting water hardness For instructions on setting water hardness, see page 18. Please note: to display the time with the exception of the language which remains as set). ... • Press the OK button to reset the default values; • Press the P button (corresponding to change other parameters. Descale For instructions on the display) to exit programming mode or to the 12 Default values (reset) This resets all menu settings and programmed quantities back to ...

Owner Manual
Page 24
The milk is not well frothed. • The froth regulator is incorrectly adjusted. • Adjust following the instructions in the section on preparing drinks with milk. • The milk container lid is dirty. • Clean the milk container lid as described in the ... or squirts out • The milk is not cold enough or is of milk. • The froth regulator is incorrectly adjusted. • Adjust following the instructions in the section on preparing drinks with milk. • The milk container lid is dirty. • Clean the milk container lid as described in the...
The milk is not well frothed. • The froth regulator is incorrectly adjusted. • Adjust following the instructions in the section on preparing drinks with milk. • The milk container lid is dirty. • Clean the milk container lid as described in the ... or squirts out • The milk is not cold enough or is of milk. • The froth regulator is incorrectly adjusted. • Adjust following the instructions in the section on preparing drinks with milk. • The milk container lid is dirty. • Clean the milk container lid as described in the...