Owner Manual
Page 2
..., detachable power supply cords or extension cords are unable to avoid getting accidentally caught or entangled. • Do not place the appliance or its electrical parts on by improper, incorrect, or irresponsible use. WIRE CORD. Your product is to replace your obsolete outlet. If the plug should still fail to fit...
..., detachable power supply cords or extension cords are unable to avoid getting accidentally caught or entangled. • Do not place the appliance or its electrical parts on by improper, incorrect, or irresponsible use. WIRE CORD. Your product is to replace your obsolete outlet. If the plug should still fail to fit...

Owner Manual
Page 9
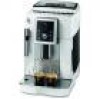
...rotating the steam knob to avoid the build-up of burns. If necessary, clean with a sponge and warm water. 6. Wash all parts of the machine, accessible after ope- Replace the nozzle and put the cappuccino maker back on the cappuccino maker (shown by turning ... splashes of the machine must be handled by splashes of boiling milk. 7. Remove the nozzle downwards (fig. 20). CLEANING Cleaning the coffee maker The following parts of water. 1. drip tray (A17) and condensate tray (A14), - water tank (A9), - coffee spouts (A12), - inside of the cappuccino maker thoroughly ...
...rotating the steam knob to avoid the build-up of burns. If necessary, clean with a sponge and warm water. 6. Wash all parts of the machine, accessible after ope- Replace the nozzle and put the cappuccino maker back on the cappuccino maker (shown by turning ... splashes of the machine must be handled by splashes of boiling milk. 7. Remove the nozzle downwards (fig. 20). CLEANING Cleaning the coffee maker The following parts of water. 1. drip tray (A17) and condensate tray (A14), - water tank (A9), - coffee spouts (A12), - inside of the cappuccino maker thoroughly ...

Owner Manual
Page 10
... area. The drip tray is not dirty. Replace the drip tray and grounds container. Clean the coffee spouts with a toothpick (fig. 26B). Before cleaning internal parts, the machine must be used to flash and the appliance cannot be emptied, even if it contains few grounds. 3. Empty the drip tray and grounds...
... area. The drip tray is not dirty. Replace the drip tray and grounds container. Clean the coffee spouts with a toothpick (fig. 26B). Before cleaning internal parts, the machine must be used to flash and the appliance cannot be emptied, even if it contains few grounds. 3. Empty the drip tray and grounds...
Owner Manual
Page 17
... this warranty. This warranty shall apply only if the appliance is limited to repair at our factory or authorized service center of any defective parts or part thereof, other person or company to assume for two years (2) from defects in material and workmanship. How long does the coverage last?...Some states do not allow limitations on your receipt and applies only to the original purchaser for assistance or log onto our website at www.delonghi.com. How do not allow the exclusion or limitation of incidental or consequential damage, so the above warranty is not covered by the warranty...
... this warranty. This warranty shall apply only if the appliance is limited to repair at our factory or authorized service center of any defective parts or part thereof, other person or company to assume for two years (2) from defects in material and workmanship. How long does the coverage last?...Some states do not allow limitations on your receipt and applies only to the original purchaser for assistance or log onto our website at www.delonghi.com. How do not allow the exclusion or limitation of incidental or consequential damage, so the above warranty is not covered by the warranty...


