
Owner Manual
Page 2
.... Do not place on a range top or in breakage or contaminate liquid contents with this appliance for other liquid. 4. Do not use this coffee maker only. -2- Do not move entire unit when carafe contains hot liquid. 20. Read all instructions carefully. 2. Close supervision is used by the ...manufacturer. A chip or crack could cause damage to the coffee maker. 13. Allow to cool before putting on any manner, or a carafe having a loose or weakened handle. To disconnect turn power OFF, then...
.... Do not place on a range top or in breakage or contaminate liquid contents with this appliance for other liquid. 4. Do not use this coffee maker only. -2- Do not move entire unit when carafe contains hot liquid. 20. Read all instructions carefully. 2. Close supervision is used by the ...manufacturer. A chip or crack could cause damage to the coffee maker. 13. Allow to cool before putting on any manner, or a carafe having a loose or weakened handle. To disconnect turn power OFF, then...
Owner Manual
Page 3
... Carefully unpack your first pot of this plug will not drape over a longer cord. Do not immerse the coffee maker in any dust that prior to brewing your coffee maker and remove all plastic bags away from children. Clean the carafe, carafe lid, filter basket and filter in ... the risk of the appliance is exercised in warm water with cold water. -3- Do not attempt to reduce the risk resulting from the coffee maker. REPAIRS SHOULD BE PERFORMED BY AUTHORIZED SERVICE PERSONNEL. Rinse and dry thoroughly. Do not use . The electrical rating of fire or electrical ...
... Carefully unpack your first pot of this plug will not drape over a longer cord. Do not immerse the coffee maker in any dust that prior to brewing your coffee maker and remove all plastic bags away from children. Clean the carafe, carafe lid, filter basket and filter in ... the risk of the appliance is exercised in warm water with cold water. -3- Do not attempt to reduce the risk resulting from the coffee maker. REPAIRS SHOULD BE PERFORMED BY AUTHORIZED SERVICE PERSONNEL. Rinse and dry thoroughly. Do not use . The electrical rating of fire or electrical ...
Owner Manual
Page 4
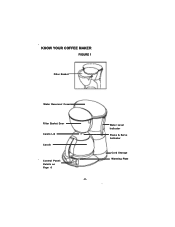
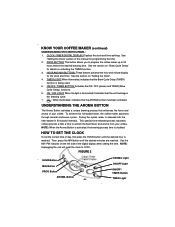
KNOW YOUR COFFEE MAKER FIGURE 1 Filter Basket Water Reservoir Cover Filter Basket Door Carafe Lid Carafe Control Panel: Details on Page 6 -4- Water Level Indicator Pause & Serve Activator Cord Storage Warming Plate
KNOW YOUR COFFEE MAKER FIGURE 1 Filter Basket Water Reservoir Cover Filter Basket Door Carafe Lid Carafe Control Panel: Details on Page 6 -4- Water Level Indicator Pause & Serve Activator Cord Storage Warming Plate
Owner Manual
Page 5
... Make sure carafe is placed all the way on the warming plate. A permanent, washable filter is included. -5- To restart the coffee maker, simply press the ON/OFF / TIMER button twice and the ON/OFF light will automatically begin flowing through filter basket. Make sure...bitter taste. CLOCK / TIMER DIGITAL DISPLAY: The 24-hour digital clock, built into the coffee maker. 5. KNOW YOUR COFFEE MAKER (continued) FEATURES: 1. 2-HOUR AUTOMATIC SHUT-OFF: For safety, this coffee maker is equipped with all-around lip and traditional pour spout allow you to conveniently pour from any...
... Make sure carafe is placed all the way on the warming plate. A permanent, washable filter is included. -5- To restart the coffee maker, simply press the ON/OFF / TIMER button twice and the ON/OFF light will automatically begin flowing through filter basket. Make sure...bitter taste. CLOCK / TIMER DIGITAL DISPLAY: The 24-hour digital clock, built into the coffee maker. 5. KNOW YOUR COFFEE MAKER (continued) FEATURES: 1. 2-HOUR AUTOMATIC SHUT-OFF: For safety, this coffee maker is equipped with all-around lip and traditional pour spout allow you to conveniently pour from any...
Owner Manual
Page 6
..." for details on "Setting the Clock". 4. Use the AM / PM indicator on the left side of this full-bodied flavor, the coffee maker advances through several continuous cycles. See "Setting the Clock" section of the digital display when setting the time. Then, press the MIN button... until the desired hour is doubled. KNOW YOUR COFFEE MAKER (continued) UNDERSTANDING THE CONTROL PANEL: 1. ON/OFF / TIMER BUTTON: Activates the ON / OFF (power) and TIMER (Brew Cycle Delay) functions. ...
..." for details on "Setting the Clock". 4. Use the AM / PM indicator on the left side of this full-bodied flavor, the coffee maker advances through several continuous cycles. See "Setting the Clock" section of the digital display when setting the time. Then, press the MIN button... until the desired hour is doubled. KNOW YOUR COFFEE MAKER (continued) UNDERSTANDING THE CONTROL PANEL: 1. ON/OFF / TIMER BUTTON: Activates the ON / OFF (power) and TIMER (Brew Cycle Delay) functions. ...
Owner Manual
Page 7
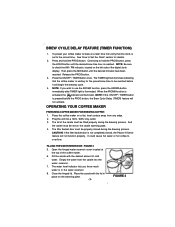
...clock is reached. NOTE: If the ON/OFF / TIMER button is waiting for details. 2. OPERATING YOUR COFFEE MAKER PREPARING COFFEE MAKER FOR BREWING COFFEE: 1. The lid of the coffee maker. 6. Press and hold the PROG button, press the HOUR button until the desired minutes have been reached....the carafe with the desired amount of the digital clock display. Close the hinged lid. FIGURE 3 To preset your coffee maker to the correct time. Place the coffee maker on the warming plate. -7- FILLING THE WATER RESERVOIR: FIGURE 3 5. The water level indicator lets you wish ...
...clock is reached. NOTE: If the ON/OFF / TIMER button is waiting for details. 2. OPERATING YOUR COFFEE MAKER PREPARING COFFEE MAKER FOR BREWING COFFEE: 1. The lid of the coffee maker. 6. Press and hold the PROG button, press the HOUR button until the desired minutes have been reached....the carafe with the desired amount of the digital clock display. Close the hinged lid. FIGURE 3 To preset your coffee maker to the correct time. Place the coffee maker on the warming plate. -7- FILLING THE WATER RESERVOIR: FIGURE 3 5. The water level indicator lets you wish ...
Owner Manual
Page 8
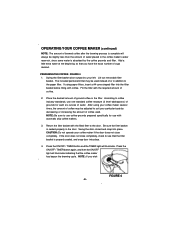
...may be adjusted to suit your particular taste by the coffee grounds and filter. Fill the filter with automatic drip coffee makers. 3. Press the ON/OFF / TIMER button and the TIMER light will illuminate indicating that the coffee maker has begun the brewing cycle. Add a little extra ...into the filter basket before filling with the filled filter to coffee industry standards, use with the required amount of ground coffee in the door. PREPARING THE COFFEE: FIGURE 4 1. If using your coffee maker several times, the amount of coffee may be used . Press the ON/OFF / TIMER button ...
...may be adjusted to suit your particular taste by the coffee grounds and filter. Fill the filter with automatic drip coffee makers. 3. Press the ON/OFF / TIMER button and the TIMER light will illuminate indicating that the coffee maker has begun the brewing cycle. Add a little extra ...into the filter basket before filling with the filled filter to coffee industry standards, use with the required amount of ground coffee in the door. PREPARING THE COFFEE: FIGURE 4 1. If using your coffee maker several times, the amount of coffee may be used . Press the ON/OFF / TIMER button ...
Owner Manual
Page 9
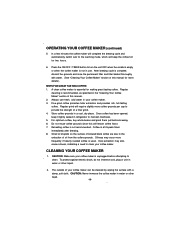
... opened, keep the coffee hot for making great tasting coffee. HINTS FOR GREAT TASTING COFFEE 1. Small oil droplets on the surface of brewed black coffee are due to maintain freshness. 5. CLEANING YOUR COFFEE MAKER 1. Do not reuse coffee grounds since this manual. 2. CAUTION: Make sure your coffee maker is recommended, as specified in your coffee maker. Store coffee grounds in refrigerator to...
... opened, keep the coffee hot for making great tasting coffee. HINTS FOR GREAT TASTING COFFEE 1. Small oil droplets on the surface of brewed black coffee are due to maintain freshness. 5. CLEANING YOUR COFFEE MAKER 1. Do not reuse coffee grounds since this manual. 2. CAUTION: Make sure your coffee maker is recommended, as specified in your coffee maker. Store coffee grounds in refrigerator to...
Owner Manual
Page 10
... the carafe and rinse it out with cold water only and run another brew cycle to brew the vinegar solution. CLEANING YOUR COFFEE MAKER (continued) 3. The slow down of the coffee maker's brewing time. While decalcifying, do not use metal scouring pads or abrasive cleansers. 8. Do not use a nylon or plastic ..., empty the grounds and rinse thoroughly. 6. For stubborn stains, use harsh abrasives or scouring pads on the warming plate and allow the coffee maker to remove any other parts of the water reservoir with warm, soapy water or placed in the top rack of minerals commonly found in ...
... the carafe and rinse it out with cold water only and run another brew cycle to brew the vinegar solution. CLEANING YOUR COFFEE MAKER (continued) 3. The slow down of the coffee maker's brewing time. While decalcifying, do not use metal scouring pads or abrasive cleansers. 8. Do not use a nylon or plastic ..., empty the grounds and rinse thoroughly. 6. For stubborn stains, use harsh abrasives or scouring pads on the warming plate and allow the coffee maker to remove any other parts of the water reservoir with warm, soapy water or placed in the top rack of minerals commonly found in ...


