
Owner Manual
Page 2
... irresponsible use . 13. The use and before blending. 20. Read all instructions carefully. 2. It is turned OFF. 15. Only operate the blender with appliance plugged in heated oven. 10. Do not operate any appliance with a damaged cord or plug or after the appliance malfunctions or has ...been damaged in use of severe injury to persons or damage to cool before cleaning. It may activate the blender. 16. Keep hands and utensils out of jar while blending, to reduce the risk of table or counter, or touch hot surfaces. ...
... irresponsible use . 13. The use and before blending. 20. Read all instructions carefully. 2. It is turned OFF. 15. Only operate the blender with appliance plugged in heated oven. 10. Do not operate any appliance with a damaged cord or plug or after the appliance malfunctions or has ...been damaged in use of severe injury to persons or damage to cool before cleaning. It may activate the blender. 16. Keep hands and utensils out of jar while blending, to reduce the risk of table or counter, or touch hot surfaces. ...
Owner Manual
Page 3
...may wipe the base with wet hands. Remove any way. Carefully clean the accessories in their use harsh or abrasive cleaners. (See "Cleaning Your Blender" section of the appliance, and (2) the longer cord should be placed in water or other . Do not use . WARNING: TO REDUCE ...the box on a large, sturdy flat surface. REPAIR SHOULD BE DONE ONLY BY AUTHORIZED PERSONNEL. Do not attempt to reduce the risk resulting from the blender. To remove any dust that it can be a grounded type 3 wire cord. IMPORTANT SAFEGUARDS (continued) 25. This appliance has a polarized plug....
...may wipe the base with wet hands. Remove any way. Carefully clean the accessories in their use harsh or abrasive cleaners. (See "Cleaning Your Blender" section of the appliance, and (2) the longer cord should be placed in water or other . Do not use . WARNING: TO REDUCE ...the box on a large, sturdy flat surface. REPAIR SHOULD BE DONE ONLY BY AUTHORIZED PERSONNEL. Do not attempt to reduce the risk resulting from the blender. To remove any dust that it can be a grounded type 3 wire cord. IMPORTANT SAFEGUARDS (continued) 25. This appliance has a polarized plug....

Owner Manual
Page 4
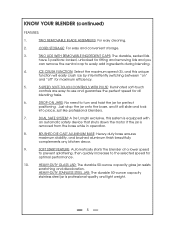
Ingredient Cap (2 included) 7. Lid Seal (2 included) 9. Speed Control 4. Cord Storage 6. Stainless Steel Jar 4 Pulse Control 3. Glass Jar 10. Dual Action Locking (2 included) Lid (2 included) 8. Sealing Ring (2 included) 11. Blade Assembly (2 included) 12. Blade Assembly Base 2. Base 5. KNOW YOUR BLENDER FIGURE 1 1.5 1.3 1.
Ingredient Cap (2 included) 7. Lid Seal (2 included) 9. Speed Control 4. Cord Storage 6. Stainless Steel Jar 4 Pulse Control 3. Glass Jar 10. Dual Action Locking (2 included) Lid (2 included) 8. Sealing Ring (2 included) 11. Blade Assembly (2 included) 12. Blade Assembly Base 2. Base 5. KNOW YOUR BLENDER FIGURE 1 1.5 1.3 1.
Owner Manual
Page 5
... HEAVY-DUTY GLASS JAR: The durable 50-ounce capacity glass jar resists scratching and discoloration. SOFT START FEATURE: Automatically starts the blender at a lower speed to prevent splattering, then quickly increases to -use and guarantee the perfect speed for optimal performance. 10. ...TWO REMOVABLE BLADE ASSEMBLIES: For easy cleaning. 2. KNOW YOUR BLENDER (continued) FEATURES: 1. Just drop the jar onto the base, and it will easily crush ice by intermittently switching between "on"...
... HEAVY-DUTY GLASS JAR: The durable 50-ounce capacity glass jar resists scratching and discoloration. SOFT START FEATURE: Automatically starts the blender at a lower speed to prevent splattering, then quickly increases to -use and guarantee the perfect speed for optimal performance. 10. ...TWO REMOVABLE BLADE ASSEMBLIES: For easy cleaning. 2. KNOW YOUR BLENDER (continued) FEATURES: 1. Just drop the jar onto the base, and it will easily crush ice by intermittently switching between "on"...
Owner Manual
Page 6
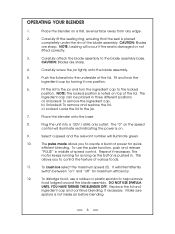
...blade assembly. CAUTION: Blades are sharp. b) Unlocked: To remove and replace the lid. Place the blender on " and "off" for as long as the button is not inside jar before blending. 6 OPERATING YOUR BLENDER 1. Replace the lid and ingredient cap and continue blending, if necessary. DO NOT USE SPATULA UNTIL... YOU HAVE TURNED THE BLENDER OFF. Carefully fit the sealing ring, ensuring that the seal is damaged or not fitted correctly. 3. Plug the unit into the underside of ...
...blade assembly. CAUTION: Blades are sharp. b) Unlocked: To remove and replace the lid. Place the blender on " and "off" for as long as the button is not inside jar before blending. 6 OPERATING YOUR BLENDER 1. Replace the lid and ingredient cap and continue blending, if necessary. DO NOT USE SPATULA UNTIL... YOU HAVE TURNED THE BLENDER OFF. Carefully fit the sealing ring, ensuring that the seal is damaged or not fitted correctly. 3. Plug the unit into the underside of ...
Owner Manual
Page 7
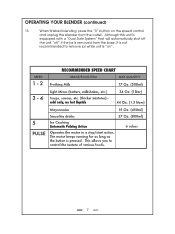
OPERATING YOUR BLENDER (continued) 13. When finished blending, press the "0" button on ". 7 Although this unit is equipped with a "Dual Safe System" that will automatically shut off the unit "off" if the jar is "on the speed control and unplug the blender from the base, it is not recommended to remove jar while unit is removed from the outlet.
OPERATING YOUR BLENDER (continued) 13. When finished blending, press the "0" button on ". 7 Although this unit is equipped with a "Dual Safe System" that will automatically shut off the unit "off" if the jar is "on the speed control and unplug the blender from the base, it is not recommended to remove jar while unit is removed from the outlet.
Owner Manual
Page 8
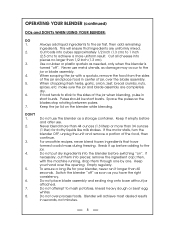
.... Always add liquid ingredients to mash potatoes, knead heavy dough or beat egg whites. Use a rubber or plastic spatula as needed, only when the blender is turned "off " as soon as a storage container. If food tends to stick to the jar or blade assembly. 4. Keep the jar lid... on ". Do not attempt to the jar first, then add remaining ingredients. If necessary, cut them through one by one. Never use the blender as you have formed a solid mass during freezing. When chopping fresh herbs, garlic, onion, zest, bread crumbs, nuts, spices, etc. Empty regularly....
.... Always add liquid ingredients to mash potatoes, knead heavy dough or beat egg whites. Use a rubber or plastic spatula as needed, only when the blender is turned "off " as soon as a storage container. If food tends to stick to the jar or blade assembly. 4. Keep the jar lid... on ". Do not attempt to the jar first, then add remaining ingredients. If necessary, cut them through one by one. Never use the blender as you have formed a solid mass during freezing. When chopping fresh herbs, garlic, onion, zest, bread crumbs, nuts, spices, etc. Empty regularly....
Owner Manual
Page 9
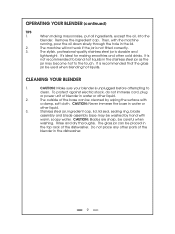
... assembly base may become hot to blend hot liquids in the stainless steel jar as the jar may be placed in the top rack of blender in water or other cold drinks. CAUTION: Never immerse the base in water or other liquid. 2. CAUTION: Blades are sharp, be used when ...the dishwasher. 9 Then, with warm, soapy water. To protect against electric shock, do not immerse cord, plug or power unit of the dishwasher. OPERATING YOUR BLENDER (continued) TIPS 1. Do not place any other parts of the base can be washed by wiping the surface with a damp, soft cloth. CAUTION: Make ...
... assembly base may become hot to blend hot liquids in the stainless steel jar as the jar may be placed in the top rack of blender in water or other cold drinks. CAUTION: Never immerse the base in water or other liquid. 2. CAUTION: Blades are sharp, be used when ...the dishwasher. 9 Then, with warm, soapy water. To protect against electric shock, do not immerse cord, plug or power unit of the dishwasher. OPERATING YOUR BLENDER (continued) TIPS 1. Do not place any other parts of the base can be washed by wiping the surface with a damp, soft cloth. CAUTION: Make ...
Owner Manual
Page 39
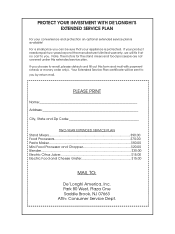
... Code TWO-YEAR EXTENDED SERVICE PLAN Stand Mixers 90.00 Food Processors 70.00 Pasta Maker 50.00 Mini Food Processor and Chopper 20.00 Blender...$30.00 Electric Citrus Juicer 15.00 Electric Food and Cheese Grater 15.00 MAIL TO: De'Longhi America, Inc. Note: The motors for the...
... Code TWO-YEAR EXTENDED SERVICE PLAN Stand Mixers 90.00 Food Processors 70.00 Pasta Maker 50.00 Mini Food Processor and Chopper 20.00 Blender...$30.00 Electric Citrus Juicer 15.00 Electric Food and Cheese Grater 15.00 MAIL TO: De'Longhi America, Inc. Note: The motors for the...