Product Manual
Page 6
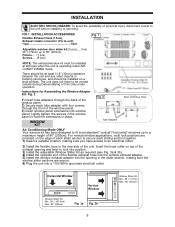
... exhaust opening in place. FIG 1. INSTALLATION ELECTRIC SHOCK HAZARD: To avoid the possibility of 80" (203cm). INSTALLATION ACCESSORIES Flexible Exhaust Hose (13cm), Exhaust nozzle connector (Fix to hold the extensions in the slider section, making sure you have to the unit before installing or servicing.
... exhaust opening in place. FIG 1. INSTALLATION ELECTRIC SHOCK HAZARD: To avoid the possibility of 80" (203cm). INSTALLATION ACCESSORIES Flexible Exhaust Hose (13cm), Exhaust nozzle connector (Fix to hold the extensions in the slider section, making sure you have to the unit before installing or servicing.
Product Manual
Page 8
... display panel for approximately 10 seconds, and the display panel will show the time of hours until it is then decided that the machine is fixed to suit your desired comfort level. Timer Cancel Control If the time has been set as in the display together with the clock symbol and...
... display panel for approximately 10 seconds, and the display panel will show the time of hours until it is then decided that the machine is fixed to suit your desired comfort level. Timer Cancel Control If the time has been set as in the display together with the clock symbol and...
Product Manual
Page 10
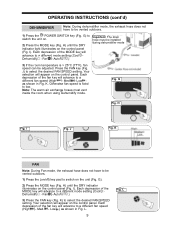
... vented outdoors. 1) Press the POWER SWITCH key (Fig. Note: The warm air exchange hoses must be installed during dehumidifier mode 3) If the room temperature is fixed to select the desired FAN SPEED setting. I ). Your selection will appear on the control panel. K. I Fig. L. 9 Fig. I). Auto ) 3) Press the FAN key (Fig. Fan - Your...
... vented outdoors. 1) Press the POWER SWITCH key (Fig. Note: The warm air exchange hoses must be installed during dehumidifier mode 3) If the room temperature is fixed to select the desired FAN SPEED setting. I ). Your selection will appear on the control panel. K. I Fig. L. 9 Fig. I). Auto ) 3) Press the FAN key (Fig. Fan - Your...