
Product Manual
Page 2
...2629) Ci> WELCOME Thank you for choosing a Danby Premiere appliance to provide you and your family with the following information, located on the manufacturers nameplate on the rear panel of the unit. Air Conditioning, Dehumidifying, and Independent Fan. This unit can be necessary... if your fingertips, anywhere, anytime. Imagine the convenience of trouble free operation. Each individual mode is a multi-functional room air-exchang-in just minutes. Your Danby Portable Air-Conditioner is...
...2629) Ci> WELCOME Thank you for choosing a Danby Premiere appliance to provide you and your family with the following information, located on the manufacturers nameplate on the rear panel of the unit. Air Conditioning, Dehumidifying, and Independent Fan. This unit can be necessary... if your fingertips, anywhere, anytime. Imagine the convenience of trouble free operation. Each individual mode is a multi-functional room air-exchang-in just minutes. Your Danby Portable Air-Conditioner is...
Product Manual
Page 5
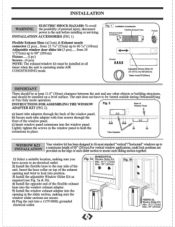
... Fixture Screws 4444 \ • Adjustable Window Slider Ktt 281/3"(72 cm)-80*(203cm) Water hose(79'1200an) IMPORTANT There should be vented outside during Dehumidifying or Fan Only mode operation. INSTRUCTIONS FOR ASSEMBLING THE WINDOW rFig. 2 ADAPTER KIT (FIG 2). INSTALLATION ELECTRIC SHOCK HAZARD: To avoid WARNING the possibility of 80" (203cm).For...) clearance between the unit and any other objects or building structures, and should be at all times when the unit is operating under AIR CONDITIONING mode.
... Fixture Screws 4444 \ • Adjustable Window Slider Ktt 281/3"(72 cm)-80*(203cm) Water hose(79'1200an) IMPORTANT There should be vented outside during Dehumidifying or Fan Only mode operation. INSTRUCTIONS FOR ASSEMBLING THE WINDOW rFig. 2 ADAPTER KIT (FIG 2). INSTALLATION ELECTRIC SHOCK HAZARD: To avoid WARNING the possibility of 80" (203cm).For...) clearance between the unit and any other objects or building structures, and should be at all times when the unit is operating under AIR CONDITIONING mode.
Product Manual
Page 6
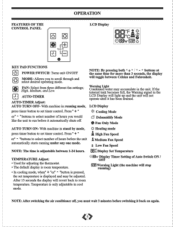
...Auto Switch ON / 0 FF EffE Warning Light (the machine will not operate until it has been drained. LCD Display Cooling Mode dl Dehumidify Mode Fan Only Mode AUTO TURN ON- BB Display Set Temperature TEMPERATURE Adjust: • Used for more than 3 seconds, the display will revert ...back to set timer control. Temperature is displayed and may accumulate in running under any one mode. Warning Light Condensed water may be ...
...Auto Switch ON / 0 FF EffE Warning Light (the machine will not operate until it has been drained. LCD Display Cooling Mode dl Dehumidify Mode Fan Only Mode AUTO TURN ON- BB Display Set Temperature TEMPERATURE Adjust: • Used for more than 3 seconds, the display will revert ...back to set timer control. Temperature is displayed and may accumulate in running under any one mode. Warning Light Condensed water may be ...
Product Manual
Page 7
... the unit in the temperature display area of the unit. OPERATION (cont'd) AIR CONDITIONING NOTE: The exhaust hose must be shown in Fan mode to a different setting). • Cooling stops automatically when the set temperature is achieved. "buttons (Fig. D2- Each depression of the ...fan key will appear on the Fig. D1 & D2) to a different mode setting (Cool- Fig. Dehumidifier-Fan-Heat). 3) Press the appropriate increase " " or decrease" - Your selection will advance to dry the interior of the control panel....
... the unit in the temperature display area of the unit. OPERATION (cont'd) AIR CONDITIONING NOTE: The exhaust hose must be shown in Fan mode to a different setting). • Cooling stops automatically when the set temperature is achieved. "buttons (Fig. D2- Each depression of the ...fan key will appear on the Fig. D1 & D2) to a different mode setting (Cool- Fig. Dehumidifier-Fan-Heat). 3) Press the appropriate increase " " or decrease" - Your selection will advance to dry the interior of the control panel....
Product Manual
Page 8
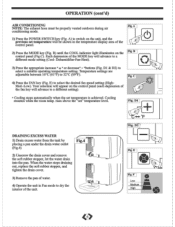
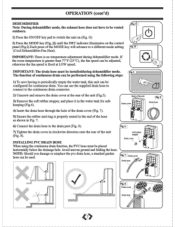
...to periodically empty the water tank, this unit can be adjusted, otherwise the fan speed is no temperature adjustment during dehumidifier mode. Drain cover 4) Insert the drain hose through the hole of the drain cover (Fig. 7). 5) Ensure the rubber... garden c hose can be placed horizontally below the drainage hole. OPERATION (cont'd) DEHUMIDIFIER Note: During dehumidifier mode, the exhaust hose does not have to be installedduring dehumidifier mode. Avoid uneven ground and folding the hose. G) 2) Press the MODE key (Fig. Fig. 7 Drain cover Drain hose Fig. 5 Drain hose 7...
...to periodically empty the water tank, this unit can be adjusted, otherwise the fan speed is no temperature adjustment during dehumidifier mode. Drain cover 4) Insert the drain hose through the hole of the drain cover (Fig. 7). 5) Ensure the rubber... garden c hose can be placed horizontally below the drainage hole. OPERATION (cont'd) DEHUMIDIFIER Note: During dehumidifier mode, the exhaust hose does not have to be installedduring dehumidifier mode. Avoid uneven ground and folding the hose. G) 2) Press the MODE key (Fig. Fig. 7 Drain cover Drain hose Fig. 5 Drain hose 7...
Product Manual
Page 9
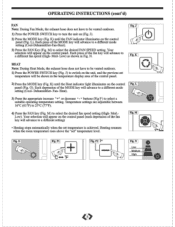
... control panel (Fig. Each press of the fan key will advance to a different fan speed (High- Fig. Med.- Each press of the MODE key will advance to a different mode setting (Cool-Dehumidifier-Fan-Heat). 3) Press the FAN Key (Fig. Fig. M Low). P1 Fig. L c 4) Press the FAN key (Fig. J) to be...176;C (61°F) to select the desired FAN SPEED setting. Fig. 0 Fig. M) to 25°C (77°F). K HEAT Note: During Heat Mode, the exhaust hose does not have to switch on (Fig. Dehumidifier- Heat). 3) Press the appropriate increase " +" or decrease -
... control panel (Fig. Each press of the fan key will advance to a different fan speed (High- Fig. Med.- Each press of the MODE key will advance to a different mode setting (Cool-Dehumidifier-Fan-Heat). 3) Press the FAN Key (Fig. Fig. M Low). P1 Fig. L c 4) Press the FAN key (Fig. J) to be...176;C (61°F) to select the desired FAN SPEED setting. Fig. 0 Fig. M) to 25°C (77°F). K HEAT Note: During Heat Mode, the exhaust hose does not have to switch on (Fig. Dehumidifier- Heat). 3) Press the appropriate increase " +" or decrease -


