Product Manual
Page 3
... suggest that sold you use and care guide, and like you will need this owner's use your Danby Refrigerator. like you will be a part of our quality products, and we believe in this information to the Danby family. you will receive from our friendly customer service department. If you do to help you... a damaged appliance: Immediately contact the builder (or dealer) that you attach a copy of all, you will experience these values each and every time you the refrigerator. We're proud of your new appliance will find in dependable service;
... suggest that sold you use and care guide, and like you will need this owner's use your Danby Refrigerator. like you will be a part of our quality products, and we believe in this information to the Danby family. you will receive from our friendly customer service department. If you do to help you... a damaged appliance: Immediately contact the builder (or dealer) that you attach a copy of all, you will experience these values each and every time you the refrigerator. We're proud of your new appliance will find in dependable service;
Product Manual
Page 4
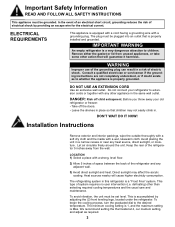
...in . To avoid vibration, the unit must be plugged into an outlet that is a "Frost Free" system. Before you throw away your refrigerator to whether the appliance is equipped with a cord having a grounding wire with any heat source, direct sunlight, or moisture. This type of...the thermostat at 4, our medium setting, and adjust as to extension cords or together with a grounding plug. WARNING Improper use of the refrigerator 5 inches away from unused appliances, or take some other than selecting required cooling temperatures and the usual care and maintenance. DANGER: Risk ...
...in . To avoid vibration, the unit must be plugged into an outlet that is a "Frost Free" system. Before you throw away your refrigerator to whether the appliance is equipped with a cord having a grounding wire with any heat source, direct sunlight, or moisture. This type of...the thermostat at 4, our medium setting, and adjust as to extension cords or together with a grounding plug. WARNING Improper use of the refrigerator 5 inches away from unused appliances, or take some other than selecting required cooling temperatures and the usual care and maintenance. DANGER: Risk ...
Product Manual
Page 5
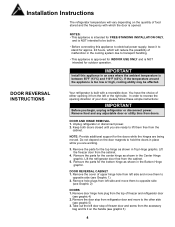
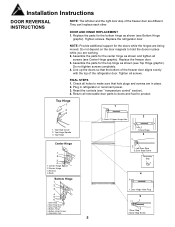
... handling. • This appliance is approved for INDOOR USE ONLY and is NOT intended for outdoor operation. DOOR REVERSAL INSTRUCTIONS Your refrigerator is opened. You have the choice of either opening direction of your door, please follow these simple instructions: IMPORTANT Before you are... Remove food and any adjustable door or utility bins from the left side and move to reverse the opening it from doors. Lift the refrigerator door free from the cabinet. 4. Lift the freezer door from the cabinet. 5. DOOR REVERSAL CABINET 1. IMPORTANT Install this appliance to electrical...
... handling. • This appliance is approved for INDOOR USE ONLY and is NOT intended for outdoor operation. DOOR REVERSAL INSTRUCTIONS Your refrigerator is opened. You have the choice of either opening direction of your door, please follow these simple instructions: IMPORTANT Before you are... Remove food and any adjustable door or utility bins from the left side and move to reverse the opening it from doors. Lift the refrigerator door free from the cabinet. 4. Lift the freezer door from the cabinet. 5. DOOR REVERSAL CABINET 1. IMPORTANT Install this appliance to electrical...
Product Manual
Page 6
... doors so that hole plugs and screws are different. Tighten all removable door parts to doors and food to hold the doors in refrigerator or reconnect power. 3. Replace the refrigerator door. Top Hinge Center Hinge 1 2 3 4 1.Center Hinge Spacer 2.Center Hinge 3.Screws 4.Bush Bottom Hinge 1 2 3 4 5 6 1.Door Stop 2.Door Stop Screw 3....1. Return all screws. DOOR AND HINGE REPLACEMENT 1. Installation Instructions DOOR REVERSAL INSTRUCTIONS NOTE: The left door and the right door stop of the refrigerator door. Assemble the parts for the doors while the hinges are working. 2.
... doors so that hole plugs and screws are different. Tighten all removable door parts to doors and food to hold the doors in refrigerator or reconnect power. 3. Replace the refrigerator door. Top Hinge Center Hinge 1 2 3 4 1.Center Hinge Spacer 2.Center Hinge 3.Screws 4.Bush Bottom Hinge 1 2 3 4 5 6 1.Door Stop 2.Door Stop Screw 3....1. Return all screws. DOOR AND HINGE REPLACEMENT 1. Installation Instructions DOOR REVERSAL INSTRUCTIONS NOTE: The left door and the right door stop of the refrigerator door. Assemble the parts for the doors while the hinges are working. 2.
Product Manual
Page 7
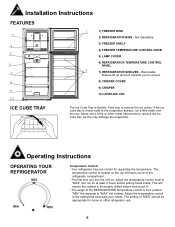
... TRAY The Ice Cube Tray is located on , adjust the temperature control knob to "MAX" the coldest. The setting of the refrigerator compartment. • The first time you to remove the ice cube tray, as this may damage the evaporator. If the ice ... left hand corner of "MED" should be appropriate for regulating the temperature. Installation Instructions FEATURES 3 4 5 6 7 8 9 10 1 1) FREEZER BINS 2) REFRIGERATOR BINS - Twist tray to the setting that best suits your needs. The temperature control is flexible. Not adjustable. 3) FREEZER SHELF 4) FREEZER TEMPERATURE CONTROL KNOB 5)...
... TRAY The Ice Cube Tray is located on , adjust the temperature control knob to "MAX" the coldest. The setting of the refrigerator compartment. • The first time you to remove the ice cube tray, as this may damage the evaporator. If the ice ... left hand corner of "MED" should be appropriate for regulating the temperature. Installation Instructions FEATURES 3 4 5 6 7 8 9 10 1 1) FREEZER BINS 2) REFRIGERATOR BINS - Twist tray to the setting that best suits your needs. The temperature control is flexible. Not adjustable. 3) FREEZER SHELF 4) FREEZER TEMPERATURE CONTROL KNOB 5)...
Product Manual
Page 8
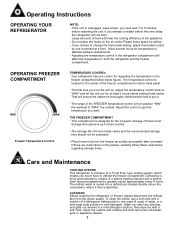
... Place frozen food into a defrost pan located directly above the compressor, where it then evaporates. CLEANING Before cleaning the refrigerator or freezer, always disconnect the refrigerator from position "MIN" the warmest to "MAX" the coldest. Clean the outside with a soft cloth. The defrost water... increment at least 2 hours before food is located on the packet, carefully follow these instructions regarding storage times. Operating Instructions OPERATING YOUR REFRIGERATOR NOTE; • If the unit is up to three months. • The storage life of a defrost heating element and a...
... Place frozen food into a defrost pan located directly above the compressor, where it then evaporates. CLEANING Before cleaning the refrigerator or freezer, always disconnect the refrigerator from position "MIN" the warmest to "MAX" the coldest. Clean the outside with a soft cloth. The defrost water... increment at least 2 hours before food is located on the packet, carefully follow these instructions regarding storage times. Operating Instructions OPERATING YOUR REFRIGERATOR NOTE; • If the unit is up to three months. • The storage life of a defrost heating element and a...
Product Manual
Page 9
... Remove, or securely fasten down, all food. Packaged meats such as ham, bacon, dried beef, or frankfurter, store best in the refrigerator. • Don't overload the refrigerator. • Don't open to room temperature before placing them all the way into the base. b) disconnect from meats, poultry, and ...packages. • Allow warm foods to cool to avoid possible formations of the drawer. 8 Meats should be used the same day of the refrigerator is covered to be stored for a long time should be stored without use for example, by adjusting the "damper" control (white slider)...
... Remove, or securely fasten down, all food. Packaged meats such as ham, bacon, dried beef, or frankfurter, store best in the refrigerator. • Don't overload the refrigerator. • Don't open to room temperature before placing them all the way into the base. b) disconnect from meats, poultry, and ...packages. • Allow warm foods to cool to avoid possible formations of the drawer. 8 Meats should be used the same day of the refrigerator is covered to be stored for a long time should be stored without use for example, by adjusting the "damper" control (white slider)...
Product Manual
Page 10
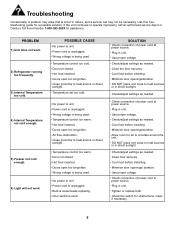
PROBLEM 1) Unit does not work. 2) Refrigerator running too frequently. 3) Internal Temperature too cold. 4) Internal Temperature not cold enough. 5) Freezer not cold enough. 6) Light will not work. POSSIBLE CAUSE • No power .../often. • Wrong voltage is being used. • No power to power source. • Plug in nature, and a service call an authorized service depot or Danby's Toll Free Number 1-800-263-2629 for a possible solution. If the unit continues to operate improperly, call may arise that is stuck. Use this troubleshooting...
PROBLEM 1) Unit does not work. 2) Refrigerator running too frequently. 3) Internal Temperature too cold. 4) Internal Temperature not cold enough. 5) Freezer not cold enough. 6) Light will not work. POSSIBLE CAUSE • No power .../often. • Wrong voltage is being used. • No power to power source. • Plug in nature, and a service call an authorized service depot or Danby's Toll Free Number 1-800-263-2629 for a possible solution. If the unit continues to operate improperly, call may arise that is stuck. Use this troubleshooting...


