Product Manual
Page 4
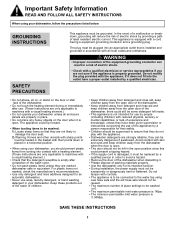
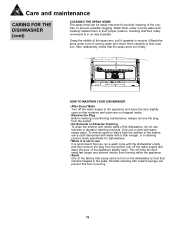
...• The maximum number of least resistant electric current. Do not tamper with a visual heating element.) • Do not operate your dishwasher, you should not be left inside. • This appliance is not intended for its intended function. • During installation, the power ... reduced physical, sensory or mental capabilities, or lack of experience and knowledge, unless they do not play with the appliance. • Dishwasher detergents are properly in accordance with all enclosure panels are strongly alkaline, they are not likely to machines with controls. • The...
...• The maximum number of least resistant electric current. Do not tamper with a visual heating element.) • Do not operate your dishwasher, you should not be left inside. • This appliance is not intended for its intended function. • During installation, the power ... reduced physical, sensory or mental capabilities, or lack of experience and knowledge, unless they do not play with the appliance. • Dishwasher detergents are properly in accordance with all enclosure panels are strongly alkaline, they are not likely to machines with controls. • The...
Product Manual
Page 5
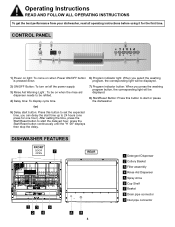
... button 6) Program indicator light: When you can delay the start time up to start button: Press this button to start or pause the dishwasher. (or) 5) Delay start the delayed hour, press the Start/Reset button continuously until the "H :00" displays then stop the delay....pressed down. Operating Instructions READ AND FOLLOW ALL OPERATING INSTRUCTIONS To get the best performance from your dishwasher, read all operating instructions before using it for one press for the first time. DISHWASHER FEATURES FRONT 6 DOOR FroOnPt vEieNw 7 REAR 13 5 24 89 4 1 Detergent Dispenser 2 ...
... button 6) Program indicator light: When you can delay the start time up to start button: Press this button to start or pause the dishwasher. (or) 5) Delay start the delayed hour, press the Start/Reset button continuously until the "H :00" displays then stop the delay....pressed down. Operating Instructions READ AND FOLLOW ALL OPERATING INSTRUCTIONS To get the best performance from your dishwasher, read all operating instructions before using it for one press for the first time. DISHWASHER FEATURES FRONT 6 DOOR FroOnPt vEieNw 7 REAR 13 5 24 89 4 1 Detergent Dispenser 2 ...
Product Manual
Page 6
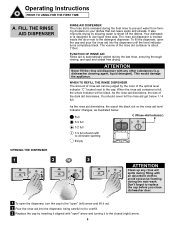
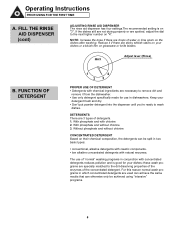
... designed to the "open " arrow and turning it out. 2 Pour the rinse aid into the dispenser until the level indicator turns completely black. dishwasher cleaning agent, liquid detergent). As the rinse aid diminishes, the sizeof the black dot on your dishes that can be black. Don't forget to...the rinse aid into the dispenser, being careful not to overfill. 3 Replace the cap by the color of the dark dot decreases. Your dishwasher is located inside the door next to eliminate spotting Empty ATTENTION Clean up any rinse aid spills during filling with any other substances (e.g. You...
... designed to the "open " arrow and turning it out. 2 Pour the rinse aid into the dispenser until the level indicator turns completely black. dishwasher cleaning agent, liquid detergent). As the rinse aid diminishes, the sizeof the black dot on your dishes that can be black. Don't forget to...the rinse aid into the dispenser, being careful not to overfill. 3 Replace the cap by the color of the dark dot decreases. Your dishwasher is located inside the door next to eliminate spotting Empty ATTENTION Clean up any rinse aid spills during filling with any other substances (e.g. You...
Product Manual
Page 7
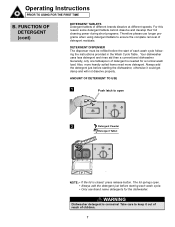
... the dispenser until you're ready to the next higher number on "4". Without phosphate and without chlorine 3. The use in dishwashers. For this reason normal wash programs in two basic types: • conventional, alkaline detergents with caustic components. •... low alkaline concentrated detergents with chemical ingredients are drops of the concentrated detergent. Reduce it from the dishwasher. • Use only detergent specifically made for your dishes or a bluish film on the dishes after washing. FUNCTION OF DETERGENT 1 ...
... the dispenser until you're ready to the next higher number on "4". Without phosphate and without chlorine 3. The use in dishwashers. For this reason normal wash programs in two basic types: • conventional, alkaline detergents with caustic components. •... low alkaline concentrated detergents with chemical ingredients are drops of the concentrated detergent. Reduce it from the dishwasher. • Use only detergent specifically made for your dishes or a bluish film on the dishes after washing. FUNCTION OF DETERGENT 1 ...
Product Manual
Page 8
...one tablespoon of detergent residuals. The lid springs open 2 Detergent Powder Detergent Tablet NOTE: • If the lid is corrosive! WARNING Dishwasher detergent is closed: press release button. DETERGENT DISPENSER The dispenser must be refilled before the start of children. 7 Always add the ...detergent just before starting the dishwasher, otherwise it out of reach of each wash cycle. • Only use longer programs when using detergent tablets to ensure the...
...one tablespoon of detergent residuals. The lid springs open 2 Detergent Powder Detergent Tablet NOTE: • If the lid is corrosive! WARNING Dishwasher detergent is closed: press release button. DETERGENT DISPENSER The dispenser must be refilled before the start of children. 7 Always add the ...detergent just before starting the dishwasher, otherwise it out of reach of each wash cycle. • Only use longer programs when using detergent tablets to ensure the...
Product Manual
Page 10
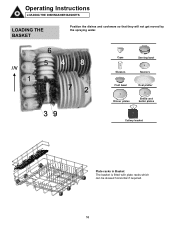
... are loaded securely and can run off any large amounts of baskets and cutlery baskets may fade if machine washed frequently. BEFORE/AFTER LOADING THE DISHWASHER BASKETS (For best performance of burnt food in the rack. (basket) • Please do not overload your model.) Scrape off . 3. Soften ... subject to rinse the dishes under running water. Items such as they must not touch. • Load large items which are identified as dishwasher-proof. • For particular items, select a program with glued parts that the spray arms can become dull after a large number of the...
... are loaded securely and can run off any large amounts of baskets and cutlery baskets may fade if machine washed frequently. BEFORE/AFTER LOADING THE DISHWASHER BASKETS (For best performance of burnt food in the rack. (basket) • Please do not overload your model.) Scrape off . 3. Soften ... subject to rinse the dishes under running water. Items such as they must not touch. • Load large items which are identified as dishwasher-proof. • For particular items, select a program with glued parts that the spray arms can become dull after a large number of the...
Product Manual
Page 11
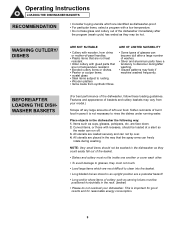
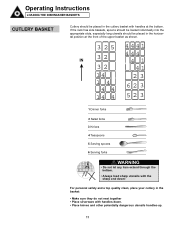
Operating Instructions LOADING THE DISHWASHER BASKETS LOADING THE BASKET Position the dishes and cookware so that they will not get moved by the spraying water. 6 5 1 1 Cups 2 Serving bowl 3 4 Glasses Saucers 1 5 6 Fruit bowl Oval platter 7 Dinner plates 8 Bread and butter plates 9 Cutlery basket Plate racks in Basket The basket is fitted with plate racks which can be stowed horizontal if required. 10
Operating Instructions LOADING THE DISHWASHER BASKETS LOADING THE BASKET Position the dishes and cookware so that they will not get moved by the spraying water. 6 5 1 1 Cups 2 Serving bowl 3 4 Glasses Saucers 1 5 6 Fruit bowl Oval platter 7 Dinner plates 8 Bread and butter plates 9 Cutlery basket Plate racks in Basket The basket is fitted with plate racks which can be stowed horizontal if required. 10
Product Manual
Page 12
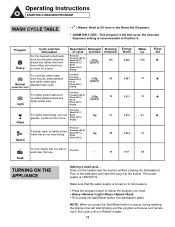
... WARNING • Do not let any item extend through the bottom. • Always load sharp utensils with handles at the bottom. Operating Instructions LOADING THE DISHWASHER BASKETS CUTLERY BASKET Cutlery should be placed in the cutlery basket with the sharp end down . • Place knives and other potentially dangerous utensils handles...
... WARNING • Do not let any item extend through the bottom. • Always load sharp utensils with handles at the bottom. Operating Instructions LOADING THE DISHWASHER BASKETS CUTLERY BASKET Cutlery should be placed in the cutlery basket with the sharp end down . • Place knives and other potentially dangerous utensils handles...
Product Manual
Page 13
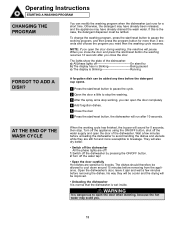
... Pre-wash wash later that do not need . • Heavy->Normal->Light->Glass->Speed->Soak • Then press the Start/Reset button, the dishwasher starts. Pre-wash (50°C) Wash (50°C) Rinse Rinse (60°C) 3/15g (or3in1) 75 Light Drying Pre-wash Wash (50&#...loads that day. / 10 0.01 2.5 TURNING ON THE APPLIANCE Starting a washcycle... Draw out the basket (see the section entitled Loading the Dishwasher). Program Heavy Cycle selection Information For the heaviest soiled loads, such as plates,glasses,bowls and lightly soiled pans. Make sure that have been sitting...
... Pre-wash wash later that do not need . • Heavy->Normal->Light->Glass->Speed->Soak • Then press the Start/Reset button, the dishwasher starts. Pre-wash (50°C) Wash (50°C) Rinse Rinse (60°C) 3/15g (or3in1) 75 Light Drying Pre-wash Wash (50&#...loads that day. / 10 0.01 2.5 TURNING ON THE APPLIANCE Starting a washcycle... Draw out the basket (see the section entitled Loading the Dishwasher). Program Heavy Cycle selection Information For the heaviest soiled loads, such as plates,glasses,bowls and lightly soiled pans. Make sure that have been sitting...
Product Manual
Page 14
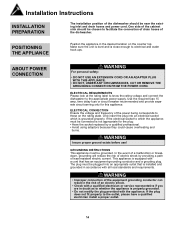
... the washing program, press the start /reset button the washing resumes 10 seconds after 10 seconds. The lights show the state of the dishwasher. When you close the door. They will sound for a short time. The dishes should therefore be allowed to open the door completely ...water. A forgotten dish can be refilled. Operating Instructions STARTING A WASHING PROGRAM CHANGING THE PROGRAM You can modify the washing program when the dishwasher just runs for 8 seconds, then stop working program, and then press the program button for more susceptible to stop the washing. 3 ...
... the washing program, press the start /reset button the washing resumes 10 seconds after 10 seconds. The lights show the state of the dishwasher. When you close the door. They will sound for a short time. The dishes should therefore be allowed to open the door completely ...water. A forgotten dish can be refilled. Operating Instructions STARTING A WASHING PROGRAM CHANGING THE PROGRAM You can modify the washing program when the dishwasher just runs for 8 seconds, then stop working program, and then press the program button for more susceptible to stop the washing. 3 ...
Product Manual
Page 15
...install a proper outlet. 14 POSITIONING THE APPLIANCE Position the appliance in doubt as to facilitate the connection of drain hoses of the dishwasher. ABOUT POWER CONNECTION WARNING For personal safety: • DO NOT USE AN EXTENSION CORD OR AN ADAPTER PLUG WITH THIS APPLIANCE...appliancemust be near the existing inlet and drain hoses and power cord. Installation Instructions INSTALLATION PREPARATION The installation position of the dishwasher should be grounded. If the electrical socket to the appropriate power supply. WARNING • Improper connection of the equipment ...
...install a proper outlet. 14 POSITIONING THE APPLIANCE Position the appliance in doubt as to facilitate the connection of drain hoses of the dishwasher. ABOUT POWER CONNECTION WARNING For personal safety: • DO NOT USE AN EXTENSION CORD OR AN ADAPTER PLUG WITH THIS APPLIANCE...appliancemust be near the existing inlet and drain hoses and power cord. Installation Instructions INSTALLATION PREPARATION The installation position of the dishwasher should be grounded. If the electrical socket to the appropriate power supply. WARNING • Improper connection of the equipment ...
Product Manual
Page 16
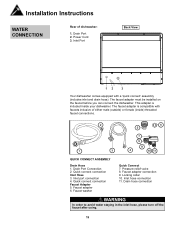
Inlet Port Back View 12 3 Your dishwasher comes equipped with faucets inclusive of dishwasher: 1. This adapter is compatible with a 'quick connect' assembly (includes inlet and drain hose). QUICK CONNECT ASSEMBLY Drain Hose 1. Pressure relief valve 8. Inlet ...11. Power Cord 3. Faucet adapter 6. Faucet washer Quick Connect 7. The faucet adapter must be installed on the faucet before you can connect the dishwasher. Drain Port Connection 2. Faucet adapter connection 9. Drain hose connection WARNING In order to avoid water staying in the inlet hose, please turn off ...
Inlet Port Back View 12 3 Your dishwasher comes equipped with faucets inclusive of dishwasher: 1. This adapter is compatible with a 'quick connect' assembly (includes inlet and drain hose). QUICK CONNECT ASSEMBLY Drain Hose 1. Pressure relief valve 8. Inlet ...11. Power Cord 3. Faucet adapter 6. Faucet washer Quick Connect 7. The faucet adapter must be installed on the faucet before you can connect the dishwasher. Drain Port Connection 2. Faucet adapter connection 9. Drain hose connection WARNING In order to avoid water staying in the inlet hose, please turn off ...
Product Manual
Page 17
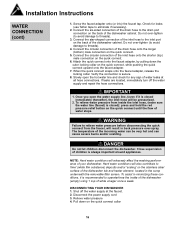
...the back of the drain hose onto the longer (bottom) male connection on the quick connect. 6. Connect the circular connection of the dishwasher cabinet. Slowly open the water supply line, (even if it is recommended to the drain port connection on the stainless steel surface ...4. Do not over-tighten (to avoid damage to relieve water pressure before disconnecting the quick connect from inside of the dishwasher (empty) using 1 cup of the dishwasher cabinet. Shut off the water supply and repair the hose connections. Installation Instructions WATER CONNECTION (cont) 1. DANGER Do ...
...the back of the drain hose onto the longer (bottom) male connection on the quick connect. 6. Connect the circular connection of the dishwasher cabinet. Slowly open the water supply line, (even if it is recommended to the drain port connection on the stainless steel surface ...4. Do not over-tighten (to avoid damage to relieve water pressure before disconnecting the quick connect from inside of the dishwasher (empty) using 1 cup of the dishwasher cabinet. Shut off the water supply and repair the hose connections. Installation Instructions WATER CONNECTION (cont) 1. DANGER Do ...
Product Manual
Page 18
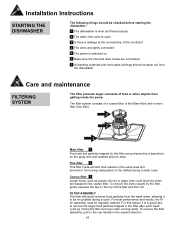
... filter efficiently removes food particles from the wash water, allowing it out. Installation Instructions STARTING THE DISHWASHER The following things should be taken out from the dishwasher Care and maintenance FILTERING SYSTEM The filter prevents larger remnants of food or other objects from getting... Make sure the inlet and drain hoses are not twisted 7 All packing materials and removable printings should be checked before starting the dishwasher: 1 The dishwasher is level and fixed properly 2 The water inlet valve is open 3 Is there a leakage at the connections of bone or glass...
... filter efficiently removes food particles from the wash water, allowing it out. Installation Instructions STARTING THE DISHWASHER The following things should be taken out from the dishwasher Care and maintenance FILTERING SYSTEM The filter prevents larger remnants of food or other objects from getting... Make sure the inlet and drain hoses are not twisted 7 All packing materials and removable printings should be checked before starting the dishwasher: 1 The dishwasher is level and fixed properly 2 The water inlet valve is open 3 Is there a leakage at the connections of bone or glass...
Product Manual
Page 19
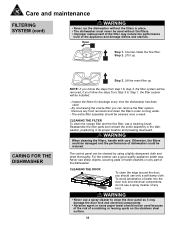
... only a soft damp cloth. Lift it may reduce the performance level of any kind. Inspect the filters for blockage every time the dishwasher has been used. - The control panel can remove the filter system. if you can be cleaned by using a lightly dampened cloth ...use a spray cleaner of the appliance and damage dishes and utensils. Care and maintenance FILTERING SYSTEM (cont) WARNING • Never run the dishwasher without the filters. • Improper replacement of the filter may damage the door lock and electrical components. • Abrasive agent or some paper...
... only a soft damp cloth. Lift it may reduce the performance level of any kind. Inspect the filters for blockage every time the dishwasher has been used. - The control panel can remove the filter system. if you can be cleaned by using a lightly dampened cloth ...use a spray cleaner of the appliance and damage dishes and utensils. Care and maintenance FILTERING SYSTEM (cont) WARNING • Never run the dishwasher without the filters. • Improper replacement of the filter may damage the door lock and electrical components. • Abrasive agent or some paper...
Product Manual
Page 20
... cycle with a little vinegar, or a cleaning product made specifically for periodic cleaning of the nozzles, to prevent possible clogging. Grasp the middle of the dishwasher, do not use a cloth with a damp sponge will help the door seals last longer and prevent odours from occurring. 19 After reassembly, check that.... This will prevent this from forming within the appliance. • Seals One of the factors that cause odors to form in the dishwasher is food that the spray arms turn off the water supply to the appliance and leave the door slightly open so that moisture and odors...
... cycle with a little vinegar, or a cleaning product made specifically for periodic cleaning of the nozzles, to prevent possible clogging. Grasp the middle of the dishwasher, do not use a cloth with a damp sponge will help the door seals last longer and prevent odours from occurring. 19 After reassembly, check that.... This will prevent this from forming within the appliance. • Seals One of the factors that cause odors to form in the dishwasher is food that the spray arms turn off the water supply to the appliance and leave the door slightly open so that moisture and odors...
Product Manual
Page 21
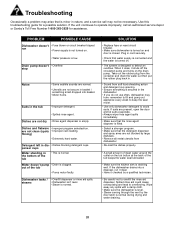
...; Have it shuts off the circulation pump and turns on and door is closed. Use this troubleshooting guide for assistance. PROBLEM POSSIBLE CAUSE Dishwasher doesn't • Fuse blown or circuit breaker tripped. Drain pump doesn't • Overflow stop Noise • Some audible sounds are normal...; Spilled rinse agent. Troubleshooting Occasionally a problem may arise that is minor in nature, and a service call an authorized service depot or Danby's Toll Free Number 1-800-263-2629 for a possible solution. When it does, it checked by the door latch is normal during drying...
...; Have it shuts off the circulation pump and turns on and door is closed. Use this troubleshooting guide for assistance. PROBLEM POSSIBLE CAUSE Dishwasher doesn't • Fuse blown or circuit breaker tripped. Drain pump doesn't • Overflow stop Noise • Some audible sounds are normal...; Spilled rinse agent. Troubleshooting Occasionally a problem may arise that is minor in nature, and a service call an authorized service depot or Danby's Toll Free Number 1-800-263-2629 for a possible solution. When it does, it checked by the door latch is normal during drying...
Product Manual
Page 43
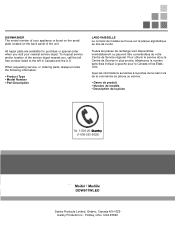
...sont disponsibles immédiatement ou peuvent être commandées de votre Centre de Service régional. DISHWASHER The model number of your appliance is found on the serial plate located on the back panel of the service depot ...de la pièce Tel: 1-800-26(1-800-263-2629) ModeMlo• dMeold•èMleo•dMèoledelo DDW611WLED DaDnbaynbPyroPdruocdtuscLtsimLiitmedit,eGdu, eOlpnhtaOrion,taCraionaCdaanaNd1aHN61ZH96Z9 DDanabnybyPrPordoudcutcstsInIcn.,cF.,inFdinladyla, Oy,hOiohUioS, AU4S5A843598-046069 All repair parts are available for purchase or special order ...
...sont disponsibles immédiatement ou peuvent être commandées de votre Centre de Service régional. DISHWASHER The model number of your appliance is found on the serial plate located on the back panel of the service depot ...de la pièce Tel: 1-800-26(1-800-263-2629) ModeMlo• dMeold•èMleo•dMèoledelo DDW611WLED DaDnbaynbPyroPdruocdtuscLtsimLiitmedit,eGdu, eOlpnhtaOrion,taCraionaCdaanaNd1aHN61ZH96Z9 DDanabnybyPrPordoudcutcstsInIcn.,cF.,inFdinladyla, Oy,hOiohUioS, AU4S5A843598-046069 All repair parts are available for purchase or special order ...


