Product Manual
Page 2
... be able to react quickly. Please take a few moments to room within your new appliance. Model Number: Serial Number: Date of the water tank compartment. For easy reference, may cause over-heating, resulting in just minutes. CAUTION: Do not leave this page, along with valuable information ...necessary for general inquiries. This unit can be necessary if your Danby appliance will provide you many years of your home and set up in personal injury or property damage. 1 To contact a Customer Service Representative...
... be able to react quickly. Please take a few moments to room within your new appliance. Model Number: Serial Number: Date of the water tank compartment. For easy reference, may cause over-heating, resulting in just minutes. CAUTION: Do not leave this page, along with valuable information ...necessary for general inquiries. This unit can be necessary if your Danby appliance will provide you many years of your home and set up in personal injury or property damage. 1 To contact a Customer Service Representative...

Product Manual
Page 4
...) • Auto-Defrost (De-Icer) • Full Bucket Indicator Light • Easy Roll Castors (4) • Front Mounted Water Tank(Removable) • Direct Drain Option (Hosenot Included) • Quiet Operation • Removable Air Filter Control Panel Front Panel Handle Air Inlet... Water level Indicator Air Filter (Side Panel) Water Tank Easy-roll Castors 3 Maintain a minimum clearance of the unit, to allow for proper air circulation and maximum efficiency...
...) • Auto-Defrost (De-Icer) • Full Bucket Indicator Light • Easy Roll Castors (4) • Front Mounted Water Tank(Removable) • Direct Drain Option (Hosenot Included) • Quiet Operation • Removable Air Filter Control Panel Front Panel Handle Air Inlet... Water level Indicator Air Filter (Side Panel) Water Tank Easy-roll Castors 3 Maintain a minimum clearance of the unit, to allow for proper air circulation and maximum efficiency...

Product Manual
Page 5
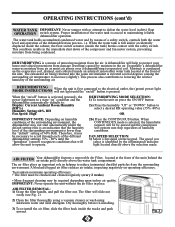
... B) Set Operating Relative Humidity Value. The adjacent (green) indicator light illuminates to display the ambient relative humidity conditions. The water tank must be programmed in the LED window, then revert back to the last program setting that was used. 4 Memory Setting:...OPERATING INSTRUCTIONS 8 1 4 2 5 3 1) LED Readout (ROOM HUMIDITY): The LED window displays the following conditions: A) When the internal water tank is programmed to default to signify the "continous" mode is emptied and/or correctly re-positioned. NOTE: Humidity values (settings) cannot be ...
... B) Set Operating Relative Humidity Value. The adjacent (green) indicator light illuminates to display the ambient relative humidity conditions. The water tank must be programmed in the LED window, then revert back to the last program setting that was used. 4 Memory Setting:...OPERATING INSTRUCTIONS 8 1 4 2 5 3 1) LED Readout (ROOM HUMIDITY): The LED window displays the following conditions: A) When the internal water tank is programmed to default to signify the "continous" mode is emptied and/or correctly re-positioned. NOTE: Humidity values (settings) cannot be ...
Product Manual
Page 6
... air intake grill) directly above the selection made. Therefore, it may be by the (illuminated) indicator light located directly above the water tank compartment. When CONTINUOUS mode is selected, the humidistat (sensor) will not light until the "humidstat" (sensor) recognizes conditions that the...is pressed. Dry thoroughly before re-installing. 3) To re-install the air filter, slide the filter back inside an internal (removable) water tank located at the front of the unit. FAN SPEED SELECTION: 3) Select a fan speed on operating efficiency. The filter will help ...
... air intake grill) directly above the selection made. Therefore, it may be by the (illuminated) indicator light located directly above the water tank compartment. When CONTINUOUS mode is selected, the humidistat (sensor) will not light until the "humidstat" (sensor) recognizes conditions that the...is pressed. Dry thoroughly before re-installing. 3) To re-install the air filter, slide the filter back inside an internal (removable) water tank located at the front of the unit. FAN SPEED SELECTION: 3) Select a fan speed on operating efficiency. The filter will help ...
Product Manual
Page 7
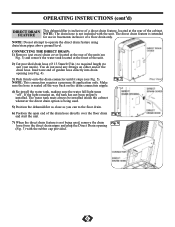
... sure the hose is seated all the way back on either end of the drain hose. Fig. 3 4) Re-install the water tank, making sure the water full light turns "off". The water tank must always be installed inside the cabinet whenever the direct drain option is being used. 5) Position the dehumidifier as close as... and plug the Direct Drain opening (see Fig. 4). 3) Push firmly onto the drain connector until it stops (see Fig. 3) and remove the water tank located at the rear of the cabinet. NOTE: The drain hose is intended for use in basements inclusive of a floor drain only. If the light...
... sure the hose is seated all the way back on either end of the drain hose. Fig. 3 4) Re-install the water tank, making sure the water full light turns "off". The water tank must always be installed inside the cabinet whenever the direct drain option is being used. 5) Position the dehumidifier as close as... and plug the Direct Drain opening (see Fig. 4). 3) Push firmly onto the drain connector until it stops (see Fig. 3) and remove the water tank located at the rear of the cabinet. NOTE: The drain hose is intended for use in basements inclusive of a floor drain only. If the light...
Product Manual
Page 8
... CLEANING CAUTION: Before attempting to clean and/or service this unit, always disconnect the power supply cord from the power supply. 2) Empty the water tank and wipe (clean) thoroughly. 3) Clean air filter thoroughly. 4) Re-package the unit in the original carton. 5) Store the unit upright ... low. 3) Relative Humidity setting not reached after • Check all doors and windows are of a minor nature and a service call your local Danby Service Depot or 1-800-26- (1-800-263-2629) PROBLEM 1) Unit will cause deterioration of electrical components and wiring insulation. 3) Use only a ...
... CLEANING CAUTION: Before attempting to clean and/or service this unit, always disconnect the power supply cord from the power supply. 2) Empty the water tank and wipe (clean) thoroughly. 3) Clean air filter thoroughly. 4) Re-package the unit in the original carton. 5) Store the unit upright ... low. 3) Relative Humidity setting not reached after • Check all doors and windows are of a minor nature and a service call your local Danby Service Depot or 1-800-26- (1-800-263-2629) PROBLEM 1) Unit will cause deterioration of electrical components and wiring insulation. 3) Use only a ...