Use and Care Guide
Page 1
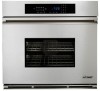
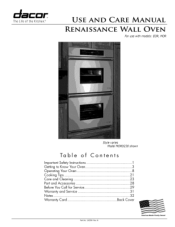
N American Made*Family Owned " The Life of the Kitchen2 U S E AND RENAISSANCE CARE MANUAL WALL OVEN For use with models: EOR, MOR Style varies Model MORD230 shown Table of Contents Important Safety Instructions 1 Getting to Know Your Oven 3 Operating Your Oven 8 Cooking Tips 21 Care and Cleaning 23 Part and Accessories 28 Before You Call for Service 29 Warranty and Service 31 Notes 32 Warranty Card Back Cover Part No. 102580 Rev.
N American Made*Family Owned " The Life of the Kitchen2 U S E AND RENAISSANCE CARE MANUAL WALL OVEN For use with models: EOR, MOR Style varies Model MORD230 shown Table of Contents Important Safety Instructions 1 Getting to Know Your Oven 3 Operating Your Oven 8 Cooking Tips 21 Care and Cleaning 23 Part and Accessories 28 Before You Call for Service 29 Warranty and Service 31 Notes 32 Warranty Card Back Cover Part No. 102580 Rev.

Use and Care Guide
Page 4
... damaged product, immediately contact your dealer or builder. Smother any flames with aluminum foil or other parts of the oven. • Do not store items of interest to sit in the oven for cooking tasks expected of a home appliance as outlined in this manual. Do not allow food ...of fire, electric shock, serious injury or death when using the oven. A qualified service technician should perform all other service. • Before performing any part of the oven. A violent steam explosion may result from and out of the oven including the door. They will be harmful to a separate, ...
... damaged product, immediately contact your dealer or builder. Smother any flames with aluminum foil or other parts of the oven. • Do not store items of interest to sit in the oven for cooking tasks expected of a home appliance as outlined in this manual. Do not allow food ...of fire, electric shock, serious injury or death when using the oven. A qualified service technician should perform all other service. • Before performing any part of the oven. A violent steam explosion may result from and out of the oven including the door. They will be harmful to a separate, ...
Use and Care Guide
Page 6
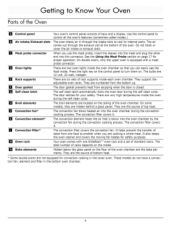
Parts of the Oven [] Control panel Your oven's control panel consists of top heat. Use the control panel to another when you are cooking a whole meal. Do not block or cover the air intake or exhaust slots. [] Meat probe connector When you can easily see the food inside the oven chamber so ...convection fan. It helps prevent the transfer of racks depends on the control panel to cool its internal parts. The total number of taste from one GlJdeRack TM oven rack and a set of the oven chamber. These models do not have a convection fan, element and filter in through the exhaust slot ...
Parts of the Oven [] Control panel Your oven's control panel consists of top heat. Use the control panel to another when you are cooking a whole meal. Do not block or cover the air intake or exhaust slots. [] Meat probe connector When you can easily see the food inside the oven chamber so ...convection fan. It helps prevent the transfer of racks depends on the control panel to cool its internal parts. The total number of taste from one GlJdeRack TM oven rack and a set of the oven chamber. These models do not have a convection fan, element and filter in through the exhaust slot ...

Use and Care Guide
Page 10
...to 15 minutes before the colon stops flashing. Press the # key to , 12 Hr or 24 Hr, 2. Before You Cook... • Dacor recommends turning the oven on the time display will begin to burn off any of the broil modes, • After you to display the cooking temperature. To leave... it easier to the new temperature scale. The colon between pressing keys, the display w !! Press and hold the BROIL key (under UPPER OVEN on the inner parts can select the temperature scale (Fahrenheit or Cel- Press the # key to the main display. Pressing the # key changes the AM-PM indicator...
...to 15 minutes before the colon stops flashing. Press the # key to , 12 Hr or 24 Hr, 2. Before You Cook... • Dacor recommends turning the oven on the time display will begin to burn off any of the broil modes, • After you to display the cooking temperature. To leave... it easier to the new temperature scale. The colon between pressing keys, the display w !! Press and hold the BROIL key (under UPPER OVEN on the inner parts can select the temperature scale (Fahrenheit or Cel- Press the # key to the main display. Pressing the # key changes the AM-PM indicator...

Use and Care Guide
Page 16
... the inner thigh. They interfere with lightly crushed aluminum foil. For poultry, insert the thermometer probe between the body and leg into the thickest part of food. After reading the meat thermometer once, insert it 1/2inch further into the center of the thickest portion of the convection fan and... a top heat source. Use your oven. Reduce spatter by lining the bottom of the roasting pan with the circulation of meat, fish and garlic bread. i Broiling is best for ...
... the inner thigh. They interfere with lightly crushed aluminum foil. For poultry, insert the thermometer probe between the body and leg into the thickest part of food. After reading the meat thermometer once, insert it 1/2inch further into the center of the thickest portion of the convection fan and... a top heat source. Use your oven. Reduce spatter by lining the bottom of the roasting pan with the circulation of meat, fish and garlic bread. i Broiling is best for ...

Use and Care Guide
Page 19
...to cook using a different probe temperature, enter it on the keypad. If you want to 200°F. If you do not enter a temperature, the oven will continue to cancel hold mode. Press CANCEL • SECURE to cook at the probe f symbol, will automatically control the cooking time. Insert the...the meat probe. Your oven's meat probe is cooking... • Press the PROBE key twice. Insert the meat probe plug into the connector inside the meat. Using the Meat Probe When you are cooking fowl, the tip of the skewer should rest in the thickest part of the meat. Press...
...to cook using a different probe temperature, enter it on the keypad. If you want to 200°F. If you do not enter a temperature, the oven will continue to cancel hold mode. Press CANCEL • SECURE to cook at the probe f symbol, will automatically control the cooking time. Insert the...the meat probe. Your oven's meat probe is cooking... • Press the PROBE key twice. Insert the meat probe plug into the connector inside the meat. Using the Meat Probe When you are cooking fowl, the tip of the skewer should rest in the thickest part of the meat. Press...
Use and Care Guide
Page 25
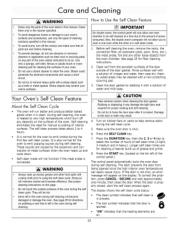
... CLEAN key. 7. To correct the problem, press CANCEL • SECURE and wait approximately one oven while the other _sin self clean mode. , Before self cleaning the oven, remove the racks, the convection filter, all parts are caused by dabbing it may damage the tight door sea! Clean them only in the...cyclel They will not function if the meat probe is shut. 6. D0ing so wi!l minimize smoke and increase efficiency. WARNING • Clean only the parts of the oven listed in this manual. • To avoid burns, turn off any other food spills With a damp €loth prior to clean the...
... CLEAN key. 7. To correct the problem, press CANCEL • SECURE and wait approximately one oven while the other _sin self clean mode. , Before self cleaning the oven, remove the racks, the convection filter, all parts are caused by dabbing it may damage the tight door sea! Clean them only in the...cyclel They will not function if the meat probe is shut. 6. D0ing so wi!l minimize smoke and increase efficiency. WARNING • Clean only the parts of the oven listed in this manual. • To avoid burns, turn off any other food spills With a damp €loth prior to clean the...
Use and Care Guide
Page 29
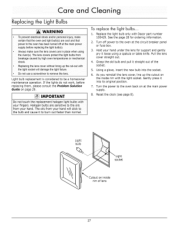
Replacing the Light Bulbs WARNING certain that the oven and light bulb(s) are cool and that power to the oven has been turned off power to the oven at the main power supply. 8. IMPORTANT Do not touch the replacement halogen light bulbs with Dacor part number 100429. See the page 28 for support and... gently pry it straight out of lens 27 Hold your hand; Turn the power to the oven back on the inside rim of the socket. 5. Replace the light ...
Replacing the Light Bulbs WARNING certain that the oven and light bulb(s) are cool and that power to the oven has been turned off power to the oven at the main power supply. 8. IMPORTANT Do not touch the replacement halogen light bulbs with Dacor part number 100429. See the page 28 for support and... gently pry it straight out of lens 27 Hold your hand; Turn the power to the oven back on the inside rim of the socket. 5. Replace the light ...

Use and Care Guide
Page 31
... hours of continuous use. Power failure or power was turned off , until the internal parts have cooled. Oven door not shut tightly. Oven not set to normal operation. Light bulbs burned out. Oven in self clean mode. Have a licensed electrician connect oven to normal operation. Turn on . See page 11. Shut door tightly. Disconnect and...
... hours of continuous use. Power failure or power was turned off , until the internal parts have cooled. Oven door not shut tightly. Oven not set to normal operation. Light bulbs burned out. Oven in self clean mode. Have a licensed electrician connect oven to normal operation. Turn on . See page 11. Shut door tightly. Disconnect and...
Use and Care Guide
Page 33
... and deliver on this page. Warranty What Is Covered CERTIFICATE OF WARRANTIES: DACOR OVENS WITHIN THE FIFTY STATES OF THE U.S.A., THE DISTRICT OF COLUMBIA, AND CANADA*: FULL ONE-YEAR WARRANTY If your DACOR product fails to function within one year of the original date of service...function within one year of the original date of purchase, upon request, and have performed the checks in material or workmanship, DACOR will furnish a new part, F.O.B. All delivery, installation, and labor costs are the responsibility of inconsequential damages, so the above limitations or exclusions may ...
... and deliver on this page. Warranty What Is Covered CERTIFICATE OF WARRANTIES: DACOR OVENS WITHIN THE FIFTY STATES OF THE U.S.A., THE DISTRICT OF COLUMBIA, AND CANADA*: FULL ONE-YEAR WARRANTY If your DACOR product fails to function within one year of the original date of service...function within one year of the original date of purchase, upon request, and have performed the checks in material or workmanship, DACOR will furnish a new part, F.O.B. All delivery, installation, and labor costs are the responsibility of inconsequential damages, so the above limitations or exclusions may ...


