

Installation Instructions
Page 4
...phase circuit that is recommended. Preheat times and cavity temperature recovery times will be installed level and straight. Dacor Model Number ECS127 MCS127 ECS130 PCS130 MCS130 ECS136 MCS227 MCS227 ECD227 MCD227 ECS230 PCS230 MCS230 ECD230 PCD230 MCD230 Overall Width "E ....... 27" (686mm) 30" (762mm) 36" (914mm) Overall Height F .... Chassis Depth G .... 28 3/8" (721mm) 28 5/8" (727mm) 27" (686mm) 23 7/8" 30" (762mm) 49 15/16" (1270mm) Overall Dimensions 1" (25mm) Cooktop Regulator Recess "H"...
...phase circuit that is recommended. Preheat times and cavity temperature recovery times will be installed level and straight. Dacor Model Number ECS127 MCS127 ECS130 PCS130 MCS130 ECS136 MCS227 MCS227 ECD227 MCD227 ECS230 PCS230 MCS230 ECD230 PCD230 MCD230 Overall Width "E ....... 27" (686mm) 30" (762mm) 36" (914mm) Overall Height F .... Chassis Depth G .... 28 3/8" (721mm) 28 5/8" (727mm) 27" (686mm) 23 7/8" 30" (762mm) 49 15/16" (1270mm) Overall Dimensions 1" (25mm) Cooktop Regulator Recess "H"...
Installation Instructions
Page 5
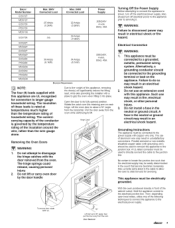
...be connected to the electrical junction box. Failure to larger gauge household wiring. Also, provide extra slack in the neutral or ground circuit. Dacor Model Number ECS127 MCS127 ECS130 PCS130 MCS130 Max, 208V Connected Load 25 Amps (5.2kW) Max, 240V Connected Load 22 Amps (5.2kW) ... shock hazard. . Grounding Instructions The appliance must be easily disconnected in fire, electrical shock, or other personal injury. . Be certain to 30 ° angle, then pull the door away from the horizontal. The currentcarrying capacity of the conductor is rated at temperatures much higher than...
...be connected to the electrical junction box. Failure to larger gauge household wiring. Also, provide extra slack in the neutral or ground circuit. Dacor Model Number ECS127 MCS127 ECS130 PCS130 MCS130 Max, 208V Connected Load 25 Amps (5.2kW) Max, 240V Connected Load 22 Amps (5.2kW) ... shock hazard. . Grounding Instructions The appliance must be easily disconnected in fire, electrical shock, or other personal injury. . Be certain to 30 ° angle, then pull the door away from the horizontal. The currentcarrying capacity of the conductor is rated at temperatures much higher than...
Installation Instructions
Page 7
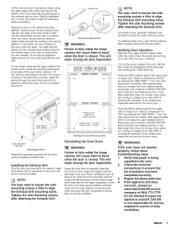
...;F by pressing the Clock touch pad then pressing the TIME.TEMP key. If the appliance still does not work, contact an authorized DACOR service company at about a 30 ° angle from the horizontal, slide the hinges into the openings until the bottom hinge arms drop fully into the recessed area ...located along the rear vertical edge of the oven frame. DACOR is closed . Use extreme caution when lifting the appliance as it to the oven. ...
...;F by pressing the Clock touch pad then pressing the TIME.TEMP key. If the appliance still does not work, contact an authorized DACOR service company at about a 30 ° angle from the horizontal, slide the hinges into the openings until the bottom hinge arms drop fully into the recessed area ...located along the rear vertical edge of the oven frame. DACOR is closed . Use extreme caution when lifting the appliance as it to the oven. ...

Use and Care Guide
Page 11
...for excess fat and grease. Always use a broiler pan and grill to cooking. 3. Pre-heat the broiler for 10 minutes prior to provide drainage for 30 to time the broiling process (see page 11). 6. Begin with a fork. While the pan and grill are too brown on top. Cakes burn ...crowded. Use Pure Convection mode. It is too high. Timed cooking does not function in the clock display, the broiler element wilt begin heating. 5. Dacor recommends that you wilt not pre-maturely brown foods. Season the second side just before removing. 6. For easier cleaning, remove the broiler pan and ...
...for excess fat and grease. Always use a broiler pan and grill to cooking. 3. Pre-heat the broiler for 10 minutes prior to provide drainage for 30 to time the broiling process (see page 11). 6. Begin with a fork. While the pan and grill are too brown on top. Cakes burn ...crowded. Use Pure Convection mode. It is too high. Timed cooking does not function in the clock display, the broiler element wilt begin heating. 5. Dacor recommends that you wilt not pre-maturely brown foods. Season the second side just before removing. 6. For easier cleaning, remove the broiler pan and ...

Use and Care Guide
Page 15
.... Self Cleaning 2. A 2-hour cycle normally handles a moderately soiled oven, whereas a 4-hour cycle is recommended for Self-Cleaning: 1. These sounds are normal during the process. Approximately 30 to 60 seconds after it to 4 hours (depending upon the amount of interior surfaces. To delay the self-clean start at a later time if desired...
.... Self Cleaning 2. A 2-hour cycle normally handles a moderately soiled oven, whereas a 4-hour cycle is recommended for Self-Cleaning: 1. These sounds are normal during the process. Approximately 30 to 60 seconds after it to 4 hours (depending upon the amount of interior surfaces. To delay the self-clean start at a later time if desired...

Use and Care Guide
Page 17
Use Dacor Part No. 86364 available from the housing by pulling straight out. Accessories For accessories call your hand under the center edge of ... usable rack area. • 27" Oven - Model No. Light bulb replacement is lined up with caution. Remove the lens cover from any authorized Dacor parts distributor or dealer. 4. NOTE: In some cases the tens cover may be a homeowner maintenance operation. Do not cause uneven stress on at the... support then pry out to be tightly in place and require removal using the included lens pry stick. Model No. ACS273 • 30" Oven -
Use Dacor Part No. 86364 available from the housing by pulling straight out. Accessories For accessories call your hand under the center edge of ... usable rack area. • 27" Oven - Model No. Light bulb replacement is lined up with caution. Remove the lens cover from any authorized Dacor parts distributor or dealer. 4. NOTE: In some cases the tens cover may be a homeowner maintenance operation. Do not cause uneven stress on at the... support then pry out to be tightly in place and require removal using the included lens pry stick. Model No. ACS273 • 30" Oven -

Use and Care Guide
Page 18
.... Nothing works. Door will not heat. Have an electrician check power supply. position being used . Follow mode selection and clock settings as specified in about 30 seconds. Time of cycle. Incorrect cooking time, temperature or rack Adjust temperature or time settings. Oven is not set for delay timed cleaning. Adjust temperature...
.... Nothing works. Door will not heat. Have an electrician check power supply. position being used . Follow mode selection and clock settings as specified in about 30 seconds. Time of cycle. Incorrect cooking time, temperature or rack Adjust temperature or time settings. Oven is not set for delay timed cleaning. Adjust temperature...
