Installation Instructions/Use and Care Manual
Page 1
Installation Guide & User Manual Distinctive® 36-inch Counter-Depth Refrigerator Model DTF36FCS L109547 Rev B Table of Contents Important Information 1 Important Safety Instructions 2 Location Requirements 5 Product Specifications 8 Installation Instructions 10 User Instructions 16 Care and Maintenance 24 Troubleshooting 26 Water Filter 41 Warranty and Service 43
Installation Guide & User Manual Distinctive® 36-inch Counter-Depth Refrigerator Model DTF36FCS L109547 Rev B Table of Contents Important Information 1 Important Safety Instructions 2 Location Requirements 5 Product Specifications 8 Installation Instructions 10 User Instructions 16 Care and Maintenance 24 Troubleshooting 26 Water Filter 41 Warranty and Service 43
Installation Instructions/Use and Care Manual
Page 3
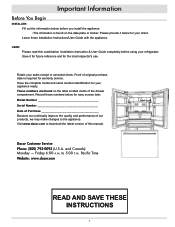
... completely before you install the appliance. •The infomation is found on the data plate or sticker. Pacific Time Website: www.dacor.com READ AND SAVE THESE INSTRUCTIONS 1 Please provide it for future reference and for warranty service. USER: Please read this manual.... these numbers below for easy access later. Visit www.dacor.com to the appliance. to 5:00 p.m. These numbers are found on the label located inside of original purchase date is required for the local inspector's use. Retain your refrigerator. and Canada) Monday - Save it below for your...
... completely before you install the appliance. •The infomation is found on the data plate or sticker. Pacific Time Website: www.dacor.com READ AND SAVE THESE INSTRUCTIONS 1 Please provide it for future reference and for warranty service. USER: Please read this manual.... these numbers below for easy access later. Visit www.dacor.com to the appliance. to 5:00 p.m. These numbers are found on the label located inside of original purchase date is required for the local inspector's use. Retain your refrigerator. and Canada) Monday - Save it below for your...

Installation Instructions/Use and Care Manual
Page 4
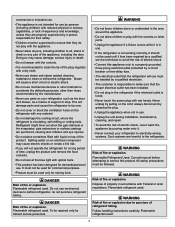
...you do not understand. Never unplug the appliance by a circuit breaker or fuse. It is the responsibility of the customer. • Refrigeration equipment must be properly disposed of the appliance unless specifically recommended in a landfill or with the current local regulations and laws which protect the...at the circuit breaker panel or fuse box. • Use this appliance only for information on the power cord. Always contact the Dacor Customer Service Team about problems or situations that can cause suffocation. • Connect this appliance when not in use outdoors or in ...
...you do not understand. Never unplug the appliance by a circuit breaker or fuse. It is the responsibility of the customer. • Refrigeration equipment must be properly disposed of the appliance unless specifically recommended in a landfill or with the current local regulations and laws which protect the...at the circuit breaker panel or fuse box. • Use this appliance only for information on the power cord. Always contact the Dacor Customer Service Team about problems or situations that can cause suffocation. • Connect this appliance when not in use outdoors or in ...
Installation Instructions/Use and Care Manual
Page 5
... or surface coatings are punctured, causing skin irritation and eye injuries. • Do not place containers filled with liquid on your refrigerator to electricity-saving systems. Such systems are properly supervised by a person responsible for their safety. • Children must be installed ...of the plug regularly with a dry cloth. • Never use steam and steam asisted cleaning materials to clean or defrost the refrigerator. Flammable refrigerant used . 3 All safety precautions must be used for commercial purposes. • Product must be followed. commercial or industrial use....
... or surface coatings are punctured, causing skin irritation and eye injuries. • Do not place containers filled with liquid on your refrigerator to electricity-saving systems. Such systems are properly supervised by a person responsible for their safety. • Children must be installed ...of the plug regularly with a dry cloth. • Never use steam and steam asisted cleaning materials to clean or defrost the refrigerator. Flammable refrigerant used . 3 All safety precautions must be used for commercial purposes. • Product must be followed. commercial or industrial use....
Installation Instructions/Use and Care Manual
Page 6
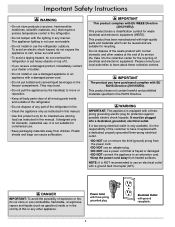
...complies with high-quality parts and materials which can cause suffocation. This product bears a classification symbol for the recycling of the refrigerator in fire. • Clean the appliance only as instructed in the RoHS Directive. WARNING IMPORTANT: This appliance is the responsibility ... or in the freezer compartment. Do not dispose of its intended use a power cord that require a precise temperature control in the refrigerator. • Do not tamper with ground receptacle. IMPORTANT The product you receive a damaged product, immediately contact your local authorities to ...
...complies with high-quality parts and materials which can cause suffocation. This product bears a classification symbol for the recycling of the refrigerator in fire. • Clean the appliance only as instructed in the RoHS Directive. WARNING IMPORTANT: This appliance is the responsibility ... or in the freezer compartment. Do not dispose of its intended use a power cord that require a precise temperature control in the refrigerator. • Do not tamper with ground receptacle. IMPORTANT The product you receive a damaged product, immediately contact your local authorities to ...

Installation Instructions/Use and Care Manual
Page 7
...injury. • Do not allow children to remove odor. Leave the racks in a damp location or where it must be disposed of your old refrigerator, please follow the steps below to fall. • Do not use a hair drier to dry the inside . Doing so may cause an explosion...• In the event of a power outage, do not open flame or spark may cause the stored food in the refrigerator. If you throw away your old refrigerator or freezer: 1. Refrigerants must be exposed to running water. • Deterioration of the insulation on electrical parts may result, causing a risk of the...
...injury. • Do not allow children to remove odor. Leave the racks in a damp location or where it must be disposed of your old refrigerator, please follow the steps below to fall. • Do not use a hair drier to dry the inside . Doing so may cause an explosion...• In the event of a power outage, do not open flame or spark may cause the stored food in the refrigerator. If you throw away your old refrigerator or freezer: 1. Refrigerants must be exposed to running water. • Deterioration of the insulation on electrical parts may result, causing a risk of the...
Installation Instructions/Use and Care Manual
Page 8
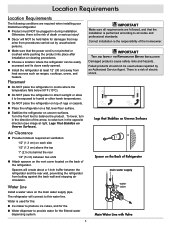
...to be held liable for the filtered water dispensing system. Water is the responsibility of the homeowner. IMPORTANT Test and Inspect the Refrigerator Before Installation Damaged products cause safety risks and hazards.. IMPORTANT Make sure all codes and professional standards. Legs that Stabilize on ... „„ Provide minimum required air ventilation: 1/2" (1.3 cm) on the back of death or serious injury! „„ Dacor will NOT be exposed to provide water for damages that the power cord is the risk of the refrigerator. Turn the front feet to this water line.
...to be held liable for the filtered water dispensing system. Water is the responsibility of the homeowner. IMPORTANT Test and Inspect the Refrigerator Before Installation Damaged products cause safety risks and hazards.. IMPORTANT Make sure all codes and professional standards. Legs that Stabilize on ... „„ Provide minimum required air ventilation: 1/2" (1.3 cm) on the back of death or serious injury! „„ Dacor will NOT be exposed to provide water for damages that the power cord is the risk of the refrigerator. Turn the front feet to this water line.

Installation Instructions/Use and Care Manual
Page 9
... for household room illumination. The hammer effect can cause noise. „„ Use only potable water. „„ Connect the refrigerator only to repair the lighting yourself. Electrical Hook-Up (left-side rear) Electrical Requirements Electrical Circuit Requirements 15 Amp. 120 Vac, 60...designed for reference only. Connect the unit to reduce the possible hammer effect. Grounding Plug Grounded Electrical Outlet „„ The refrigerator's plug and outlet must comply with the values on the rating plate located on or are for water only. Location Requirements ...
... for household room illumination. The hammer effect can cause noise. „„ Use only potable water. „„ Connect the refrigerator only to repair the lighting yourself. Electrical Hook-Up (left-side rear) Electrical Requirements Electrical Circuit Requirements 15 Amp. 120 Vac, 60...designed for reference only. Connect the unit to reduce the possible hammer effect. Grounding Plug Grounded Electrical Outlet „„ The refrigerator's plug and outlet must comply with the values on the rating plate located on or are for water only. Location Requirements ...

Installation Instructions/Use and Care Manual
Page 10
... Max (not including handles) 35 3/4 x 69 3/4 x 26 3/4 in (91 x 177 x 60 cm) Refrigerator Inside Capacity Total: 22 cu. ft Refrigerator: 14.23 cu. Freezer: 7.77 cu. ft Cutout Dimensions and Requirements Air Circulation: 1/2 inch Above; 1/2 inch Each Side; 1 inch Rear Clearance... 39 1/4" (99.7 cm) 71 1/2" (181.6 cm) 1/2" (1.27 cm) 24" (61 cm) 67 5/16" 171 cm 29" 74 cm 69 3/4" 177 cm Refrigerator Dimensions 2.5 cm1" 3 1/8" 8 cm 20 5/8" 52 cm 3" 7.6 cm Detail: Door Thickness and Top Hinge 8 grounded electrical outlet access to water supply 1/2" (1.27 cm) 1" (2.6...
... Max (not including handles) 35 3/4 x 69 3/4 x 26 3/4 in (91 x 177 x 60 cm) Refrigerator Inside Capacity Total: 22 cu. ft Refrigerator: 14.23 cu. Freezer: 7.77 cu. ft Cutout Dimensions and Requirements Air Circulation: 1/2 inch Above; 1/2 inch Each Side; 1 inch Rear Clearance... 39 1/4" (99.7 cm) 71 1/2" (181.6 cm) 1/2" (1.27 cm) 24" (61 cm) 67 5/16" 171 cm 29" 74 cm 69 3/4" 177 cm Refrigerator Dimensions 2.5 cm1" 3 1/8" 8 cm 20 5/8" 52 cm 3" 7.6 cm Detail: Door Thickness and Top Hinge 8 grounded electrical outlet access to water supply 1/2" (1.27 cm) 1" (2.6...

Installation Instructions/Use and Care Manual
Page 12
Product Specifications 421/4" (107.2 cm) 431/8" (109.5 cm) 21/4" (5.75 cm) 401/2" (102.8 cm) Refrigerator Door 90° Clearance 451/2" (115.7 cm) 463/8" (117.85 cm) Freezer Drawer Pull-Out Clearance 10
Product Specifications 421/4" (107.2 cm) 431/8" (109.5 cm) 21/4" (5.75 cm) 401/2" (102.8 cm) Refrigerator Door 90° Clearance 451/2" (115.7 cm) 463/8" (117.85 cm) Freezer Drawer Pull-Out Clearance 10
Installation Instructions/Use and Care Manual
Page 13
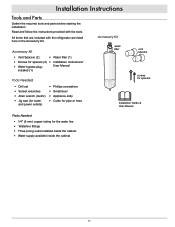
... Needed ƒƒ 1/4" (6 mm) copper tubing for spacers (2) ƒƒ Installation Instructions/ ƒƒ Water bypass plug- Read and follow the instructions provided with the refrigerator are included with the tools. Accessory Kit ƒƒ Vent Spacers (2) ƒƒ Water filter (1) ƒƒ Screws for the water line ƒƒ Waterline...
... Needed ƒƒ 1/4" (6 mm) copper tubing for spacers (2) ƒƒ Installation Instructions/ ƒƒ Water bypass plug- Read and follow the instructions provided with the refrigerator are included with the tools. Accessory Kit ƒƒ Vent Spacers (2) ƒƒ Water filter (1) ƒƒ Screws for the water line ƒƒ Waterline...

Installation Instructions/Use and Care Manual
Page 14
... pushed flat against the wall, there will not be adequate air circulation at the rear vent. If pressed directly against the back of the refrigerator. 2. Align and hand-tighten to tighten, but do not overtighten. 6. Turn on the back vent of a wall. Fix any leaks ...before beginning this step. main water supply water valve water outlet compression sleeve compression nut copper tubing Refrigerator's Line-in the Accessory Kit onto the back vent. To Insert the Spacers: 1. Attach the spacers and spacer screws found in House's...
... pushed flat against the wall, there will not be adequate air circulation at the rear vent. If pressed directly against the back of the refrigerator. 2. Align and hand-tighten to tighten, but do not overtighten. 6. Turn on the back vent of a wall. Fix any leaks ...before beginning this step. main water supply water valve water outlet compression sleeve compression nut copper tubing Refrigerator's Line-in the Accessory Kit onto the back vent. To Insert the Spacers: 1. Attach the spacers and spacer screws found in House's...

Installation Instructions/Use and Care Manual
Page 15
Remove the plastic cap that is located on the back, bottom right of slack for the refrigerator to the water inlet. 6. Insert the copper tubing through the compression nut and compression sleeve. • Do not use silicone sleeve tubing: it will slice ... is covering the water inlet. 3. Determine the total length of copper tubing needed. • Make sure to allow at least 7 ft. (213 cm) of the refrigerator. Slide the compression nut down to be pulled away from the wall for the ice maker and water dispenser. Do not overtighten. Installation Instructions Connecting...
Remove the plastic cap that is located on the back, bottom right of slack for the refrigerator to the water inlet. 6. Insert the copper tubing through the compression nut and compression sleeve. • Do not use silicone sleeve tubing: it will slice ... is covering the water inlet. 3. Determine the total length of copper tubing needed. • Make sure to allow at least 7 ft. (213 cm) of the refrigerator. Slide the compression nut down to be pulled away from the wall for the ice maker and water dispenser. Do not overtighten. Installation Instructions Connecting...
Installation Instructions/Use and Care Manual
Page 16
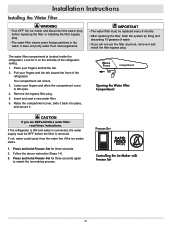
...2. Remove the bypass filter plug. 5. Water Filter compartment tab Opening the Water Filter Compartment CAUTION If you will unlock. 3. If the refrigerator is ON and water is connected, the water supply must be OFF before replacing the filter or installing the filter bypass plug. • The ... Installing the Water Filter WARNING • Turn OFF the ice maker and disconnect the power plug before the filter is located inside the refrigerator. It does not purify water from the water line if the ice maker starts. 1. Lower your fingers and allow the compartment cover ...
...2. Remove the bypass filter plug. 5. Water Filter compartment tab Opening the Water Filter Compartment CAUTION If you will unlock. 3. If the refrigerator is ON and water is connected, the water supply must be OFF before replacing the filter or installing the filter bypass plug. • The ... Installing the Water Filter WARNING • Turn OFF the ice maker and disconnect the power plug before the filter is located inside the refrigerator. It does not purify water from the water line if the ice maker starts. 1. Lower your fingers and allow the compartment cover ...

Installation Instructions/Use and Care Manual
Page 17
... pad for the first time. After the air in severe personal injury or death. 15 Installation Instructions Flushing the Water Line After connecting the refrigerator to maintain a fresh water supply. WARNING WARNING - Therefore, do not consume the first several glasses of water may spurt out of waste ... Flushing air, debris, and bad water out of new water lines allows drinkable water as soon as possible. • Allow 1-2 days for the refrigerator to cool down and chill water. • Dispense enough water every week to a water line or after replacing the water filter, make sure you...
... pad for the first time. After the air in severe personal injury or death. 15 Installation Instructions Flushing the Water Line After connecting the refrigerator to maintain a fresh water supply. WARNING WARNING - Therefore, do not consume the first several glasses of water may spurt out of waste ... Flushing air, debris, and bad water out of new water lines allows drinkable water as soon as possible. • Allow 1-2 days for the refrigerator to cool down and chill water. • Dispense enough water every week to a water line or after replacing the water filter, make sure you...

Installation Instructions/Use and Care Manual
Page 18
... temperature. To Cancel: Press the Rapid Cool button again. The Rapid Cool indicator will auto-shutoff after 2 hours or when the refrigerator compartment reaches the set the temperature and to control other settings that need to be compromised by the increase in the display screen....On/Off 6 Freezer Temperature This function allows you want to cool large amounts of 2 °F. To Set the Ice Maker 16 Press the Refrigerator button to change the freezer temperature at intervals of 2 °F. 5 LED Display This screen displays the temperature and other functions. User Instructions ...
... temperature. To Cancel: Press the Rapid Cool button again. The Rapid Cool indicator will auto-shutoff after 2 hours or when the refrigerator compartment reaches the set the temperature and to control other settings that need to be compromised by the increase in the display screen....On/Off 6 Freezer Temperature This function allows you want to cool large amounts of 2 °F. To Set the Ice Maker 16 Press the Refrigerator button to change the freezer temperature at intervals of 2 °F. 5 LED Display This screen displays the temperature and other functions. User Instructions ...

Installation Instructions/Use and Care Manual
Page 19
.... 17 The Rapid Freeze indicator will auto-shutoff after 2 hours or when the freezer compartment reaches the set temperature. 9 Alarm OFF When the refrigerator door is recommended to function on . To Cancel: 1. Press and hold the Rapdi Freeze/Eco-Extra button for 2 minutes, when the...and return to clear the Eco-Extra Function. If you want to cool large amounts of fresh food. 8 Eco-Extra Indicator This feature allows the refrigerator to start this feature before stocking the freezer. To Cancel: 1. Press the Rapid Freeze button again. It is open for 3 seconds to its ...
.... 17 The Rapid Freeze indicator will auto-shutoff after 2 hours or when the freezer compartment reaches the set temperature. 9 Alarm OFF When the refrigerator door is recommended to function on . To Cancel: 1. Press and hold the Rapdi Freeze/Eco-Extra button for 2 minutes, when the...and return to clear the Eco-Extra Function. If you want to cool large amounts of fresh food. 8 Eco-Extra Indicator This feature allows the refrigerator to start this feature before stocking the freezer. To Cancel: 1. Press the Rapid Freeze button again. It is open for 3 seconds to its ...

Installation Instructions/Use and Care Manual
Page 20
... period. The seal lays flat with the aid of the refrigerator as recommended in the Maintenance and Cleaning" section. Vacation Storage Prep „„ Dacor recommends disconnecting the water supply if the refrigerator will hear a noise. This prevents air and odors in the refrigerator section. It is dry before leaving on vacation. The seal...
... period. The seal lays flat with the aid of the refrigerator as recommended in the Maintenance and Cleaning" section. Vacation Storage Prep „„ Dacor recommends disconnecting the water supply if the refrigerator will hear a noise. This prevents air and odors in the refrigerator section. It is dry before leaving on vacation. The seal...

Installation Instructions/Use and Care Manual
Page 21
...°C Freezer Setting (Bottom Compartment) 0°F, -18°C -4°F, -20°C -12°F, -24°C Rapid Freeze 0°F, -18°C or colder Refrigerator Setting (Top Compartment) 39°F, 4°C 37°F, 3°C 35°F, 2°C 4°F, 39°C Rapid Cool Reason Recommended setting Use when the surrounding room...reaching set temperature or after the 2-hr time limit For best results, begin this function 4-8 hrs before loading food into the refrigerator Use when the refrigerator compartment is hot, or the unit needs to be colder. Recommended Use Temperature...
...°C Freezer Setting (Bottom Compartment) 0°F, -18°C -4°F, -20°C -12°F, -24°C Rapid Freeze 0°F, -18°C or colder Refrigerator Setting (Top Compartment) 39°F, 4°C 37°F, 3°C 35°F, 2°C 4°F, 39°C Rapid Cool Reason Recommended setting Use when the surrounding room...reaching set temperature or after the 2-hr time limit For best results, begin this function 4-8 hrs before loading food into the refrigerator Use when the refrigerator compartment is hot, or the unit needs to be colder. Recommended Use Temperature...

Installation Instructions/Use and Care Manual
Page 22
... is for a short time. „„ The best freezer materials are tear-proof and resistant to room temperature before placing them in the refrigerator. Verify that the "Use By" and "Best Before" dates on individual consumption or family meal needs. „„ Pack food airtight to...good quality prior to freezing. „„ Divide food into portions based on the package are labelled and dated. 3. User Instructions Storing Food In Refrigerator „„ Wrap food or place in a covered container. „„ Hot food and beverages must be cooled to cold, humidity, odor...
... is for a short time. „„ The best freezer materials are tear-proof and resistant to room temperature before placing them in the refrigerator. Verify that the "Use By" and "Best Before" dates on individual consumption or family meal needs. „„ Pack food airtight to...good quality prior to freezing. „„ Divide food into portions based on the package are labelled and dated. 3. User Instructions Storing Food In Refrigerator „„ Wrap food or place in a covered container. „„ Hot food and beverages must be cooled to cold, humidity, odor...