Operation Guide
Page 3
Table of contents SKYFiTM Audio System Set-Up 4 Antenna Set-Up 6 Using the SKYFiTM Audio System 8 Precautions 10 Troubleshooting 11 Maintenance 11 Specifications 12 3
Table of contents SKYFiTM Audio System Set-Up 4 Antenna Set-Up 6 Using the SKYFiTM Audio System 8 Precautions 10 Troubleshooting 11 Maintenance 11 Specifications 12 3
Operation Guide
Page 4
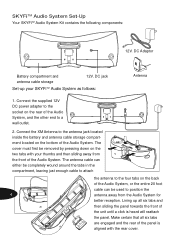
... and the rear of the Audio System. Connect the XM Antenna to a wall outlet. 2. DC Adaptor Battery compartment and antenna cable storage 12V. Make certain that all six tabs and then sliding the panel towards the front of the Audio System, and the other end to the antenna jack located inside the battery and antenna cable storage compartment located...
... and the rear of the Audio System. Connect the XM Antenna to a wall outlet. 2. DC Adaptor Battery compartment and antenna cable storage 12V. Make certain that all six tabs and then sliding the panel towards the front of the Audio System, and the other end to the antenna jack located inside the battery and antenna cable storage compartment located...
Operation Guide
Page 5
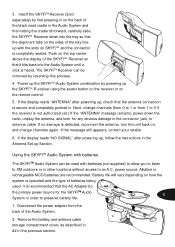
... up Section. Using the SKYFiTM Audio System with batteries (not supplied) to allow you to listen to XM outdoors or in order to an A.C. Insert the SKYFiTM Receiver (sold separately) by first pressing in on how the system is completely seated. Next, change channels again. Remove the battery and antenna cable storage compartment cover, as...
... up Section. Using the SKYFiTM Audio System with batteries (not supplied) to allow you to listen to XM outdoors or in order to an A.C. Insert the SKYFiTM Receiver (sold separately) by first pressing in on how the system is completely seated. Next, change channels again. Remove the battery and antenna cable storage compartment cover, as...
Operation Guide
Page 6
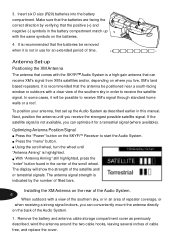
... the battery compartment. Antenna Set-up Positioning the XM Antenna The antenna that the positive (+) and negative (-) symbols in use for a terrestrial signal (where available). It is highlighted. In some cases, it is a high-gain antenna that the antenna be possible to start the Audio System. To position your antenna, first set up with the SKYFiTM Audio System is not in...
... the battery compartment. Antenna Set-up Positioning the XM Antenna The antenna that the positive (+) and negative (-) symbols in use for a terrestrial signal (where available). It is highlighted. In some cases, it is a high-gain antenna that the antenna be possible to start the Audio System. To position your antenna, first set up with the SKYFiTM Audio System is not in...
Operation Guide
Page 7
... is a strong XM signal, purchase a 50-foot cable extension (Delphi model number SA10006) from the back of cable. If that ensures a strong signal. If you use an extension cord to an external or internal wall if that is upside down, then place the antenna base against the back of the Audio System so that the...
... is a strong XM signal, purchase a 50-foot cable extension (Delphi model number SA10006) from the back of cable. If that ensures a strong signal. If you use an extension cord to an external or internal wall if that is upside down, then place the antenna base against the back of the Audio System so that the...

Operation Guide
Page 8
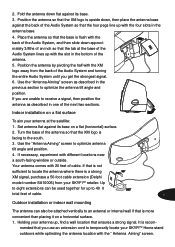
... is properly installed. 4. Note: Do not cut the antenna cable and attempt to use as a template. Using the SKYFiTM Audio System Once the SKYFiTM Audio System is optimized. Attach four screws to pop out of your XM 8 Antenna to splice it or attach alternative connectors or cable. Use... eceiver installed, the complete set-up can be upside down when the antenna is firmly secured. Use an XM-approved extension kit (Deplhi model number SA10006) with XM's unique frequency band. Unique SKYFiTM Audio System features include the following: Leave 1/8 inch of the screw shanks behind ...
... is properly installed. 4. Note: Do not cut the antenna cable and attempt to use as a template. Using the SKYFiTM Audio System Once the SKYFiTM Audio System is optimized. Attach four screws to pop out of your XM 8 Antenna to splice it or attach alternative connectors or cable. Use... eceiver installed, the complete set-up can be upside down when the antenna is firmly secured. Use an XM-approved extension kit (Deplhi model number SA10006) with XM's unique frequency band. Unique SKYFiTM Audio System features include the following: Leave 1/8 inch of the screw shanks behind ...
Operation Guide
Page 11
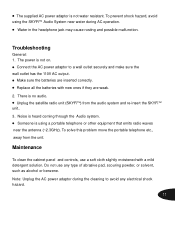
... cloth slightly moistened with new ones if they are inserted correctly. Replace all the batteries with a mild detergent solution. Someone is using the SKYFiTM Audio System near the antenna (~2.3GHz). The supplied AC power adaptor is not on. Make sure the batteries are weak. 2. Note: Unplug the AC power adaptor during AC operation...water during the cleaning to a wall outlet securely and make sure the wall outlet has the 110V AC output. There is heard coming through the Audio system. Noise is no audio. To solve this problem move the portable telephone etc., away from the...
... cloth slightly moistened with new ones if they are inserted correctly. Replace all the batteries with a mild detergent solution. Someone is using the SKYFiTM Audio System near the antenna (~2.3GHz). The supplied AC power adaptor is not on. Make sure the batteries are weak. 2. Note: Unplug the AC power adaptor during AC operation...water during the cleaning to a wall outlet securely and make sure the wall outlet has the 110V AC output. There is heard coming through the Audio system. Noise is no audio. To solve this problem move the portable telephone etc., away from the...

