User Manual
Page 2
...Features 5 Hardware Overview 6 Front View 6 Rear Panel (Connections 7 Installation 8 Hardware Setup 8 Configuration 11 Easy Search Utility 11 Getting Started 12 Web UI 17 Setup 18 Wizard 18 LAN 22... Device Settings 23 Advanced 24 Users and Groups 24 Quotas 26 Network Access 29 FTP Server 31 UPnP AV Server 34 iTunes Server 35 ...Drive 52 Download Scheduling 55 Schedule Downloads 57 Scheduling Settings 58 Replacing or Adding a New Hard Drive 59 Contacting Technical Support 60 GNU/Linux GPL 61 GNU General Public License 62 Warranty 68 Registration 73 D-Link DNS-321...
...Features 5 Hardware Overview 6 Front View 6 Rear Panel (Connections 7 Installation 8 Hardware Setup 8 Configuration 11 Easy Search Utility 11 Getting Started 12 Web UI 17 Setup 18 Wizard 18 LAN 22... Device Settings 23 Advanced 24 Users and Groups 24 Quotas 26 Network Access 29 FTP Server 31 UPnP AV Server 34 iTunes Server 35 ...Drive 52 Download Scheduling 55 Schedule Downloads 57 Scheduling Settings 58 Replacing or Adding a New Hard Drive 59 Contacting Technical Support 60 GNU/Linux GPL 61 GNU General Public License 62 Warranty 68 Registration 73 D-Link DNS-321...
User Manual
Page 5
... to automatically find and play music directly from the DNS-321 D-Link Easy Search Utility Configurable by Web Browser 1 Hard Drive(s) not included. 2 RAID 1 mirroring requires the use of 2 internal SATA drives. 3 Note that use of Any Capacity1 Simplified Hard Drive Installation Process - Product Overview Features The DNS-321 is designed for easy installation and allows remote access...
... to automatically find and play music directly from the DNS-321 D-Link Easy Search Utility Configurable by Web Browser 1 Hard Drive(s) not included. 2 RAID 1 mirroring requires the use of 2 internal SATA drives. 3 Note that use of Any Capacity1 Simplified Hard Drive Installation Process - Product Overview Features The DNS-321 is designed for easy installation and allows remote access...
User Manual
Page 10
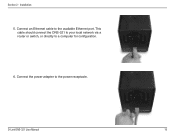
Connect an Ethernet cable to the power receptacle. Installation 5. Section 2 - Connect the power adapter to the available Ethernet port. D-Link DNS-321 User Manual 10 This cable should connect the DNS-321 to your local network via a router or switch, or directly to a computer for configuration. 6.
Connect an Ethernet cable to the power receptacle. Installation 5. Section 2 - Connect the power adapter to the available Ethernet port. D-Link DNS-321 User Manual 10 This cable should connect the DNS-321 to your local network via a router or switch, or directly to a computer for configuration. 6.
User Manual
Page 11
... default it will wait to the LAN Settings. Configuration Click Configuration to close the utility. LAN Configure the LAN Settings for the first time. Available Drive Letters Exit Choose an available drive letter. D-Link DNS-321 User Manual 11 Network The Easy Search Utility displays Storage Device the available DNS-321 devices on your network and make any needed changes. Click Exit to...
... default it will wait to the LAN Settings. Configuration Click Configuration to close the utility. LAN Configure the LAN Settings for the first time. Available Drive Letters Exit Choose an available drive letter. D-Link DNS-321 User Manual 11 Network The Easy Search Utility displays Storage Device the available DNS-321 devices on your network and make any needed changes. Click Exit to...
User Manual
Page 12
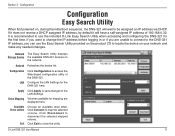
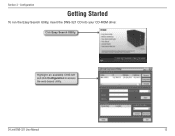
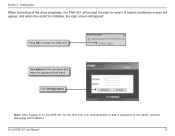
Configuration Getting Started To run the Easy Search Utility, insert the DNS-321 CD into your CD-ROM drive: Click Easy Search Utility. D-Link DNS-321 User Manual 12 Highlight an available DNS-321 and click Configuration to access the web-based utility. Section 3 -
Configuration Getting Started To run the Easy Search Utility, insert the DNS-321 CD into your CD-ROM drive: Click Easy Search Utility. D-Link DNS-321 User Manual 12 Highlight an available DNS-321 and click Configuration to access the web-based utility. Section 3 -
User Manual
Page 13
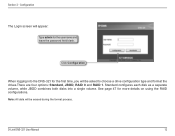
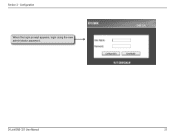
...Link DNS-321 User Manual 13 Click Configuration When logging into a single volume. Note: All data will appear: Type admin for the username and leave the password field blank. Standard configures each disk as a separate volume, while JBOD combines both disks into the DNS-321 for more details on using the RAID configurations.... See page 47 for the first time, you will be erased during the format process. Configuration The Login screen will be asked to choose a drive configuration type and format the drives.There ...
...Link DNS-321 User Manual 13 Click Configuration When logging into a single volume. Note: All data will appear: Type admin for the username and leave the password field blank. Standard configures each disk as a separate volume, while JBOD combines both disks into the DNS-321 for more details on using the RAID configurations.... See page 47 for the first time, you will be erased during the format process. Configuration The Login screen will be asked to choose a drive configuration type and format the drives.There ...
User Manual
Page 14
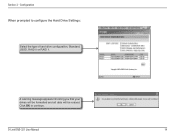
Configuration When prompted to continue. A warning message appears informing you that your drives will be formatted and all data will be erased. D-Link DNS-321 User Manual 14 Section 3 - Click OK to configure the Hard Drive Settings: Select the type of hard drive configuration, Standard, JBOD, RAID 0 or RAID 1.
Configuration When prompted to continue. A warning message appears informing you that your drives will be formatted and all data will be erased. D-Link DNS-321 User Manual 14 Section 3 - Click OK to configure the Hard Drive Settings: Select the type of hard drive configuration, Standard, JBOD, RAID 0 or RAID 1.
User Manual
Page 15
Configuration When formatting of the drive completes, the DNS-321 will appear: Press OK to restart the DNS-321. A restart countdown screen will appear, and when the restart is recommended to add a password to restart. Click Configuration Note: After logging in to the DNS-321 for the first time it is complete, the login screen will prompt the user to the admin account. (See page 39 for the username and leave the password field blank. Type admin for details.) D-Link DNS-321 User Manual 15 Section 3 -
Configuration When formatting of the drive completes, the DNS-321 will appear: Press OK to restart the DNS-321. A restart countdown screen will appear, and when the restart is recommended to add a password to restart. Click Configuration Note: After logging in to the DNS-321 for the first time it is complete, the login screen will prompt the user to the admin account. (See page 39 for the username and leave the password field blank. Type admin for details.) D-Link DNS-321 User Manual 15 Section 3 -
User Manual
Page 16
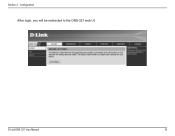
Section 3 - Configuration After login, you will be redirected to the DNS-321 web UI: D-Link DNS-321 User Manual 16
Section 3 - Configuration After login, you will be redirected to the DNS-321 web UI: D-Link DNS-321 User Manual 16
User Manual
Page 17
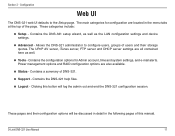
... pages and their storage quotas. Configuration Web UI The DNS-321 web UI defaults to configure users, groups of DNS-321. Support - The UPnP AV server, iTunes server, FTP server and DHCP server settings are all contained here as the LAN configuration settings and device settings. Advanced - Contains the DNS-321 help files. Logout - D-Link DNS-321 User Manual 17...
... pages and their storage quotas. Configuration Web UI The DNS-321 web UI defaults to configure users, groups of DNS-321. Support - The UPnP AV server, iTunes server, FTP server and DHCP server settings are all contained here as the LAN configuration settings and device settings. Advanced - Contains the DNS-321 help files. Logout - D-Link DNS-321 User Manual 17...

User Manual
Page 18
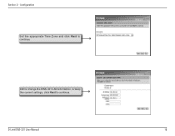
Section 3 - Click Next to continue. D-Link DNS-321 User Manual 18 It is recommended you to quickly configure some of the wizard. When running the DNS-321 setup wizard, the welcome screen details the five steps of the basic device settings. Configuration Setup Wizard The DNS-321 has a setup Wizard that allows you set an admin password here. Click Next to continue. Enter the new password and re-enter it for confirmation.
Section 3 - Click Next to continue. D-Link DNS-321 User Manual 18 It is recommended you to quickly configure some of the wizard. When running the DNS-321 setup wizard, the welcome screen details the five steps of the basic device settings. Configuration Setup Wizard The DNS-321 has a setup Wizard that allows you set an admin password here. Click Next to continue. Enter the new password and re-enter it for confirmation.
User Manual
Page 19
D-Link DNS-321 User Manual 19 Edit or change the DNS-321 LAN information, or keep the current settings, click Next to continue. Section 3 - Configuration Set the appropriate Time Zone and click Next to continue.
D-Link DNS-321 User Manual 19 Edit or change the DNS-321 LAN information, or keep the current settings, click Next to continue. Section 3 - Configuration Set the appropriate Time Zone and click Next to continue.

User Manual
Page 20
While the DNS-321 is restarting, a countdown screen will appear. D-Link DNS-321 User Manual 20 When the wizard completes, click Back to go back and make changes or click Restart to continue. Configuration Enter a workgroup, name, and description for the DNS-321, or leave the default values and click Next to restart the DNS-321 and save the configuration. Section 3 -
While the DNS-321 is restarting, a countdown screen will appear. D-Link DNS-321 User Manual 20 When the wizard completes, click Back to go back and make changes or click Restart to continue. Configuration Enter a workgroup, name, and description for the DNS-321, or leave the default values and click Next to restart the DNS-321 and save the configuration. Section 3 -
User Manual
Page 21
Section 3 - D-Link DNS-321 User Manual 21 Configuration When the login prompt appears, login using the new administrator password.
Section 3 - D-Link DNS-321 User Manual 21 Configuration When the login prompt appears, login using the new administrator password.
User Manual
Page 22
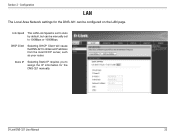
Static IP Selecting Static IP requires you to assign the IP information for the DNS-321 can be configured on the LAN page. Link Speed The LAN Link Speed is set to Auto by default, but can be manually set to obtain an IP address from the local DHCP server, such as your router. Section 3 - Configuration LAN The Local Area Network settings for the DNS-321 manually. DHCP Client Selecting DHCP Client will cause the DNS-321 to 100Mbps or 1000Mbps. D-Link DNS-321 User Manual 22
Static IP Selecting Static IP requires you to assign the IP information for the DNS-321 can be configured on the LAN page. Link Speed The LAN Link Speed is set to Auto by default, but can be manually set to obtain an IP address from the local DHCP server, such as your router. Section 3 - Configuration LAN The Local Area Network settings for the DNS-321 manually. DHCP Client Selecting DHCP Client will cause the DNS-321 to 100Mbps or 1000Mbps. D-Link DNS-321 User Manual 22
User Manual
Page 23
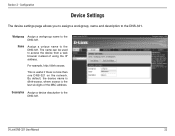
... dlink-xxxxxx, where xxxxxx is more than one DNS-321 on the network. D-Link DNS-321 User Manual 23 Section 3 - Description Assign a device description to the DNS-321. Workgroup Assign a workgroup name to the DNS-321. This is useful if there is the last six digits of using the IP address. Configuration Device Settings The device settings page allows you to...
... dlink-xxxxxx, where xxxxxx is more than one DNS-321 on the network. D-Link DNS-321 User Manual 23 Section 3 - Description Assign a device description to the DNS-321. Workgroup Assign a workgroup name to the DNS-321. This is useful if there is the last six digits of using the IP address. Configuration Device Settings The device settings page allows you to...
User Manual
Page 24
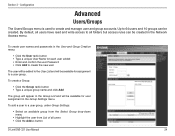
...in the Group Settings menu. To add a user to all users • Click the Add>> button D-Link DNS-321 User Manual 24 To create user names and passwords in the User and Group Creation menu: • Click...the new user The user will be added to 64 users and 10 groups can be created. Configuration Advanced Users/Groups The Users/Groups menu is used to a user group. Up to the User... List and will be available for user assignment in the Network Access menu. To create a Group: • Click the Group radio button • Type a unique...
...in the Group Settings menu. To add a user to all users • Click the Add>> button D-Link DNS-321 User Manual 24 To create user names and passwords in the User and Group Creation menu: • Click...the new user The user will be added to 64 users and 10 groups can be created. Configuration Advanced Users/Groups The Users/Groups menu is used to a user group. Up to the User... List and will be available for user assignment in the Network Access menu. To create a Group: • Click the Group radio button • Type a unique...
User Manual
Page 25
To delete a user from a group, under Group Setting: • Select the group • Highlight the user to be removed • Click the Section 3 - Configuration The user is now listed in the Users in group list.
To delete a user from a group, under Group Setting: • Select the group • Highlight the user to be removed • Click the Section 3 - Configuration The user is now listed in the Users in group list.
User Manual
Page 26
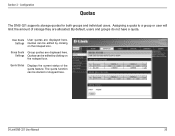
...Settings Quotas can be edited by clicking on the notepad icon. Quota Status Displays the current status of storage they are displayed here. D-Link DNS-321 User Manual 26 Assigning a quota to a group or user will limit the amount of the quota ...feature. The quota function can be started or stopped here. By default, users and groups do not have a quota. User Quota User quotas are allocated. Group Quota Group quotas are displayed here. Configuration Quotas The DNS-321...
...Settings Quotas can be edited by clicking on the notepad icon. Quota Status Displays the current status of storage they are displayed here. D-Link DNS-321 User Manual 26 Assigning a quota to a group or user will limit the amount of the quota ...feature. The quota function can be started or stopped here. By default, users and groups do not have a quota. User Quota User quotas are allocated. Group Quota Group quotas are displayed here. Configuration Quotas The DNS-321...
User Manual
Page 27
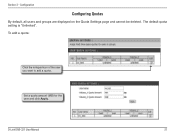
Set a quota amount (MB) for the user and click Apply. D-Link DNS-321 User Manual 27 Configuration Configuring Quotas By default, all users and groups are displayed on the Quota Settings page and cannot be deleted. The default quota setting is "Unlimited". To add a quota: Click the notepad icon of the user you want to add a quota. Section 3 -
Set a quota amount (MB) for the user and click Apply. D-Link DNS-321 User Manual 27 Configuration Configuring Quotas By default, all users and groups are displayed on the Quota Settings page and cannot be deleted. The default quota setting is "Unlimited". To add a quota: Click the notepad icon of the user you want to add a quota. Section 3 -