Product Manual
Page 11
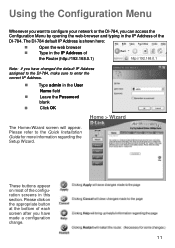
...192.168.0.1 Note: if you have made a configuration change. 11 Using the Configuration Menu Whenever you want to configure your network or the DI-784, you can access the Configuration Menu by opening the web-browser and typing in this section. These buttons appear on the appropriate button at .... Please refer to the Quick Installation Guide for more information regarding the Setup Wizard. The DI-784 default IP Address is shown here: Open the web browser Type in the User Name field Leave the Password blank Click OK Home > Wizard The Home>Wizard screen will appear. Type admin in the...
...192.168.0.1 Note: if you have made a configuration change. 11 Using the Configuration Menu Whenever you want to configure your network or the DI-784, you can access the Configuration Menu by opening the web-browser and typing in this section. These buttons appear on the appropriate button at .... Please refer to the Quick Installation Guide for more information regarding the Setup Wizard. The DI-784 default IP Address is shown here: Open the web browser Type in the User Name field Leave the Password blank Click OK Home > Wizard The Home>Wizard screen will appear. Type admin in the...
Product Manual
Page 34
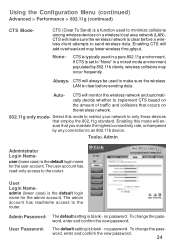
... to make sure the wireless network is clear before sending data. user (lower case) is blank - Admin PasswordUser Password- no password. The default setting is the default login name for the admin account. The user account has read /write access to the router. User Login Nameadmin ...CTS will always be used to the router. To change the password, enter and confirm the new password. CTS will add overhead and may occur frequently. Tools> Admin Administrator Login Name- If CTS is the default login name for the user account. Auto- sure that employ...
... to make sure the wireless network is clear before sending data. user (lower case) is blank - Admin PasswordUser Password- no password. The default setting is the default login name for the admin account. The user account has read /write access to the router. User Login Nameadmin ...CTS will always be used to the router. To change the password, enter and confirm the new password. CTS will add overhead and may occur frequently. Tools> Admin Administrator Login Name- If CTS is the default login name for the user account. Auto- sure that employ...
Product Manual
Page 35
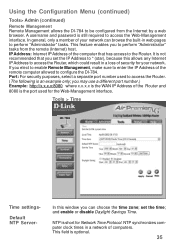
... is not recommended that has access to configure the DI-784. Default NTP Server- and enable or disable Daylight Savings Time. Using the Configuration Menu (continued) Tools> Admin (continued) Remote Management Remote Management allows the DI-784 to be configured from the remote (Internet) host. A username and password is the port used to access the Router...
... is not recommended that has access to configure the DI-784. Default NTP Server- and enable or disable Daylight Savings Time. Using the Configuration Menu (continued) Tools> Admin (continued) Remote Management Remote Management allows the DI-784 to be configured from the remote (Internet) host. A username and password is the port used to access the Router...
Product Manual
Page 76
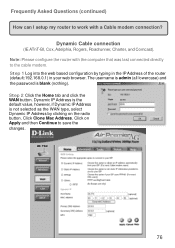
Click Clone Mac Address. Dynamic IP Address is the DI-784 default value, however, if Dynamic IP Address is blank (nothing). Dynamic Cable connection (IE ATnT-BI, Cox, Adelphia, Rogers, Roadrunner, Charter, and Comcast). Step 1 Log into ... Home tab and click the WAN button. The username is admin (all lowercase) and the password is not selected as the WAN type, select Dynamic IP Address by typing in the IP Address of the router (default:192.168.0.1) in your web browser. Click on the radio button. Frequently Asked Questions (continued...
Click Clone Mac Address. Dynamic IP Address is the DI-784 default value, however, if Dynamic IP Address is blank (nothing). Dynamic Cable connection (IE ATnT-BI, Cox, Adelphia, Rogers, Roadrunner, Charter, and Comcast). Step 1 Log into ... Home tab and click the WAN button. The username is admin (all lowercase) and the password is not selected as the WAN type, select Dynamic IP Address by typing in the IP Address of the router (default:192.168.0.1) in your web browser. Click on the radio button. Frequently Asked Questions (continued...
Product Manual
Page 77
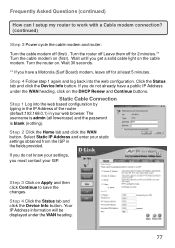
... you must contact your web browser. Click the Status tab and click the Device Info button. The username is admin (all lowercase) and the password DI-784 is blank (nothing). Your IP Address information will be displayed under the WAN heading, click on . Frequently Asked Questions (continued) How can I... save the changes. Step 4 Follow step 1 again and log back into the web based configuration by typing in the IP Address of the router (default:192.168.0.1) in the fields provided. If you do not know your settings, you get a solid cable light on (first). Wait 30 seconds....
... you must contact your web browser. Click the Status tab and click the Device Info button. The username is admin (all lowercase) and the password DI-784 is blank (nothing). Your IP Address information will be displayed under the WAN heading, click on . Frequently Asked Questions (continued) How can I... save the changes. Step 4 Follow step 1 again and log back into the web based configuration by typing in the IP Address of the router (default:192.168.0.1) in the fields provided. If you do not know your settings, you get a solid cable light on (first). Wait 30 seconds....

Product Manual
Page 80
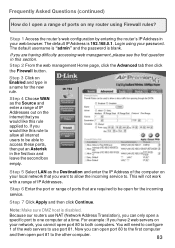
To allow traffic from the WAN side, and the private port is the port being used by default). Step 8 Enter the Schedule information. If DMZ is disabled. Because our routers use port 81. Step 2 Click on Advanced on top and then click Virtual ... that you want to allow the incoming service to. Step 4 Enter a name for your D-Link router (192.168.0.1). Frequently Asked Questions (continued) How do I open port 81 to the other computer. 80 Enter username (admin) and your password (blank by the application on your local network, you are usually the same. Step...
To allow traffic from the WAN side, and the private port is the port being used by default). Step 8 Enter the Schedule information. If DMZ is disabled. Because our routers use port 81. Step 2 Click on Advanced on top and then click Virtual ... that you want to allow the incoming service to. Step 4 Enter a name for your D-Link router (192.168.0.1). Frequently Asked Questions (continued) How do I open port 81 to the other computer. 80 Enter username (admin) and your password (blank by the application on your local network, you are usually the same. Step...
Product Manual
Page 82
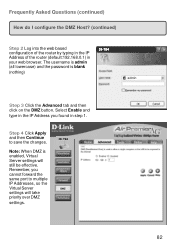
... (all lowercase) and the password is enabled, Virtual Server settings will take priority over DMZ settings. 82 Step 4 Click Apply and then Continue to multiple IP Addresses, so the Virtual Server settings will still be effective. Note: When DMZ is blank (nothing) DI-784 admin Step 3 Click the ...Advanced tab and then click on the DMZ button. Frequently Asked Questions (continued) How do I configure the DMZ Host? (continued) Step 2 Log into the web based configuration of the router by typing in the IP Address of the router (default:192.168...
... (all lowercase) and the password is enabled, Virtual Server settings will take priority over DMZ settings. 82 Step 4 Click Apply and then Continue to multiple IP Addresses, so the Virtual Server settings will still be effective. Note: When DMZ is blank (nothing) DI-784 admin Step 3 Click the ...Advanced tab and then click on the DMZ button. Frequently Asked Questions (continued) How do I configure the DMZ Host? (continued) Step 2 Log into the web based configuration of the router by typing in the IP Address of the router (default:192.168...
Product Manual
Page 83
... as the Destination and enter the IP Address of IP Addresses out on your network, you have 2 web servers on Enabled and type in your password. The default IP Address is disabled. Step 5 Select LAN as the Source and enter a range of the computer on the internet that you can only open... port 80 to one computer at a time. Now you want to allow all internet users to the other computer. 83 The default username is "admin" and the password is blank. Because our routers use port 81.
... as the Destination and enter the IP Address of IP Addresses out on your network, you have 2 web servers on Enabled and type in your password. The default IP Address is disabled. Step 5 Select LAN as the Source and enter a range of the computer on the internet that you can only open... port 80 to one computer at a time. Now you want to allow all internet users to the other computer. 83 The default username is "admin" and the password is blank. Because our routers use port 81.
Product Manual
Page 87
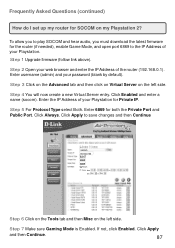
Step 1 Upgrade firmware (follow link above). Enter the IP Address of the router (192.168.0.1). Click Apply to the IP Address of your Playstation. Step 3 Click on the Advanced tab ...) and your Playstation for Private IP. Click Apply and then Continue. 87 Step 2 Open your web browser and enter the IP Address of your password (blank by default). Step 7 Make sure Gaming Mode is Enabled. Frequently Asked Questions (continued) How do I set up my router for SOCOM on the left side. Step...
Step 1 Upgrade firmware (follow link above). Enter the IP Address of the router (192.168.0.1). Click Apply to the IP Address of your Playstation. Step 3 Click on the Advanced tab ...) and your Playstation for Private IP. Click Apply and then Continue. 87 Step 2 Open your web browser and enter the IP Address of your password (blank by default). Step 7 Make sure Gaming Mode is Enabled. Frequently Asked Questions (continued) How do I set up my router for SOCOM on the left side. Step...
Product Manual
Page 88
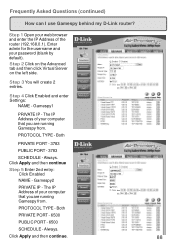
... running Gamespy from . Gamespy1 PRIVATE IP - Always. gamespy1 192.168.0.100 3783! 3783 gamespy2 192.168.0.100 Both 6500 6500 88 Step 1 Open your password (blank by default). Step 3 You will create 2 entries. PROTOCOL TYPE - The IP Address of the router (192.168.0.1). Step 4 Click Enabled and enter Settings: NAME - Both PRIVATE...
... running Gamespy from . Gamespy1 PRIVATE IP - Always. gamespy1 192.168.0.100 3783! 3783 gamespy2 192.168.0.100 Both 6500 6500 88 Step 1 Open your password (blank by default). Step 3 You will create 2 entries. PROTOCOL TYPE - The IP Address of the router (192.168.0.1). Step 4 Click Enabled and enter Settings: NAME - Both PRIVATE...
Product Manual
Page 89
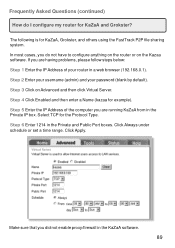
... router or on Advanced and then click Virtual Server. Click Always under schedule or set a time range. Step 5 Enter the IP Address of your password (blank by default). Make sure that you are having problems, please follow steps below: Step 1 Enter the IP Address of the computer you did not enable proxy...
... router or on Advanced and then click Virtual Server. Click Always under schedule or set a time range. Step 5 Enter the IP Address of your password (blank by default). Make sure that you are having problems, please follow steps below: Step 1 Enter the IP Address of the computer you did not enable proxy...


