

User Manual
Page 1
USER MANUAL DHP-P500AV/DHP-P501AV VERSION 1.2
USER MANUAL DHP-P500AV/DHP-P501AV VERSION 1.2

User Manual
Page 2
Table of Contents Table of Contents Product Overview 3 Package Contents 3 Utility and System Requirements 3 Introduction 4 Features 4 EU type Hardware Overview 5 LEDs 5 Connection 6 UK type Hardware Overview 7 LEDs 7 Connection 8 FR type Hardware Overview 9 LEDs 9 Connection 10 Hardware Installation 11 Push Button Security 12 Using the Setup Wizard 14 Configuration 15 Main 16 Security 18 PowerLine Installation Considerations 20 Troubleshooting 22 Technical Specifications 23 D-Link DHP-P500AV/DHP-P501AV User Manual 2
Table of Contents Table of Contents Product Overview 3 Package Contents 3 Utility and System Requirements 3 Introduction 4 Features 4 EU type Hardware Overview 5 LEDs 5 Connection 6 UK type Hardware Overview 7 LEDs 7 Connection 8 FR type Hardware Overview 9 LEDs 9 Connection 10 Hardware Installation 11 Push Button Security 12 Using the Setup Wizard 14 Configuration 15 Main 16 Security 18 PowerLine Installation Considerations 20 Troubleshooting 22 Technical Specifications 23 D-Link DHP-P500AV/DHP-P501AV User Manual 2

User Manual
Page 3
Section 1 - Product Overview PPraocdkuacgteOCvoenrtevnietsw DHP-P500AV • D-Link DHP-P500AV Powerline AV 500 Passthrough Adapter • CAT5 Ethernet Cable • CD-ROM with Software and User Manual • Quick Install Guide DHP-P501AV • D-Link DHP-P500AV Powerline AV 500 Passthrough Adapter X2 • CAT5 Ethernet Cable X2 • CD-ROM with Software and User Manual • Quick Install Guide Utility and...
Section 1 - Product Overview PPraocdkuacgteOCvoenrtevnietsw DHP-P500AV • D-Link DHP-P500AV Powerline AV 500 Passthrough Adapter • CAT5 Ethernet Cable • CD-ROM with Software and User Manual • Quick Install Guide DHP-P501AV • D-Link DHP-P500AV Powerline AV 500 Passthrough Adapter X2 • CAT5 Ethernet Cable X2 • CD-ROM with Software and User Manual • Quick Install Guide Utility and...

User Manual
Page 4
... Adapter which allows you to use Management Utility • Firmware Upgrade Support • Push Button Security * Maximum throughput based on theoretical transmission PHY rate. D-Link DHP-P500AV/DHP-P501AV User Manual 4 Features • Provides Ethernet to Powerline Connection • Fast Data Transfer Rate of Up to 500Mbps* • Integrated Passthrough Power Socket with devices such...
... Adapter which allows you to use Management Utility • Firmware Upgrade Support • Push Button Security * Maximum throughput based on theoretical transmission PHY rate. D-Link DHP-P500AV/DHP-P501AV User Manual 4 Features • Provides Ethernet to Powerline Connection • Fast Data Transfer Rate of Up to 500Mbps* • Integrated Passthrough Power Socket with devices such...

User Manual
Page 5
... is no Ethernet connection. The device is not receiving electrical power. The Powerline link rate is transmitting data. • Off. The color indicates the Powerline link rate: • Green. D-Link DHP-P500AV/DHP-P501AV User Manual 5 The device is between 50 Mbps and 80 Mbps. • Red. The device is transmitting data. • Off. The device is...
... is no Ethernet connection. The device is not receiving electrical power. The Powerline link rate is transmitting data. • Off. The color indicates the Powerline link rate: • Green. D-Link DHP-P500AV/DHP-P501AV User Manual 5 The device is between 50 Mbps and 80 Mbps. • Red. The device is transmitting data. • Off. The device is...
User Manual
Page 6
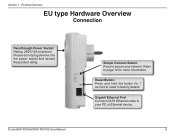
Section 1 - D-Link DHP-P500AV/DHP-P501AV User Manual Simple Connect Button Press to secure your PC or Ethernet device. 6 Refer to page 12 for 1 second to reset to your network. Gigabit Ethernet Port Connect CAT5 Ethernet cable to factory default. Reset Button Press and hold the button for more information. Product Overview EU type Hardware Overview Connection Passthrough Power Socket Rating: 250V/16A maximum Please do not plug devices into the power socket that exceed the product rating.
Section 1 - D-Link DHP-P500AV/DHP-P501AV User Manual Simple Connect Button Press to secure your PC or Ethernet device. 6 Refer to page 12 for 1 second to reset to your network. Gigabit Ethernet Port Connect CAT5 Ethernet cable to factory default. Reset Button Press and hold the button for more information. Product Overview EU type Hardware Overview Connection Passthrough Power Socket Rating: 250V/16A maximum Please do not plug devices into the power socket that exceed the product rating.

User Manual
Page 7
... after reset or simple connect button was pressed. • Off. The device is connected to a Powerline network. • Blinking. D-Link DHP-P500AV/DHP-P501AV User Manual 7 The device is transmitting data. • Off. The Powerline link rate is not receiving electrical power. There is faster than 50 Mbps. Product Overview UK type Hardware Overview LEDs Power...
... after reset or simple connect button was pressed. • Off. The device is connected to a Powerline network. • Blinking. D-Link DHP-P500AV/DHP-P501AV User Manual 7 The device is transmitting data. • Off. The Powerline link rate is not receiving electrical power. There is faster than 50 Mbps. Product Overview UK type Hardware Overview LEDs Power...

User Manual
Page 8
Product Overview UK type Hardware Overview Connection Passthrough Power Socket Rating: 250V/13A maximum Please do not plug devices into the power socket that exceed the product rating. D-Link DHP-P500AV/DHP-P501AV User Manual Simple Connect Button Press to secure your PC or Ethernet device. 8 Gigabit Ethernet Port Connect CAT5 Ethernet cable to factory default. Reset Button Press and hold the button for more information. Refer to page 12 for 1 second to reset to your network. Section 1 -
Product Overview UK type Hardware Overview Connection Passthrough Power Socket Rating: 250V/13A maximum Please do not plug devices into the power socket that exceed the product rating. D-Link DHP-P500AV/DHP-P501AV User Manual Simple Connect Button Press to secure your PC or Ethernet device. 8 Gigabit Ethernet Port Connect CAT5 Ethernet cable to factory default. Reset Button Press and hold the button for more information. Refer to page 12 for 1 second to reset to your network. Section 1 -

User Manual
Page 9
... Overview FR type Hardware Overview LEDs Power LED • Solid. The device is transmitting data. • Off. The Powerline link rate is no data traffic. • Blinking. The device has not found any other compatible Powerline devices using the same encryption... setting itself up after reset or simple connect button was pressed. • Off. The Powerline link rate is receiving electrical power. • Blinking. Section 1 - The device is less than 80 Mbps. • Amber. The device is not receiving electrical power. D-Link DHP-P500AV/DHP-P501AV User Manual 9
... Overview FR type Hardware Overview LEDs Power LED • Solid. The device is transmitting data. • Off. The Powerline link rate is no data traffic. • Blinking. The device has not found any other compatible Powerline devices using the same encryption... setting itself up after reset or simple connect button was pressed. • Off. The Powerline link rate is receiving electrical power. • Blinking. Section 1 - The device is less than 80 Mbps. • Amber. The device is not receiving electrical power. D-Link DHP-P500AV/DHP-P501AV User Manual 9

User Manual
Page 10
Reset Button Press and hold the button for more information. Refer to page 12 for 1 second to reset to factory default. Section 1 - Gigabit Ethernet Port Connect CAT5 Ethernet cable to secure your PC or Ethernet device. 10 Product Overview FR type Hardware Overview Connection Passthrough Power Socket Rating: 250V/16A maximum Please do not plug devices into the power socket that exceed the product rating. D-Link DHP-P500AV/DHP-P501AV User Manual Simple Connect Button Press to your network.
Reset Button Press and hold the button for more information. Refer to page 12 for 1 second to reset to factory default. Section 1 - Gigabit Ethernet Port Connect CAT5 Ethernet cable to secure your PC or Ethernet device. 10 Product Overview FR type Hardware Overview Connection Passthrough Power Socket Rating: 250V/16A maximum Please do not plug devices into the power socket that exceed the product rating. D-Link DHP-P500AV/DHP-P501AV User Manual Simple Connect Button Press to your network.

User Manual
Page 11
... the Ethernet cable to be inserted into an AC wall outlet or power strip. Note: Power source is confirmed when the Power LED on the DHP-P500AV is confirmed when the Ethernet LED on the DHP-P500AV and attach the other direct plug-in equipment. D-Link DHP-P500AV/DHP-P501AV User Manual 11
... the Ethernet cable to be inserted into an AC wall outlet or power strip. Note: Power source is confirmed when the Power LED on the DHP-P500AV is confirmed when the Ethernet LED on the DHP-P500AV and attach the other direct plug-in equipment. D-Link DHP-P500AV/DHP-P501AV User Manual 11

User Manual
Page 12
... must use . 3. First Adapter Press Simple connect button of each Powerline AV 500 passthrough network adapter will start blinking after you release the button. D-Link DHP-P500AV/DHP-P501AV User Manual 12 It's recommended to HomePlugAV (default value). All Powerline AV 500 passthrough network adapters with default encryption key can communicate with each device's encryption...
... must use . 3. First Adapter Press Simple connect button of each Powerline AV 500 passthrough network adapter will start blinking after you release the button. D-Link DHP-P500AV/DHP-P501AV User Manual 12 It's recommended to HomePlugAV (default value). All Powerline AV 500 passthrough network adapters with default encryption key can communicate with each device's encryption...

User Manual
Page 13
... adapter back to add more than two adapters, press the button of any adapter in your existing Powerline network for no more than three seconds. D-Link DHP-P500AV/DHP-P501AV User Manual 13 Installation Note: Both Simple connect buttons must be securely configured with the same network encryption key.
... adapter back to add more than two adapters, press the button of any adapter in your existing Powerline network for no more than three seconds. D-Link DHP-P500AV/DHP-P501AV User Manual 13 Installation Note: Both Simple connect buttons must be securely configured with the same network encryption key.
User Manual
Page 14
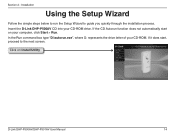
Section 2 - If it does start on Install Utility D-Link DHP-P500AV/DHP-P501AV User Manual 14 Installation Using the Setup Wizard Follow the simple steps below to run the Setup Wizard to the next screen. In the Run command box type "D:\autorun.exe", where D: represents the drive letter of your CD-ROM drive. Click on your computer, click Start > Run. If the CD Autorun function does not automatically start , proceed to guide you quickly through the installation process. Insert the D-Link DHP-P500AV CD into your CD-ROM.
Section 2 - If it does start on Install Utility D-Link DHP-P500AV/DHP-P501AV User Manual 14 Installation Using the Setup Wizard Follow the simple steps below to run the Setup Wizard to the next screen. In the Run command box type "D:\autorun.exe", where D: represents the drive letter of your CD-ROM drive. Click on your computer, click Start > Run. If the CD Autorun function does not automatically start , proceed to guide you quickly through the installation process. Insert the D-Link DHP-P500AV CD into your CD-ROM.

User Manual
Page 15
Double-click the D-Link Powerline Utility icon The D-Link Powerline Utility provides you have completed the D-Link Powerline AV Utility installation wizard, double-click the D-Link Powerline AV Utility icon on your own Powerline network and the network information of the DHP-P500AV. Configuration Configuration After you the option of setting your desktop to start the configuration of connected Powerline devices. Section 3 - D-Link DHP-P500AV/DHP-P501AV User Manual 15
Double-click the D-Link Powerline Utility icon The D-Link Powerline Utility provides you have completed the D-Link Powerline AV Utility installation wizard, double-click the D-Link Powerline AV Utility icon on your own Powerline network and the network information of the DHP-P500AV. Configuration Configuration After you the option of setting your desktop to start the configuration of connected Powerline devices. Section 3 - D-Link DHP-P500AV/DHP-P501AV User Manual 15

User Manual
Page 16
... connection quality of the connected device. Suitable for HD video stream connection. • Two squares - Section 3 - Suitable for data and Internet activity connection. D-Link DHP-P500AV/DHP-P501AV User Manual 16 MAC Address: Shows the MAC address of the connected device. • Three squares - Firmware Version: Shows the firmware version of devices that have.... • One square - The device name is local or remote. Configuration Main Device Information Tab: Device Name: Shows the name of the connected device. Link Rate: Shows the link rate of the connected device.
... connection quality of the connected device. Suitable for HD video stream connection. • Two squares - Section 3 - Suitable for data and Internet activity connection. D-Link DHP-P500AV/DHP-P501AV User Manual 16 MAC Address: Shows the MAC address of the connected device. • Three squares - Firmware Version: Shows the firmware version of devices that have.... • One square - The device name is local or remote. Configuration Main Device Information Tab: Device Name: Shows the name of the connected device. Link Rate: Shows the link rate of the connected device.
User Manual
Page 17
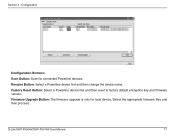
Rename Button: Select a Powerline device first and then change the device name. Configuration Configuration Buttons: Scan Button: Scan for local device. D-Link DHP-P500AV/DHP-P501AV User Manual 17 Section 3 - Firmware Upgrade Button: The firmware upgrade is only for connected Powerline devices. Select the appropriate firmware files and then proceed. Factory Reset Button: Select a Powerline device first and then reset to factory default encryption key and firmware version.
Rename Button: Select a Powerline device first and then change the device name. Configuration Configuration Buttons: Scan Button: Scan for local device. D-Link DHP-P500AV/DHP-P501AV User Manual 17 Section 3 - Firmware Upgrade Button: The firmware upgrade is only for connected Powerline devices. Select the appropriate firmware files and then proceed. Factory Reset Button: Select a Powerline device first and then reset to factory default encryption key and firmware version.

User Manual
Page 18
... device password before changing the encryption key: • Local Device: You do not need to enter the device password before changing the encryption key. D-Link DHP-P500AV/DHP-P501AV User Manual 18 Setting your network from unauthorized access via the Powerline network. Section 4 - The default encryption key of each other. Note: Each device has a unique...
... device password before changing the encryption key: • Local Device: You do not need to enter the device password before changing the encryption key. D-Link DHP-P500AV/DHP-P501AV User Manual 18 Setting your network from unauthorized access via the Powerline network. Section 4 - The default encryption key of each other. Note: Each device has a unique...

User Manual
Page 19
... the Set Device Password window. Then click OK. 3. You can communicate with each other . Your Powerline network will show a message once the setting been completed. D-Link DHP-P500AV/DHP-P501AV User Manual 19 Note: Please keep your private encryption key in the list. Section 4 -
... the Set Device Password window. Then click OK. 3. You can communicate with each other . Your Powerline network will show a message once the setting been completed. D-Link DHP-P500AV/DHP-P501AV User Manual 19 Note: Please keep your private encryption key in the list. Section 4 -
User Manual
Page 20
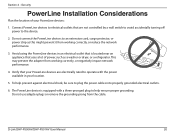
Connect PowerLine devices to an extension cord, surge protector, or power strip as a washer or dryer, or a refrigerator. Verify that your location. 5. D-Link DHP-P500AV/DHP-P501AV User Manual 20 Do not connect the PowerLine devices to electrical outlets that uses a lot of your PowerLine devices: 1. To help ensure proper grounding. The PowerLine device ...
Connect PowerLine devices to an extension cord, surge protector, or power strip as a washer or dryer, or a refrigerator. Verify that your location. 5. D-Link DHP-P500AV/DHP-P501AV User Manual 20 Do not connect the PowerLine devices to electrical outlets that uses a lot of your PowerLine devices: 1. To help ensure proper grounding. The PowerLine device ...