
Manual
Page 2
...hereof without prior expressed written permission from D-Link Systems, Inc. This publication may not be reproduced, in whole or in the United States or other countries. Copyright © 2011 by D-Link Systems, Inc. D-Link DHP-541 User Manual 2 All other company or product names... mentioned herein are trademarks or registered trademarks of D-Link Corporation or its subsidiaries in part, without obligation to notify any ...
...hereof without prior expressed written permission from D-Link Systems, Inc. This publication may not be reproduced, in whole or in the United States or other countries. Copyright © 2011 by D-Link Systems, Inc. D-Link DHP-541 User Manual 2 All other company or product names... mentioned herein are trademarks or registered trademarks of D-Link Corporation or its subsidiaries in part, without obligation to notify any ...

Manual
Page 3
... Button Security 11 Using the Setup Wizard 12 Configuration 13 Advanced Settings 19 Device Info 20 Network Info 21 Diagnostics 22 Security 23 Documentation 25 D-Link DHP-541 User Manual Troubleshooting 26 DHP-540 Technical Specifications 27 DHP-502AV Technical Specifications 28 Contacting Technical Support 29 Warranty 30 Registration 35 3
... Button Security 11 Using the Setup Wizard 12 Configuration 13 Advanced Settings 19 Device Info 20 Network Info 21 Diagnostics 22 Security 23 Documentation 25 D-Link DHP-541 User Manual Troubleshooting 26 DHP-540 Technical Specifications 27 DHP-502AV Technical Specifications 28 Contacting Technical Support 29 Warranty 30 Registration 35 3
Manual
Page 4
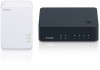
Product Overview PProacdkuacgteOCvoentrevnietsw One D-Link DHP-502AV PowerLine AV 500 Network Adapter One D-Link DHP-540 PowerLine AV 500 4-Port Gigabit Switch Two CAT5 Ethernet Cables CD-ROM with Software and User Manual One Power Cord Quick Install Guide System Requirements • Windows® 7, Windows Vista®, XP (with Service Pack 3) • PC with 233MHz Processor, 64MB Memory • Ethernet Adapter (1000Mbit/s) D-Link DHP-541 User Manual 4 Section 1 -
Product Overview PProacdkuacgteOCvoentrevnietsw One D-Link DHP-502AV PowerLine AV 500 Network Adapter One D-Link DHP-540 PowerLine AV 500 4-Port Gigabit Switch Two CAT5 Ethernet Cables CD-ROM with Software and User Manual One Power Cord Quick Install Guide System Requirements • Windows® 7, Windows Vista®, XP (with Service Pack 3) • PC with 233MHz Processor, 64MB Memory • Ethernet Adapter (1000Mbit/s) D-Link DHP-541 User Manual 4 Section 1 -

Manual
Page 5
...• Fast Data Transfer Rate of up to 500Mbps* to 500Mbps* • Four 10/100/1000 Ethernet Ports (DHP-540) • One 10/100/1000 Ethernet Port (DHP-502AV) • Plug & Play, Easy Installation • Supports 128-bit AES Encryption for Network Security • ... the PowerLine AV 500 switch into any room in each room without tripping over tangled, messy wires. D-Link DHP-541 User Manual 5 Actual data throughput will vary. Product Overview Introduction D-Link announces the PowerLine AV 500 4-Port Gigabit Switch Starter Kit which uses the electrical wiring that have a ...
...• Fast Data Transfer Rate of up to 500Mbps* to 500Mbps* • Four 10/100/1000 Ethernet Ports (DHP-540) • One 10/100/1000 Ethernet Port (DHP-502AV) • Plug & Play, Easy Installation • Supports 128-bit AES Encryption for Network Security • ... the PowerLine AV 500 switch into any room in each room without tripping over tangled, messy wires. D-Link DHP-541 User Manual 5 Actual data throughput will vary. Product Overview Introduction D-Link announces the PowerLine AV 500 4-Port Gigabit Switch Starter Kit which uses the electrical wiring that have a ...

Manual
Page 6
The device is between 50 Mbps and 80 Mbps. 1 • Red - The PowerLine link rate is transmitting data. • Off - D-Link DHP-541 User Manual 6 The device is less than 80 Mbps. • Amber - The PowerLine link rate is connected to a PowerLine network. • Blinking - The device is no Ethernet connection. The device has not found any...
The device is between 50 Mbps and 80 Mbps. 1 • Red - The PowerLine link rate is transmitting data. • Off - D-Link DHP-541 User Manual 6 The device is less than 80 Mbps. • Amber - The PowerLine link rate is connected to a PowerLine network. • Blinking - The device is no Ethernet connection. The device has not found any...
Manual
Page 7
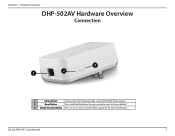
Section 1 - D-Link DHP-541 User Manual 7 Product Overview DHP-502AV Hardware Overview Connection 3 1 2 1 Ethernet Port Connect the CAT5 Ethernet cable to secure your network. Refer to page 10 for one second to reset to factory default. 3 Simple Connect Button Press to the DHP-502AV Ethernet port. 2 Reset Button Press and hold the button for more information.
Section 1 - D-Link DHP-541 User Manual 7 Product Overview DHP-502AV Hardware Overview Connection 3 1 2 1 Ethernet Port Connect the CAT5 Ethernet cable to secure your network. Refer to page 10 for one second to reset to factory default. 3 Simple Connect Button Press to the DHP-502AV Ethernet port. 2 Reset Button Press and hold the button for more information.

Manual
Page 8
...8226; Off - Refer to secure your network. The PowerLine link rate is faster than 50 Mbps. • Solid - D-Link DHP-541 User Manual 8 The PowerLine link rate is between 50 Mbps and 80 Mbps. • Red - The PowerLine link rate is transmitting data. • Off - The device ... no Ethernet connection. 4 Simple Connect Button Press to page 11 for more information. The Ethernet port is linked but there is not receiving electrical power. • Solid - Product Overview DHP-540 Hardware Overview LEDs 4 12 3 • Solid - Indicates that the device is no data traffic....
...8226; Off - Refer to secure your network. The PowerLine link rate is faster than 50 Mbps. • Solid - D-Link DHP-541 User Manual 8 The PowerLine link rate is between 50 Mbps and 80 Mbps. • Red - The PowerLine link rate is transmitting data. • Off - The device ... no Ethernet connection. 4 Simple Connect Button Press to page 11 for more information. The Ethernet port is linked but there is not receiving electrical power. • Solid - Product Overview DHP-540 Hardware Overview LEDs 4 12 3 • Solid - Indicates that the device is no data traffic....

Manual
Page 9
Product Overview DHP-540 Hardware Overview Connection 1 2 3 1 Ethernet Ports (1-4) Connect the CAT5 Ethernet cable to the selected Ethernet port in accordance to priority. 2 On/Off Button Press to turn the power on or off. 3 Power Receptor Receptor for the supplied power cord. Section 1 - D-Link DHP-541 User Manual 9
Product Overview DHP-540 Hardware Overview Connection 1 2 3 1 Ethernet Ports (1-4) Connect the CAT5 Ethernet cable to the selected Ethernet port in accordance to priority. 2 On/Off Button Press to turn the power on or off. 3 Power Receptor Receptor for the supplied power cord. Section 1 - D-Link DHP-541 User Manual 9

Manual
Page 10
...TV Wireless Router 1 2 LAN 3 4 RESET INTERNET USB 5V - - - 3A Cable/ DSL Modem INTERNET Blu-ray DVD Player DHP-502AV (included) DHP-540 (included) D-Link DHP-541 User Manual 10 Section 2 - Step 3 Connect an Ethernet cable to one of the 4 ports located on the PowerLine AV 500 Network Adapter... and attach the other end of the DHP-540 switch and press the power button to the issue. Installation ...
...TV Wireless Router 1 2 LAN 3 4 RESET INTERNET USB 5V - - - 3A Cable/ DSL Modem INTERNET Blu-ray DVD Player DHP-502AV (included) DHP-540 (included) D-Link DHP-541 User Manual 10 Section 2 - Step 3 Connect an Ethernet cable to one of the 4 ports located on the PowerLine AV 500 Network Adapter... and attach the other end of the DHP-540 switch and press the power button to the issue. Installation ...

Manual
Page 11
PowerLine AV 500 4-Port Gigabit Switch (DHP-540) Press the Simple Connect button located on the adapter for the network. The default encryption key for no more than two seconds. Step 2 - Note: ... setup procedure above network security setup steps, your network will use an identical encryption key for no more than two seconds. It is HomePlugAV. DHP-540 DHP-502AV D-Link DHP-541 User Manual 11 To create a private encryption key instead of the switch, press the Security Button on the top of the switch for each other...
PowerLine AV 500 4-Port Gigabit Switch (DHP-540) Press the Simple Connect button located on the adapter for the network. The default encryption key for no more than two seconds. Step 2 - Note: ... setup procedure above network security setup steps, your network will use an identical encryption key for no more than two seconds. It is HomePlugAV. DHP-540 DHP-502AV D-Link DHP-541 User Manual 11 To create a private encryption key instead of the switch, press the Security Button on the top of the switch for each other...

Manual
Page 12
Insert the D-Link DHP-541 CD into your CD-ROM. D-Link DHP-541 User Manual 12 Configuration Using the Setup Wizard Follow the simple steps below to run the Setup Wizard to the next screen. In the Run command box type "D:\autorun.exe", where D: represents the drive letter of your CD-ROM drive. If it does start on Install to begin. Click on your computer, click Start > Run. If the CD Autorun function does not automatically start , proceed to guide you quickly through the installation process. Section 3 -
Insert the D-Link DHP-541 CD into your CD-ROM. D-Link DHP-541 User Manual 12 Configuration Using the Setup Wizard Follow the simple steps below to run the Setup Wizard to the next screen. In the Run command box type "D:\autorun.exe", where D: represents the drive letter of your CD-ROM drive. If it does start on Install to begin. Click on your computer, click Start > Run. If the CD Autorun function does not automatically start , proceed to guide you quickly through the installation process. Section 3 -

Manual
Page 13
Section 3 - Double-click the D-Link PowerLine AV Utility icon The D-Link PowerLine AV Utility allows you have completed the D-Link PowerLine AV Utility installation wizard, double-click the D-Link PowerLine AV Utility icon on your PowerLine network settings and will display PowerLine device information. Configuration Configuration After you the option to configure your desktop to start the configuration of the DHP-541. D-Link DHP-541 User Manual 13
Section 3 - Double-click the D-Link PowerLine AV Utility icon The D-Link PowerLine AV Utility allows you have completed the D-Link PowerLine AV Utility installation wizard, double-click the D-Link PowerLine AV Utility icon on your PowerLine network settings and will display PowerLine device information. Configuration Configuration After you the option to configure your desktop to start the configuration of the DHP-541. D-Link DHP-541 User Manual 13

Manual
Page 14
Configuration The setup wizard is designed to assist the installation of utility to start the installation process. Click the Setup Wizard icon. D-Link DHP-541 User Manual 14 Click the Setup Wizard icon on the left corner of your PowerLine network. Section 3 -
Configuration The setup wizard is designed to assist the installation of utility to start the installation process. Click the Setup Wizard icon. D-Link DHP-541 User Manual 14 Click the Setup Wizard icon on the left corner of your PowerLine network. Section 3 -

Manual
Page 15
Plug the other end of the power cord to the back of the device and then turn on the device by pushing the power switch to continue. Please ensure that the LED in front of the device. Configuration Plug the DHP-540 power cord into an electric outlet. Power source is confirmed when the Power LED is on the back of the device is illuminated. Click Next to the ON position located on . Connect the Ethernet cable from the LAN port to continue. 1. Click Next to your computer's Ethernet Port. 2. D-Link DHP-541 User Manual 15 Section 3 -
Plug the other end of the power cord to the back of the device and then turn on the device by pushing the power switch to continue. Please ensure that the LED in front of the device. Configuration Plug the DHP-540 power cord into an electric outlet. Power source is confirmed when the Power LED is on the back of the device is illuminated. Click Next to the ON position located on . Connect the Ethernet cable from the LAN port to continue. 1. Click Next to your computer's Ethernet Port. 2. D-Link DHP-541 User Manual 15 Section 3 -

Manual
Page 16
Within 2 minutes, press the Simple Connect Button on top of the DHP-540 switch for 2 seconds. To encrypt your network, press the Simple Connect Button on the DHP-502AV adapter. Power source is confirmed when the Power LED is illuminated. The power LED will begin flashing. D-Link DHP-541 User Manual 16 Configuration Plug in the DHP-502AV adapter into an outlet. Section 3 -
Within 2 minutes, press the Simple Connect Button on top of the DHP-540 switch for 2 seconds. To encrypt your network, press the Simple Connect Button on the DHP-502AV adapter. Power source is confirmed when the Power LED is illuminated. The power LED will begin flashing. D-Link DHP-541 User Manual 16 Configuration Plug in the DHP-502AV adapter into an outlet. Section 3 -

Manual
Page 17
Section 3 - Your PowerLine network is being secured. D-Link DHP-541 User Manual 17 Configuration Please wait while the your PowerLine network is now secured, click Next to continue.
Section 3 - Your PowerLine network is being secured. D-Link DHP-541 User Manual 17 Configuration Please wait while the your PowerLine network is now secured, click Next to continue.

Manual
Page 18
Configuration Click Finish to complete the installation. D-Link DHP-541 User Manual 18 Section 3 -
Configuration Click Finish to complete the installation. D-Link DHP-541 User Manual 18 Section 3 -

Manual
Page 19
Click the Advanced Settings icon. Section 3 - Configuration Advanced Settings The Advanced Settings section will allow you to reset your device back to default settings, upgrade firmware, secure your network, and display device and network information. D-Link DHP-541 User Manual 19
Click the Advanced Settings icon. Section 3 - Configuration Advanced Settings The Advanced Settings section will allow you to reset your device back to default settings, upgrade firmware, secure your network, and display device and network information. D-Link DHP-541 User Manual 19

Manual
Page 20
... on your PowerLine device. The device's name is an updated firmware available here. Reset Device: Reset the device back to complete the firmware upgrade D-Link DHP-541 User Manual 20 Device Name: Displays the name of the devices that have downloaded the new firmware, click Browse to improve the functionality of the PowerLine device...
... on your PowerLine device. The device's name is an updated firmware available here. Reset Device: Reset the device back to complete the firmware upgrade D-Link DHP-541 User Manual 20 Device Name: Displays the name of the devices that have downloaded the new firmware, click Browse to improve the functionality of the PowerLine device...

Manual
Page 21
.... Use Default: Click to your PowerLine devices. Apply: Click Apply to scan your settings. The device's password is initially set by the utility itself . D-Link DHP-541 User Manual 21 Scan: Click to save your network for PowerLine devices. Encryption Key: Enter an encryption key to apply to use the default encryption key. Edit...
.... Use Default: Click to your PowerLine devices. Apply: Click Apply to scan your settings. The device's password is initially set by the utility itself . D-Link DHP-541 User Manual 21 Scan: Click to save your network for PowerLine devices. Encryption Key: Enter an encryption key to apply to use the default encryption key. Edit...