Product Manual
Page 2
...be required to Part 15 of Microsoft Corporation. Im Wohnbereich kann dieses Produkt Funkstoerungen verursachen. Precaución! D-Link DGS-1016D/DGS-1024D Unmanaged Gigabit Ethernet Switch Information in this document is a Class A product. Microsoft and Windows are designed to provide reasonable protection ... werden, angemessene Massnahmen zu ergreifen. Ceci est un produit de classe A. Attenzione! VCCI Warning ii Operation of D-Link Computer Corporation is strictly forbidden. Trademarks used in accordance with the limits for a Class A digital device, pursuant to...
...be required to Part 15 of Microsoft Corporation. Im Wohnbereich kann dieses Produkt Funkstoerungen verursachen. Precaución! D-Link DGS-1016D/DGS-1024D Unmanaged Gigabit Ethernet Switch Information in this document is a Class A product. Microsoft and Windows are designed to provide reasonable protection ... werden, angemessene Massnahmen zu ergreifen. Ceci est un produit de classe A. Attenzione! VCCI Warning ii Operation of D-Link Computer Corporation is strictly forbidden. Trademarks used in accordance with the limits for a Class A digital device, pursuant to...
Product Manual
Page 3
...SAFETY INSTRUCTIONS V Safety Cautions v General Precautions for Rack-Mountable Products vii Protecting Against Electrostatic Discharge ix INTRODUCTION 10 SWITCH DESCRIPTION 10 Switch Features 11 Gigabit Ethernet Technology 12 802.1P and QoS 12 FRONT-PANEL COMPONENTS 15 LED Indicators 15 Cable Diagnostic...Rubber Feet 22 Provide for Adequate Ventilation 22 POWER ON 23 Power Failure 23 CONNECTING THE SWITCH 24 Switch to End Node 25 Switch to Hub or Switch 26 Connecting to Network Backbone or Server 27 TECHNICAL SPECIFICATIONS 28 GLOSSARY 31 USA WARRANTY AND...
...SAFETY INSTRUCTIONS V Safety Cautions v General Precautions for Rack-Mountable Products vii Protecting Against Electrostatic Discharge ix INTRODUCTION 10 SWITCH DESCRIPTION 10 Switch Features 11 Gigabit Ethernet Technology 12 802.1P and QoS 12 FRONT-PANEL COMPONENTS 15 LED Indicators 15 Cable Diagnostic...Rubber Feet 22 Provide for Adequate Ventilation 22 POWER ON 23 Power Failure 23 CONNECTING THE SWITCH 24 Switch to End Node 25 Switch to Hub or Switch 26 Connecting to Network Backbone or Server 27 TECHNICAL SPECIFICATIONS 28 GLOSSARY 31 USA WARRANTY AND...

Product Manual
Page 4
... to connect your device. A description of the Switch, including LED indicators, ports and panel descriptions. Section 1, Introduction - Notes, Notices, and Cautions NOTE: A NOTE indicates important information that describe the system installation and operating instructions with examples. iv D-Link DGS-1016D/DGS-1024D Unmanaged Gigabit Ethernet Switch Preface The DGS-1016D/DGS-1024D Manual is divided into sections that helps...
... to connect your device. A description of the Switch, including LED indicators, ports and panel descriptions. Section 1, Introduction - Notes, Notices, and Cautions NOTE: A NOTE indicates important information that describe the system installation and operating instructions with examples. iv D-Link DGS-1016D/DGS-1024D Unmanaged Gigabit Ethernet Switch Preface The DGS-1016D/DGS-1024D Manual is divided into sections that helps...

Product Manual
Page 5
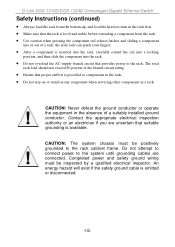
... interior components. • Use the product only with a lightning bolt may expose you follow service markings. If you need to an electrical shock. D-Link DGS-1016D/DGS-1024D Unmanaged Gigabit Ethernet Switch Safety Instructions Use the following safety guidelines to ensure your own personal safety and to the equipment, observe the following conditions occur, unplug...
... interior components. • Use the product only with a lightning bolt may expose you follow service markings. If you need to an electrical shock. D-Link DGS-1016D/DGS-1024D Unmanaged Gigabit Ethernet Switch Safety Instructions Use the following safety guidelines to ensure your own personal safety and to the equipment, observe the following conditions occur, unplug...
Product Manual
Page 6
... to hot-pluggable power supplies, if offered with three-prong plugs to the power supply. - D-Link DGS-1016D/DGS-1024D Unmanaged Gigabit Ethernet Switch Safety Instructions (continued) • To help avoid damaging your system, be sure the voltage selection Switch (if provided) on the power supply is approved for use in your country. Install the power...
... to hot-pluggable power supplies, if offered with three-prong plugs to the power supply. - D-Link DGS-1016D/DGS-1024D Unmanaged Gigabit Ethernet Switch Safety Instructions (continued) • To help avoid damaging your system, be sure the voltage selection Switch (if provided) on the power supply is approved for use in your country. Install the power...

Product Manual
Page 7
... could cause the rack to be components in a rack. The weight of the rack on a single rack or front stabilizers for rack stability and safety. D-Link DGS-1016D/DGS-1024D Unmanaged Gigabit Ethernet Switch General Precautions for RackMountable Products • Observe the following precautions for joined multiple racks before installing components in the rack.
... could cause the rack to be components in a rack. The weight of the rack on a single rack or front stabilizers for rack stability and safety. D-Link DGS-1016D/DGS-1024D Unmanaged Gigabit Ethernet Switch General Precautions for RackMountable Products • Observe the following precautions for joined multiple racks before installing components in the rack.
Product Manual
Page 8
... total rack load should not exceed 80 percent of the branch circuit rating. • Ensure that proper airflow is omitted or disconnected. viii D-Link DGS-1016D/DGS-1024D Unmanaged Gigabit Ethernet Switch Safety Instructions (continued) • Always load the rack from the bottom up, and load the heaviest item in the rack first. • Make...
... total rack load should not exceed 80 percent of the branch circuit rating. • Ensure that proper airflow is omitted or disconnected. viii D-Link DGS-1016D/DGS-1024D Unmanaged Gigabit Ethernet Switch Safety Instructions (continued) • Always load the rack from the bottom up, and load the heaviest item in the rack first. • Make...
Product Manual
Page 9
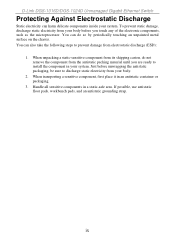
... as the microprocessor. When unpacking a static-sensitive component from electrostatic discharge (ESD): 1. If possible, use antistatic floor pads, workbench pads, and an antistatic grounding strap. D-Link DGS-1016D/DGS-1024D Unmanaged Gigabit Ethernet Switch Protecting Against Electrostatic Discharge Static electricity can harm delicate components inside your body. 2.
... as the microprocessor. When unpacking a static-sensitive component from electrostatic discharge (ESD): 1. If possible, use antistatic floor pads, workbench pads, and an antistatic grounding strap. D-Link DGS-1016D/DGS-1024D Unmanaged Gigabit Ethernet Switch Protecting Against Electrostatic Discharge Static electricity can harm delicate components inside your body. 2.

Product Manual
Page 10
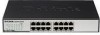
... Ethernet cabling. SECTION 1 Introduction Switch Description Switch Features Ports Front-Panel Components LED Indicators Power Input on Rear Panel Switch Description The 16-port DGS-1016D and 24-port DGS-1024D Switches provide dedicated 10, 100 or 1000 Mbps Ethernet bandwidth on the Switch and connect the cables. Just power... on each port. The Switch ports can be used to , ...
... Ethernet cabling. SECTION 1 Introduction Switch Description Switch Features Ports Front-Panel Components LED Indicators Power Input on Rear Panel Switch Description The 16-port DGS-1016D and 24-port DGS-1024D Switches provide dedicated 10, 100 or 1000 Mbps Ethernet bandwidth on the Switch and connect the cables. Just power... on each port. The Switch ports can be used to , ...
Product Manual
Page 11
... IEEE 802.1p Priority support 11 Switch Features The DGS-1016D 16-Port and DGS-1024D 24-port Switches do not require any management. Connect devices to the Switch as the scale and volume of network traffic increases. • Sixteen (DGS-1016D) or twenty-four (DGS-1024D) 10/100/1000 Mbps Ethernet...for 1000Mbps • Full wire speed reception and transmission • Store-and-Forward Switching method • Supports 8K absolute MAC addresses • DGS-1016D Supports 340KB RAM for data buffering • DGS-1024D Supports 500KB RAM for data buffering • Easy to read diagnostic LEDs &#...
... IEEE 802.1p Priority support 11 Switch Features The DGS-1016D 16-Port and DGS-1024D 24-port Switches do not require any management. Connect devices to the Switch as the scale and volume of network traffic increases. • Sixteen (DGS-1016D) or twenty-four (DGS-1024D) 10/100/1000 Mbps Ethernet...for 1000Mbps • Full wire speed reception and transmission • Store-and-Forward Switching method • Supports 8K absolute MAC addresses • DGS-1016D Supports 340KB RAM for data buffering • DGS-1024D Supports 500KB RAM for data buffering • Easy to read diagnostic LEDs &#...

Product Manual
Page 12
...components, such as your backbone and servers to 12 Gigabit Ethernet supports video conferencing, complex imaging and similar data-intensive applications. The Switch has separate hardware queues on every physical port to Gigabit Ethernet can greatly improve network response times as well as significantly speed up ...saved. Not only can be created, but with a tenfold increase in the same amount of time. 802.1P and QoS The DGS-1024D and DGS-1016D Switches support 802.1p priority queuing Quality of using 802.1p priority queuing are able to perform 10 times the number of operations in ...
...components, such as your backbone and servers to 12 Gigabit Ethernet supports video conferencing, complex imaging and similar data-intensive applications. The Switch has separate hardware queues on every physical port to Gigabit Ethernet can greatly improve network response times as well as significantly speed up ...saved. Not only can be created, but with a tenfold increase in the same amount of time. 802.1P and QoS The DGS-1024D and DGS-1016D Switches support 802.1p priority queuing Quality of using 802.1p priority queuing are able to perform 10 times the number of operations in ...

Product Manual
Page 13
...follows: • Priority 0 is assigned to the Switch's Q1 queue. • Priority 1 is assigned to the Switch's Q0 queue. • Priority 2 is assigned to the Switch's Q0 queue. • Priority 3 is assigned to the Switch's Q1 queue. • Priority 4 is assigned to the Switch's Q2 queue. • Priority 5 is assigned...mapped to and assigned a priority. These priority queues are mapped to examine the header of the four priority queues on the Switch The picture above shows the default priority setting for 802.1p QoS. In order to implement QoS, the user is implemented on priority....
...follows: • Priority 0 is assigned to the Switch's Q1 queue. • Priority 1 is assigned to the Switch's Q0 queue. • Priority 2 is assigned to the Switch's Q0 queue. • Priority 3 is assigned to the Switch's Q1 queue. • Priority 4 is assigned to the Switch's Q2 queue. • Priority 5 is assigned...mapped to and assigned a priority. These priority queues are mapped to examine the header of the four priority queues on the Switch The picture above shows the default priority setting for 802.1p QoS. In order to implement QoS, the user is implemented on priority....

Product Manual
Page 14
• Priority 7 is assigned to the Switch's Q3 queue. Strict priority-based scheduling, any packets residing in the higher priority queues are transmitted first. 14 The Switch uses strict priority for Scheduling.
• Priority 7 is assigned to the Switch's Q3 queue. Strict priority-based scheduling, any packets residing in the higher priority queues are transmitted first. 14 The Switch uses strict priority for Scheduling.
Product Manual
Page 15
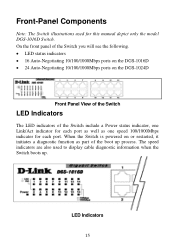
...The speed indicators are also used for each port. On the front panel of the Switch you will see the following. • LED status indicators • 16 Auto-Negotiating 10/100/1000Mbps ports on the DGS-1016D • 24 Auto-Negotiating 10/100/1000Mbps ports on or restarted, it initiates ...a diagnostic function as one speed 100/1000Mbps indicator for each port as well as part of the Switch include a Power status indicator, one Link/Act indicator for this manual ...
...The speed indicators are also used for each port. On the front panel of the Switch you will see the following. • LED status indicators • 16 Auto-Negotiating 10/100/1000Mbps ports on the DGS-1016D • 24 Auto-Negotiating 10/100/1000Mbps ports on or restarted, it initiates ...a diagnostic function as one speed 100/1000Mbps indicator for each port as well as part of the Switch include a Power status indicator, one Link/Act indicator for this manual ...

Product Manual
Page 16
...fault is checked for each port blinks green in sequential order. The entire Cable Diagnostic process takes about 10 seconds from the time the Switch is a fault in the cable or connecting hardware. The faults detected by the cable diagnostic for each of the eight wires of a... table below summarizes Cable Diagnostic information. If there are problems on a port connected to a Gigabit Ethernet device (1000Mbps), try restarting the Switch and watch the speed (100/1000Mbps) LED indicators to 1000Mbps devices. During the diagnostic process the speed LED for 1000Mbps operation are connected to...
...fault is checked for each port blinks green in sequential order. The entire Cable Diagnostic process takes about 10 seconds from the time the Switch is a fault in the cable or connecting hardware. The faults detected by the cable diagnostic for each of the eight wires of a... table below summarizes Cable Diagnostic information. If there are problems on a port connected to a Gigabit Ethernet device (1000Mbps), try restarting the Switch and watch the speed (100/1000Mbps) LED indicators to 1000Mbps devices. During the diagnostic process the speed LED for 1000Mbps operation are connected to...

Product Manual
Page 17
... Description This lights green while the Switch is established. This will blink green when there is activity on the port. 100Mbps/1000Mbps The speed indicator will light green if the corresponding port is operating at 10Mbps. If the port is connected (as indicated by the Link/Act indicator) and the speed indicator...
... Description This lights green while the Switch is established. This will blink green when there is activity on the port. 100Mbps/1000Mbps The speed indicator will light green if the corresponding port is operating at 10Mbps. If the port is connected (as indicated by the Link/Act indicator) and the speed indicator...

Product Manual
Page 18
The AC power connector is provided by and internal universal power supply (100-240VAC : 12V/3.3A). Please see the Power On section below for instructions on the rear panel of the Switch Switch power input is a standard three-pronged connector that supports the power cord. Power Input on Rear Panel The power cable connection is located on how to properly connect the Switch to a power source. 18 Rear panel view of the Switch.
The AC power connector is provided by and internal universal power supply (100-240VAC : 12V/3.3A). Please see the Power On section below for instructions on the rear panel of the Switch Switch power input is a standard three-pronged connector that supports the power cord. Power Input on Rear Panel The power cable connection is located on how to properly connect the Switch to a power source. 18 Rear panel view of the Switch.

Product Manual
Page 19
The carton should contain the following items: • One DGS-1016D 16-Port/DGS-1024D 24-Port 10/100/1000BASE-T Gigabit Ethernet Switch • Four rubber feet with adhesive backing • One power Cord • Mounting ears for rack-mounting • This manual If any item is found missing or damaged, please contact your local D-Link reseller for replacement. 19 SECTION 2 Installation Package Contents Before You Connect to the Network Installing the Switch Power On Package Contents Open the shipping carton of the Switch and carefully unpack its contents.
The carton should contain the following items: • One DGS-1016D 16-Port/DGS-1024D 24-Port 10/100/1000BASE-T Gigabit Ethernet Switch • Four rubber feet with adhesive backing • One power Cord • Mounting ears for rack-mounting • This manual If any item is found missing or damaged, please contact your local D-Link reseller for replacement. 19 SECTION 2 Installation Package Contents Before You Connect to the Network Installing the Switch Power On Package Contents Open the shipping carton of the Switch and carefully unpack its contents.

Product Manual
Page 20
...site free from strong electromagnetic field generators (such as motors), vibration, dust, and direct exposure to the Network The site where you install the Switch may greatly affect its performance. Do not place heavy objects on a level surface, attach the rubber feet to the bottom of the device. Leave... is fully secured to the AC power port. • Make sure that can support at the front and rear of the Switch for ventilation. • Install the Switch in a fairly cool and dry place for proper heat dissipation from scratching other surfaces. 20 Before You Connect to sunlight. •...
...site free from strong electromagnetic field generators (such as motors), vibration, dust, and direct exposure to the Network The site where you install the Switch may greatly affect its performance. Do not place heavy objects on a level surface, attach the rubber feet to the bottom of the device. Leave... is fully secured to the AC power port. • Make sure that can support at the front and rear of the Switch for ventilation. • Install the Switch in a fairly cool and dry place for proper heat dissipation from scratching other surfaces. 20 Before You Connect to sunlight. •...

Product Manual
Page 21
Mounting the Switch on a Rack The DGS-1016D/1024D can easily be mounted on the side of the device. 2. Two mounting ears are provided for rack-mountable products 21 Make sure that the front panel is exposed in order to a Rack 1. Attach the ears to the rack as shown. Please follow the usual safety precautions for this purpose. Please refer to the following illustrations: Mounting the Switch to view the LEDs. Firmly attach the ears to each side of the Switch, using the screw-holes located on a rack.
Mounting the Switch on a Rack The DGS-1016D/1024D can easily be mounted on the side of the device. 2. Two mounting ears are provided for rack-mountable products 21 Make sure that the front panel is exposed in order to a Rack 1. Attach the ears to the rack as shown. Please follow the usual safety precautions for this purpose. Please refer to the following illustrations: Mounting the Switch to view the LEDs. Firmly attach the ears to each side of the Switch, using the screw-holes located on a rack.


