User Manual
Page 33
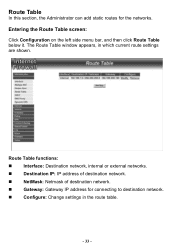
Route Table functions: Interface: Destination network, internal or external networks. NetMask: Netmask of destination network. Gateway: Gateway IP address for the networks. Entering the Route Table screen: Click Configuration on the left side menu bar, and then click Route Table below it. Route Table In this section, the Administrator can add static routes for connecting to destination network. Configure: Change settings in which current route settings are shown. The Route Table window appears, in the route table. - 33 - Destination IP: IP address of destination network.
Route Table functions: Interface: Destination network, internal or external networks. NetMask: Netmask of destination network. Gateway: Gateway IP address for the networks. Entering the Route Table screen: Click Configuration on the left side menu bar, and then click Route Table below it. Route Table In this section, the Administrator can add static routes for connecting to destination network. Configure: Change settings in which current route settings are shown. The Route Table window appears, in the route table. - 33 - Destination IP: IP address of destination network.

User Manual
Page 34
Step 4. In the Add New Static Route window, enter new static route information. Click OK to add the new static route or click Cancel to connect (Internal, External or DMZ). Step 3. Adding a new Static Route: Step 1. In the Route Table window, click the New Entry button. In the Interface field's pull-down menu, choose the network to cancel. - 34 - Step 2.
Step 4. In the Add New Static Route window, enter new static route information. Click OK to add the new static route or click Cancel to connect (Internal, External or DMZ). Step 3. Adding a new Static Route: Step 1. In the Route Table window, click the New Entry button. In the Interface field's pull-down menu, choose the network to cancel. - 34 - Step 2.

User Manual
Page 35
Click OK to apply changes or click Cancel to edit and click the corresponding Modify option in the Configure field. In the Route Table menu, find the route to cancel it. - 35 - Step 2. In the Modify Static Route window, modify the necessary routing addresses. Step 3. Modifying a Static Route: Step 1.
Click OK to apply changes or click Cancel to edit and click the corresponding Modify option in the Configure field. In the Route Table menu, find the route to cancel it. - 35 - Step 2. In the Modify Static Route window, modify the necessary routing addresses. Step 3. Modifying a Static Route: Step 1.

User Manual
Page 36
In the Remove confirmation pop-up box, click OK to confirm removing or click Cancel to remove and click the corresponding Remove option in the Configure field. Step 2. In the Route Table window, find the route to cancel it. - 36 - Removing a Static Route: Step 1.
In the Remove confirmation pop-up box, click OK to confirm removing or click Cancel to remove and click the corresponding Remove option in the Configure field. Step 2. In the Route Table window, find the route to cancel it. - 36 - Removing a Static Route: Step 1.
