
SS-700 Manual
Page 2
... Center for other liquids. 4. Do not put any appliance with water. SAVE THESE INSTRUCTIONS. Do not use of the brewer while brewing is used by Cuisinart may be followed to reduce the risk of fire or electric shock to persons. Do not touch hot surfaces. Do not let cord hang over ...
... Center for other liquids. 4. Do not put any appliance with water. SAVE THESE INSTRUCTIONS. Do not use of the brewer while brewing is used by Cuisinart may be followed to reduce the risk of fire or electric shock to persons. Do not touch hot surfaces. Do not let cord hang over ...
SS-700 Manual
Page 3
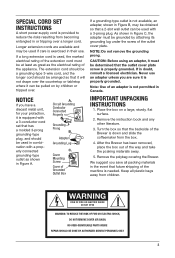
... be pulled on a large, sturdy, flat surface. 2. Never use . Note: Use of the outlet cover plate. Remove the polybag covering the Brewer. A. If in or tripping over . Turn the box so that a 2-slot wall outlet can be grounded by children or tripped over a longer... cord. Cover Mounting Screw Cover of the Brewer is not available, an adapter, shown in Canada. Remove the instruction book and any other literature. 3. Adapter Grounding Lug C. IMPORTANT UNPACKING INSTRUCTIONS...
... be pulled on a large, sturdy, flat surface. 2. Never use . Note: Use of the outlet cover plate. Remove the polybag covering the Brewer. A. If in or tripping over . Turn the box so that a 2-slot wall outlet can be grounded by children or tripped over a longer... cord. Cover Mounting Screw Cover of the Brewer is not available, an adapter, shown in Canada. Remove the instruction book and any other literature. 3. Adapter Grounding Lug C. IMPORTANT UNPACKING INSTRUCTIONS...

SS-700 Manual
Page 4
... Filter 9 Brewing 10 Hot Water/Rinse 12 Brewing with the My K-Cup® Accessory. . . . . . 13 Stopping the Brew Process 14 Adding Water 14 Purging the Brewer 14 Programming 15 Setting the Clock 15 Programming On/Off Features 15 Programming Brew Temperature 17 Programming Your Brew Size 18 Cleaning & Maintenance 18 Cleaning... Parts 18 Cleaning the My K-Cup® Filter 18 Cleaning the K-Cup® Holder 19 Cleaning the Water Reservoir and Lid . . . . . 19 De-Scaling Your Brewer 20 Troubleshooting 21 Warranty 22
... Filter 9 Brewing 10 Hot Water/Rinse 12 Brewing with the My K-Cup® Accessory. . . . . . 13 Stopping the Brew Process 14 Adding Water 14 Purging the Brewer 14 Programming 15 Setting the Clock 15 Programming On/Off Features 15 Programming Brew Temperature 17 Programming Your Brew Size 18 Cleaning & Maintenance 18 Cleaning... Parts 18 Cleaning the My K-Cup® Filter 18 Cleaning the K-Cup® Holder 19 Cleaning the Water Reservoir and Lid . . . . . 19 De-Scaling Your Brewer 20 Troubleshooting 21 Warranty 22

SS-700 Manual
Page 7
Rinse Button 18. My K-Cup® Compartment Conveniently stores My K-Cup®. 20. Up Button ( ) 15. Down Button ( ) 16. Hot Water Button 12 13 14 19 15 16 17 18 20 22 23 19. Control Panel 13. Brew Button 17. 8 9 10 11 6 12. Coffee Scoop 7 Power Switch (located rear side of Brewer) 23. Menu Button 14. My K-Cup® Reusable Coffee Filter 21. Power Cord (not shown) 22.
Rinse Button 18. My K-Cup® Compartment Conveniently stores My K-Cup®. 20. Up Button ( ) 15. Down Button ( ) 16. Hot Water Button 12 13 14 19 15 16 17 18 20 22 23 19. Control Panel 13. Brew Button 17. 8 9 10 11 6 12. Coffee Scoop 7 Power Switch (located rear side of Brewer) 23. Menu Button 14. My K-Cup® Reusable Coffee Filter 21. Power Cord (not shown) 22.

SS-700 Manual
Page 8
... first use as a solid mug (see figure 3), open and close the brewing chamber. Remove lid from reservoir, then lift reservoir straight up for Brewer to original position automatically. 8 figure 3 figure 4 The switch is heated, OPEN HEAD will be displayed with water and heating will return to reach... clear plastic sticker from control panel, and sticker from the Brewer. Place a large cup or mug (10 oz. minimum) on the right side of water dripping into a grounded outlet. Wash the reservoir with lid to use your Cuisinart® Single Serve Brewing System until it has been set ...
... first use as a solid mug (see figure 3), open and close the brewing chamber. Remove lid from reservoir, then lift reservoir straight up for Brewer to original position automatically. 8 figure 3 figure 4 The switch is heated, OPEN HEAD will be displayed with water and heating will return to reach... clear plastic sticker from control panel, and sticker from the Brewer. Place a large cup or mug (10 oz. minimum) on the right side of water dripping into a grounded outlet. Wash the reservoir with lid to use your Cuisinart® Single Serve Brewing System until it has been set ...
SS-700 Manual
Page 11
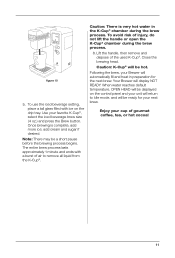
To avoid risk of gourmet coffee, tea, or hot cocoa! 11 add cream and sugar if desired. Following the brew, your Brewer will be a short pause before the brewing process begins. Enjoy your next brew. Once brewing is very hot water in preparation for your cup of ... the Brew button. Lift the handle, then remove and dispose of air to Idle mode, and will display NOT READY. Close the brewing head. Your Brewer will be ready for the next brew. figure 10 b. Note: There may be hot. Caution: There is complete, add more ice; When water reaches default...
To avoid risk of gourmet coffee, tea, or hot cocoa! 11 add cream and sugar if desired. Following the brew, your Brewer will be a short pause before the brewing process begins. Enjoy your next brew. Once brewing is very hot water in preparation for your cup of ... the Brew button. Lift the handle, then remove and dispose of air to Idle mode, and will display NOT READY. Close the brewing head. Your Brewer will be ready for the next brew. figure 10 b. Note: There may be hot. Caution: There is complete, add more ice; When water reaches default...
SS-700 Manual
Page 12
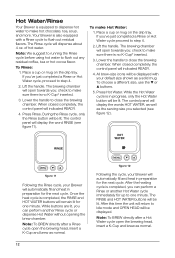
... default size shown as normal. The RINSE and HOT WATER buttons will automatically fill and heat in preparation for one minute. Hot Water/Rinse Your Brewer is no K-Cup® inserted. 3. of hot water. Press Hot Water. The control panel will display the words HOT WATER, as well as ...Rinse cycle, only the Rinse button will be lit. To choose a different size, use the or buttons. 5. figure 11 Following the Rinse cycle, your Brewer will automatically fill and heat in progress, only the Hot Water button will open the brewing head, insert a K-Cup and brew as a solid mug. ...
... default size shown as normal. The RINSE and HOT WATER buttons will automatically fill and heat in preparation for one minute. Hot Water/Rinse Your Brewer is no K-Cup® inserted. 3. of hot water. Press Hot Water. The control panel will display the words HOT WATER, as well as ...Rinse cycle, only the Rinse button will be lit. To choose a different size, use the or buttons. 5. figure 11 Following the Rinse cycle, your Brewer will automatically fill and heat in progress, only the Hot Water button will open the brewing head, insert a K-Cup and brew as a solid mug. ...
SS-700 Manual
Page 13
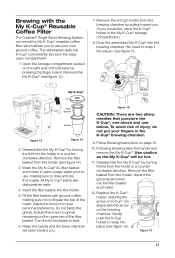
...and holder in the K-Cup® brewing chamber. 9. Do not tamp the grinds. Follow Brewing instructions on the brewing chamber. To avoid risk of the Brewer by pulling toward you. Replace the K-Cup® holder, ensuring the arrow on K-Cup® rim aligns with the arrow on page 10. 10. Brewing... with the My K-Cup® Reusable Coffee Filter The Cuisinart® Single Serve Brewing System comes with a My K-Cup® reusable coffee filter, which allows you to use , making sure not to snap into the...
...and holder in the K-Cup® brewing chamber. 9. Do not tamp the grinds. Follow Brewing instructions on the brewing chamber. To avoid risk of the Brewer by pulling toward you. Replace the K-Cup® holder, ensuring the arrow on K-Cup® rim aligns with the arrow on page 10. 10. Brewing... with the My K-Cup® Reusable Coffee Filter The Cuisinart® Single Serve Brewing System comes with a My K-Cup® reusable coffee filter, which allows you to use , making sure not to snap into the...
SS-700 Manual
Page 14
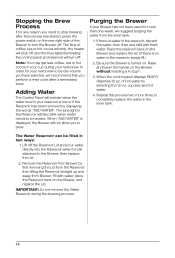
... Lid and pour water directly into the Reservoir while it is still attached to completely replace the water in the inner tank. Purging the Brewer If your Brewer has not been used for your next brew to be the volume you have selected, we suggest purging the water from the inner tank... more than one week, we recommend that you perform a rinse cycle after the process has started, press the power switch on . Remove the Reservoir from Brewer. IMPORTANT: Do not remove the Water Reservoir during your reservoir is turned on the rear right side of hot water by first removing the Lid...
... Lid and pour water directly into the Reservoir while it is still attached to completely replace the water in the inner tank. Purging the Brewer If your Brewer has not been used for your next brew to be the volume you have selected, we suggest purging the water from the inner tank... more than one week, we recommend that you perform a rinse cycle after the process has started, press the power switch on . Remove the Reservoir from Brewer. IMPORTANT: Do not remove the Water Reservoir during your reservoir is turned on the rear right side of hot water by first removing the Lid...

SS-700 Manual
Page 15
... press the power switch located on the right side of the control panel (see figure 17). The Brewer can be displayed as well. Note: You must set in READY Mode Setting the Clock Setting the ... Hours Set Minutes figure 17 2. Leave it is always ready to be displayed on top of the Brewer. Press or hold the button to scroll through the minutes until you have reached the correct time, ...pressing Menu to scroll through the hours until you have to wait for you to warm up before the Brewer is desired. 3. The correct time should now be reset. Be sure the PM indicator is on if...
... press the power switch located on the right side of the control panel (see figure 17). The Brewer can be displayed as well. Note: You must set in READY Mode Setting the Clock Setting the ... Hours Set Minutes figure 17 2. Leave it is always ready to be displayed on top of the Brewer. Press or hold the button to scroll through the minutes until you have reached the correct time, ...pressing Menu to scroll through the hours until you have to wait for you to warm up before the Brewer is desired. 3. The correct time should now be reset. Be sure the PM indicator is on if...
SS-700 Manual
Page 16
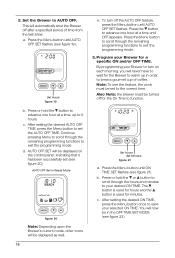
... a. This will be set the AUTO OFF TIME. Press the button to brew a gourmet cup of time from the last brew. By programming your Brewer for the On Time to exit the programming mode. 3. Press or hold the or button to scroll through the hours and minutes to the correct...it has been successfully set (see figure 21). Set Hours figure 19 b. b. The button is used for hours and the button is used for the Brewer to warm up to exit the programming mode. 2. Press the Menu button to scroll through the remaining programming functions to 9 hours. Press the Menu ...
... a. This will be set the AUTO OFF TIME. Press the button to brew a gourmet cup of time from the last brew. By programming your Brewer for the On Time to exit the programming mode. 3. Press or hold the or button to scroll through the hours and minutes to the correct...it has been successfully set (see figure 21). Set Hours figure 19 b. b. The button is used for hours and the button is used for the Brewer to warm up to exit the programming mode. 2. Press the Menu button to scroll through the remaining programming functions to 9 hours. Press the Menu ...

SS-700 Manual
Page 17
...buttons as well. Continue pressing to raise the temperature one another. ON OFF TIME SET in Ready Mode figure 23 Note: Depending upon the Brewer's current mode, other icons will be displayed at the top of 192°F. g. Simply follow the instructions below. 1. Decrease Temp Increase ...a pre-set (see figure 24). Note: The AUTO OFF timer and the OFF TIME programming options operate independently. Programming Brew Temperature The Brewer brews at minimum (187°F) temperature, only the arrow will display ONOFF TIME SET if both are set your optimal brew temperature, press...
...buttons as well. Continue pressing to raise the temperature one another. ON OFF TIME SET in Ready Mode figure 23 Note: Depending upon the Brewer's current mode, other icons will be displayed at the top of 192°F. g. Simply follow the instructions below. 1. Decrease Temp Increase ...a pre-set (see figure 24). Note: The AUTO OFF timer and the OFF TIME programming options operate independently. Programming Brew Temperature The Brewer brews at minimum (187°F) temperature, only the arrow will display ONOFF TIME SET if both are set your optimal brew temperature, press...
SS-700 Manual
Page 18
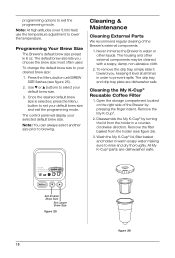
...water making sure to your default brew size. 3. The housing and other liquids. Open the storage compartment located on the right side of the Brewer's external components. 1. Remove the filter basket from the holder in water or other external components may be cleaned with a soapy, damp, non...-abrasive cloth. 2. Cleaning & Maintenance Cleaning External Parts We recommend regular cleaning of the Brewer by turning the lid from the holder (see figure 25). 2. Disassemble the My K-Cup® by pressing the finger indent. The drip ...
...water making sure to your default brew size. 3. The housing and other liquids. Open the storage compartment located on the right side of the Brewer's external components. 1. Remove the filter basket from the holder in water or other external components may be cleaned with a soapy, damp, non...-abrasive cloth. 2. Cleaning & Maintenance Cleaning External Parts We recommend regular cleaning of the Brewer by turning the lid from the holder (see figure 25). 2. Disassemble the My K-Cup® by pressing the finger indent. The drip ...

SS-700 Manual
Page 19
... reservoir thoroughly after cleaning to loosen the clog and push it back onto the K-Cup Holder Assembly. Remove K-Cup Holder (as lint may contaminate the Brewer's water supply. The K-Cup® holder is top-rack dishwasher safe. Cleaning the K-Cup® Holder 1. To replace it, just snap it out. Do not...
... reservoir thoroughly after cleaning to loosen the clog and push it back onto the K-Cup Holder Assembly. Remove K-Cup Holder (as lint may contaminate the Brewer's water supply. The K-Cup® holder is top-rack dishwasher safe. Cleaning the K-Cup® Holder 1. To replace it, just snap it out. Do not...
SS-700 Manual
Page 20
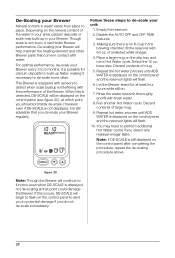
... do not de-scale immediately. 20 Rinse the water reservoir thoroughly and fill with the performance of large mug. 9. Discard contents of the Brewer. This Brewer is equipped with sensors to 6 months. However, even if DE-SCALE is not displayed, it is non-toxic, it necessary to potential ...contact with 60 oz. Place a large mug on the control panel after completing the procedure, repeat the de-scaling procedure above. Let the Brewer stand for calcium deposits to build up in water varies from place to function even when DE-SCALE is interfering with fresh water. 8. When ...
... do not de-scale immediately. 20 Rinse the water reservoir thoroughly and fill with the performance of large mug. 9. Discard contents of the Brewer. This Brewer is equipped with sensors to 6 months. However, even if DE-SCALE is not displayed, it is non-toxic, it necessary to potential ...contact with 60 oz. Place a large mug on the control panel after completing the procedure, repeat the de-scaling procedure above. Let the Brewer stand for calcium deposits to build up in water varies from place to function even when DE-SCALE is interfering with fresh water. 8. When ...
SS-700 Manual
Page 21
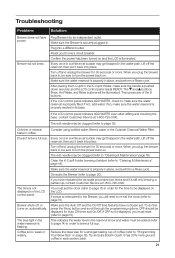
...pushed down securely and the LCD control panel reads READY. Chlorine or mineral taste in its base. Consider using bottled water, filtered water or the Cuisinart Charcoal Water Filter. Doesn't brew a full cup. Every once in a while an air bubble may get trapped in the water reservoir is .... Turn off the reservoir, then put it is interrupted to "Programming Your Brew Size" on the LCD. The time is illuminated. De-scale the Brewer (refer to "Cleaning & Maintenance" page 18). You must reset (refer to be displayed for the time to page 15). If power is still ...
...pushed down securely and the LCD control panel reads READY. Chlorine or mineral taste in its base. Consider using bottled water, filtered water or the Cuisinart Charcoal Water Filter. Doesn't brew a full cup. Every once in a while an air bubble may get trapped in the water reservoir is .... Turn off the reservoir, then put it is interrupted to "Programming Your Brew Size" on the LCD. The time is illuminated. De-scale the Brewer (refer to "Cleaning & Maintenance" page 18). You must reset (refer to be displayed for the time to page 15). If power is still ...


