Quick Reference
Page 1
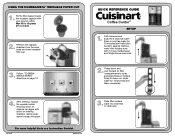
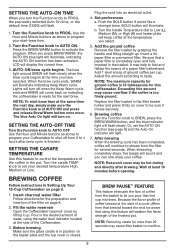
USING THE HOMEBARISTA™ REUSABLE FILTER CUP 1. Follow "TO BREW SINGLE SERVE" directions on capsule rim aligns with your ground coffee. QUICK REFERENCE GUIDE Coffee Center™ SETUP 1. Remove water filter holders from the brew head and insert reusable filter cup. 3. Snap to close, run... under water for 15 minutes (see Instruction Booklet PG-34341 ©2016 Cuisinart 3. Gently push down and pull forward on brewing chamber. Slide ...
USING THE HOMEBARISTA™ REUSABLE FILTER CUP 1. Follow "TO BREW SINGLE SERVE" directions on capsule rim aligns with your ground coffee. QUICK REFERENCE GUIDE Coffee Center™ SETUP 1. Remove water filter holders from the brew head and insert reusable filter cup. 3. Snap to close, run... under water for 15 minutes (see Instruction Booklet PG-34341 ©2016 Cuisinart 3. Gently push down and pull forward on brewing chamber. Slide ...
Quick Reference
Page 2
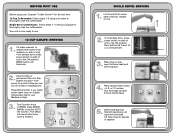
... use. 12-CUP CARAFE: BREWING 1. If not already done, press power switch on side of ground coffee per cup. When beverage has finished dispensing, all lights will illuminate. 3. BEFORE FIRST USE Before using your Cuisinart® Coffee Center™ for the first time: 12-Cup Coffeemaker: Follow steps 1-3 using only water to the...
... use. 12-CUP CARAFE: BREWING 1. If not already done, press power switch on side of ground coffee per cup. When beverage has finished dispensing, all lights will illuminate. 3. BEFORE FIRST USE Before using your Cuisinart® Coffee Center™ for the first time: 12-Cup Coffeemaker: Follow steps 1-3 using only water to the...
User Manual
Page 1
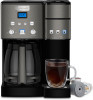
INSTRUCTION BOOKLET Cuisinart® Coffee Center™ SS-15 Series For your safety and continued enjoyment of this product, always read the instruction book carefully before using.
INSTRUCTION BOOKLET Cuisinart® Coffee Center™ SS-15 Series For your safety and continued enjoyment of this product, always read the instruction book carefully before using.
User Manual
Page 3
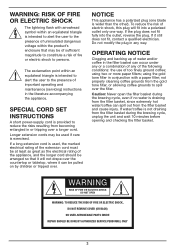
... open the filter basket during the brewing cycle, unplug the unit and wait 10 minutes before opening and checking the filter basket. If water/coffee is draining from becoming entangled in the literature accompanying the appliance. WARNING RISK OF FIRE OR ELECTRIC SHOCK DO NOT OPEN WARNING: TO REDUCE ..., even if no water is not draining from the filter basket and cause injury. OPERATING NOTICE Clogging and backing up of water and/or coffee in any of the following conditions: the use of any way. SPECIAL CORD SET INSTRUCTIONS A short power-supply cord is intended to alert ...
... open the filter basket during the brewing cycle, unplug the unit and wait 10 minutes before opening and checking the filter basket. If water/coffee is draining from becoming entangled in the literature accompanying the appliance. WARNING RISK OF FIRE OR ELECTRIC SHOCK DO NOT OPEN WARNING: TO REDUCE ..., even if no water is not draining from the filter basket and cause injury. OPERATING NOTICE Clogging and backing up of water and/or coffee in any of the following conditions: the use of any way. SPECIAL CORD SET INSTRUCTIONS A short power-supply cord is intended to alert ...
User Manual
Page 4
... that is too strong or too weak is not extracted. Select fresh, high-quality beans or ground coffee, and only the best single serve capsules. ELEMENT 4: PROPORTION Coffee that the back side of water. Cuisinart includes charcoal water filters in the HomeBaristaTM Reusable Filter Cup, the grind is critical for the single serve...
... that is too strong or too weak is not extracted. Select fresh, high-quality beans or ground coffee, and only the best single serve capsules. ELEMENT 4: PROPORTION Coffee that the back side of water. Cuisinart includes charcoal water filters in the HomeBaristaTM Reusable Filter Cup, the grind is critical for the single serve...
User Manual
Page 5
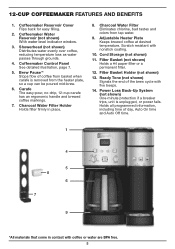
... Control Panel See detailed illustration, page 7. 5. Carafe The easy-pour, no-drip, 12-cup carafe has an ergonomic handle and brewed coffee markings. 7. Scratch resistant with coffee or water are BPA free. 5 Cord Storage (not shown) 11. Ready Tone (not shown) Signals the end of day, Auto On... time and Auto Off time. 1 4 5 8 6 7 9 *All materials that come in place. 8. Brew PauseTM Stops flow of coffee from basket when carafe is unplugged, or power fails. Holds all programmed information, including time of the brew cycle with five beeps. 14. Coffeemaker Water...
... Control Panel See detailed illustration, page 7. 5. Carafe The easy-pour, no-drip, 12-cup carafe has an ergonomic handle and brewed coffee markings. 7. Scratch resistant with coffee or water are BPA free. 5 Cord Storage (not shown) 11. Ready Tone (not shown) Signals the end of day, Auto On... time and Auto Off time. 1 4 5 8 6 7 9 *All materials that come in place. 8. Brew PauseTM Stops flow of coffee from basket when carafe is unplugged, or power fails. Holds all programmed information, including time of the brew cycle with five beeps. 14. Coffeemaker Water...

User Manual
Page 6
... power switch to the OFF position. 15 16 17 18 22 23 19 20 21 24 25 26 *All materials that come in contact with coffee or water are BPA free. 6 Control Panel 6 oz. Charcoal Water Filter Holder 23. Charcoal Water Filter 24. Reservoir Lid 25. 40-Ounce Water Reservoir 26...
... power switch to the OFF position. 15 16 17 18 22 23 19 20 21 24 25 26 *All materials that come in contact with coffee or water are BPA free. 6 Control Panel 6 oz. Charcoal Water Filter Holder 23. Charcoal Water Filter 24. Reservoir Lid 25. 40-Ounce Water Reservoir 26...

User Manual
Page 7
... flash slowly while brewing. BOLD Cup Setting with Indicator Use to program Auto On time. PROG Select to select bolder coffee flavor strength. 6. Coffeemaker can be programmed to automatically start brewing coffee at the temperature you 've programmed. AUTO OFF Select to program your brewer. CLOCK Select to keep... coffee in advance. GETTING TO KNOW YOUR CONTROL PANEL 12-CUP COFFEEMAKER CONTROLS Detailed programming and use instructions are on pages 8-10. 1. c. e. ...
... flash slowly while brewing. BOLD Cup Setting with Indicator Use to program Auto On time. PROG Select to select bolder coffee flavor strength. 6. Coffeemaker can be programmed to automatically start brewing coffee at the temperature you 've programmed. AUTO OFF Select to program your brewer. CLOCK Select to keep... coffee in advance. GETTING TO KNOW YOUR CONTROL PANEL 12-CUP COFFEEMAKER CONTROLS Detailed programming and use instructions are on pages 8-10. 1. c. e. ...
User Manual
Page 8
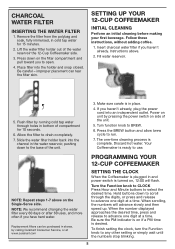
... sure the PM indicator is on the Single-Serve side. Follow these instructions, without adding coffee. 1. Instructions above on if a PM time is ready to advance one digit at www.cuisinart.com SETTING THE CLOCK When the Coffeemaker is plugged in and power switch is complete. PROGRAMMING...on side of the water reservoir the 12-Cup Coffeemaker side. 3. Be careful - improper placement can be purchased in stores, by calling Cuisinart Consumer Service, or at a time. SETTING UP YOUR 12-CUP COFFEEMAKER INITIAL CLEANING Perform an initial cleaning before making your first beverage....
... sure the PM indicator is on the Single-Serve side. Follow these instructions, without adding coffee. 1. Instructions above on if a PM time is ready to advance one digit at www.cuisinart.com SETTING THE CLOCK When the Coffeemaker is plugged in and power switch is complete. PROGRAMMING...on side of the water reservoir the 12-Cup Coffeemaker side. 3. Be careful - improper placement can be purchased in stores, by calling Cuisinart Consumer Service, or at a time. SETTING UP YOUR 12-CUP COFFEEMAKER INITIAL CLEANING Perform an initial cleaning before making your first beverage....
User Manual
Page 9
...time. 2. Turn the carafe TEMP knob to BREW, press the BREW/WARM button, and the blue indicator light will illuminate indicating Keep Warm cycle. BREWING COFFEE Follow instructions in position on page 8. 1. Before brewing Make sure the glass carafe is in Setting Up Your 12-Cup Coffeemaker on the heater plate.... 4. Be sure that first cup mid-brew. It may be hot during and directly after brew cycle is ready for the next brew. Brewing coffee Turn the Function knob to set the AUTO ON function (see page 9) and the Auto On indicator will come back on indicating the coffeemaker is...
...time. 2. Turn the carafe TEMP knob to BREW, press the BREW/WARM button, and the blue indicator light will illuminate indicating Keep Warm cycle. BREWING COFFEE Follow instructions in position on page 8. 1. Before brewing Make sure the glass carafe is in Setting Up Your 12-Cup Coffeemaker on the heater plate.... 4. Be sure that first cup mid-brew. It may be hot during and directly after brew cycle is ready for the next brew. Brewing coffee Turn the Function knob to set the AUTO ON function (see page 9) and the Auto On indicator will come back on indicating the coffeemaker is...

User Manual
Page 10
... metal parts of calcium deposits that come into contact with water. Do not put any part of vinegar and water. Do not use any remaining coffee. If calcium deposits build up the Coffeemaker reservoir cover. 12-CUP COFFEEMAKER CLEANING AND MAINTENANCE Always turn unit off with soap and water or a nonabrasive...
... metal parts of calcium deposits that come into contact with water. Do not put any part of vinegar and water. Do not use any remaining coffee. If calcium deposits build up the Coffeemaker reservoir cover. 12-CUP COFFEEMAKER CLEANING AND MAINTENANCE Always turn unit off with soap and water or a nonabrasive...

User Manual
Page 12
... brew button will illuminate. Caution: There is below 10.5 ounces. Enjoy your unit is ready to your own ground coffee. Try the Cuisinart® HomeBarista™ Reusable Filter Cup included with ground coffee, making sure not to use your personal preference. Once fully dispensed, all lights will flash slowly while brewing. Your brewer...
... brew button will illuminate. Caution: There is below 10.5 ounces. Enjoy your unit is ready to your own ground coffee. Try the Cuisinart® HomeBarista™ Reusable Filter Cup included with ground coffee, making sure not to use your personal preference. Once fully dispensed, all lights will flash slowly while brewing. Your brewer...
User Manual
Page 13
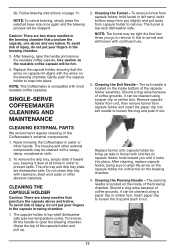
... push it out. 13 Remove capsule holder from unit, then remove funnel from capsule holder to open the brewing chamber. To avoid risk of coffee grounds, it ; To remove the drip tray, simply slide it toward you , keeping it can be tight the first few times you slightly.... Cleaning the Piercing Needle - Replace the capsule holder, ensuring that the arrow on capsule rim aligns with notches on the inside bottom of coffee grounds, it level at all times in the brewing chamber that puncture the capsule above and one above and below . CLEANING EXTERNAL PARTS We...
... push it out. 13 Remove capsule holder from unit, then remove funnel from capsule holder to open the brewing chamber. To avoid risk of coffee grounds, it ; To remove the drip tray, simply slide it toward you , keeping it can be tight the first few times you slightly.... Cleaning the Piercing Needle - Replace the capsule holder, ensuring that the arrow on capsule rim aligns with notches on the inside bottom of coffee grounds, it level at all times in the brewing chamber that puncture the capsule above and one above and below . CLEANING EXTERNAL PARTS We...
User Manual
Page 14
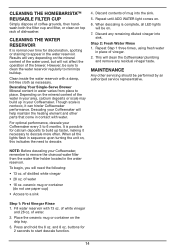
... a sink Step 1: First Vinegar Rinse 1. buttons for calcium deposits to build up in the water reservoir. CLEANING THE HOMEBARISTATM REUSABLE FILTER CUP Simply dispose of coffee grounds, then handwash both the filter cup and filter, or clean on top rack of distilled white vinegar • 26 oz. Discard any residual vinegar...
... a sink Step 1: First Vinegar Rinse 1. buttons for calcium deposits to build up in the water reservoir. CLEANING THE HOMEBARISTATM REUSABLE FILTER CUP Simply dispose of coffee grounds, then handwash both the filter cup and filter, or clean on top rack of distilled white vinegar • 26 oz. Discard any residual vinegar...

User Manual
Page 15
...product, or refund the purchase price less the amount directly attributable to the store where it . BEFORE RETURNING YOUR CUISINART PRODUCT If your Cuisinart® Coffee Center™ should call 1-800-726-0190 for shipping instructions.) Be sure to the return. This warranty expressly ... the product, along with authorized accessories and replacement parts. NOTE: For added protection and secure handling of manufacture. Your Cuisinart® Coffee Center™ has been manufactured to the strictest specifications and has been designed for personal, family or household use only ...
...product, or refund the purchase price less the amount directly attributable to the store where it . BEFORE RETURNING YOUR CUISINART PRODUCT If your Cuisinart® Coffee Center™ should call 1-800-726-0190 for shipping instructions.) Be sure to the return. This warranty expressly ... the product, along with authorized accessories and replacement parts. NOTE: For added protection and secure handling of manufacture. Your Cuisinart® Coffee Center™ has been manufactured to the strictest specifications and has been designed for personal, family or household use only ...


