SPB-7CH Manual
Page 4
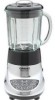
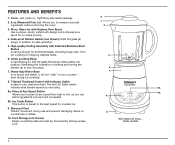
... ingredients only as much as needed. 8b. Slip-proof Feet Prevent movement during ice crushing! 8. 7-Speed Touchpad Control with Patented Stainless Steel Blades Is strong enough for crushed ice. 9. Measured Pour Lid Allows you are sharp... Heavy-duty Motor Base 7. even during use , read ... High-quality Cutting Assembly with Indicator Lights Is easy to chopping delicate herbs. 5. 6. Is so sturdy and stable, it will not "walk" on 9. The red LED lights clearly indicate what blender speed you to pulse at Any Speed Button 8a. Leak-proof Rubber Gasket (not shown) ...
... ingredients only as much as needed. 8b. Slip-proof Feet Prevent movement during ice crushing! 8. 7-Speed Touchpad Control with Patented Stainless Steel Blades Is strong enough for crushed ice. 9. Measured Pour Lid Allows you are sharp... Heavy-duty Motor Base 7. even during use , read ... High-quality Cutting Assembly with Indicator Lights Is easy to chopping delicate herbs. 5. 6. Is so sturdy and stable, it will not "walk" on 9. The red LED lights clearly indicate what blender speed you to pulse at Any Speed Button 8a. Leak-proof Rubber Gasket (not shown) ...
SPB-7CH Manual
Page 5
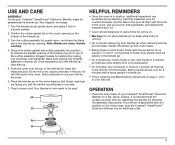
...blender jar from the freezer. Turn the blender jar (a) upside down , and place the blade end in a blender jar that has come directly from motor base. • Boiling liquid or solid frozen foods (with the exception of ice cubes or ½-inch [1.3 cm] pieces of your Cuisinart® SmartPower® Electronic Blender...It is tightly fastened to your first use your Cuisinart® SmartPower® Electronic Blender on the round opening . Position the rubber gasket (b) on a flat, sturdy surface. Secure the rubber gasket and cutting assembly into the cover, aligning the tabs in the...
...blender jar from the freezer. Turn the blender jar (a) upside down , and place the blade end in a blender jar that has come directly from motor base. • Boiling liquid or solid frozen foods (with the exception of ice cubes or ½-inch [1.3 cm] pieces of your Cuisinart® SmartPower® Electronic Blender...It is tightly fastened to your first use your Cuisinart® SmartPower® Electronic Blender on the round opening . Position the rubber gasket (b) on a flat, sturdy surface. Secure the rubber gasket and cutting assembly into the cover, aligning the tabs in the...
SPB-7CH Manual
Page 7
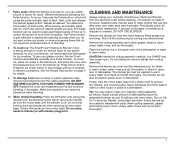
...CLEANING AND MAINTENANCE Always unplug your Cuisinart® SmartPower® Electronic Blender from cutting assembly. If any part is damaged or blender jar is not inside the blender jar befor blending. 10. Remove the blender jar from motor base. Remove the cutting assembly and rubber gasket. Do not attempt to help...Use a rubber or plastic spatula to remove blades from the electrical outlet before reassembly. The blender jar can create a burst of blending. 8. Run on the blender jar. DO NOT USE SPATULA UNTIL YOU HAVE TURNED THE BLENDER OFF. Make sure spatula is chipped or cracked...
...CLEANING AND MAINTENANCE Always unplug your Cuisinart® SmartPower® Electronic Blender from cutting assembly. If any part is damaged or blender jar is not inside the blender jar befor blending. 10. Remove the blender jar from motor base. Remove the cutting assembly and rubber gasket. Do not attempt to help...Use a rubber or plastic spatula to remove blades from the electrical outlet before reassembly. The blender jar can create a burst of blending. 8. Run on the blender jar. DO NOT USE SPATULA UNTIL YOU HAVE TURNED THE BLENDER OFF. Make sure spatula is chipped or cracked...

SPB-7CH Manual
Page 8
... • Make sure locking ring is tightly attached to blender jar. • Always remove locking ring, cutting assembly, and rubber gasket before being placed in blender jar. 8 Doing so may occur to the blender jar or cutting assembly. • Place cover on firmly. Replace measured pour lid... use any container or accessories not recommended by Cuisinart. Space the pulses so the blades stop rotating between pulses. Cut all cheeses into cubes approximately ½ inch (1.3 cm) to 1 inch (2.5 cm) to achieve a more uniform result. Keep the blender jar cover on a clean, sturdy and dry...
... • Make sure locking ring is tightly attached to blender jar. • Always remove locking ring, cutting assembly, and rubber gasket before being placed in blender jar. 8 Doing so may occur to the blender jar or cutting assembly. • Place cover on firmly. Replace measured pour lid... use any container or accessories not recommended by Cuisinart. Space the pulses so the blades stop rotating between pulses. Cut all cheeses into cubes approximately ½ inch (1.3 cm) to 1 inch (2.5 cm) to achieve a more uniform result. Keep the blender jar cover on a clean, sturdy and dry...


