
DLC-1 Manual
Page 3
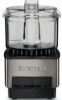
..., basic safety precautions should always be used by Cuisinart may be used, but must be followed including the following: 1. Do not attempt to accomplish any appliance is used only when the food processor is securely locked in the outlet, reverse the ...11 IMPORTANT SAFEGUARDS When using . Be certain cover is not running. 11. Close supervision is sharp. As a safety feature, this safety feature. PG 1 INTRODUCTION PG 1 THE PARTS PG 2 ASSEMBLING THE PARTS......... The Mini- INTRODUCTION The Cuisinart® Mini-Prep® Processor handles a variety of food preparation tasks ...
..., basic safety precautions should always be used by Cuisinart may be used, but must be followed including the following: 1. Do not attempt to accomplish any appliance is used only when the food processor is securely locked in the outlet, reverse the ...11 IMPORTANT SAFEGUARDS When using . Be certain cover is not running. 11. Close supervision is sharp. As a safety feature, this safety feature. PG 1 INTRODUCTION PG 1 THE PARTS PG 2 ASSEMBLING THE PARTS......... The Mini- INTRODUCTION The Cuisinart® Mini-Prep® Processor handles a variety of food preparation tasks ...
DLC-1 Manual
Page 4
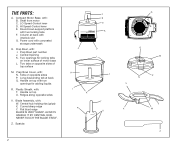
... with : N. Two openings for adding liquids R. THE PARTS: A. Column at back Q. Central Opening K. Prep Bowl Cover, with concealed storage underneath H. Flat blunt edge BLADE IS VERY SHARP. ALWAYS HANDLE IT BY CENTRAL HUB. ...Y X W Z Compact Motor Base, with two locking tabs F. Blade Assembly, with : T. Two tabs on lower surface of top surface M. Spatula 2 MINI PREP PROCESSOR LO HI F B E A C D L H J I . Plastic Sheath, with : W. Central hub holding ribs (grips) X. Z. Prep Bowl, with two openings for locking tabs on opposite sides of motor base L.
... with : N. Two openings for adding liquids R. THE PARTS: A. Column at back Q. Central Opening K. Prep Bowl Cover, with concealed storage underneath H. Flat blunt edge BLADE IS VERY SHARP. ALWAYS HANDLE IT BY CENTRAL HUB. ...Y X W Z Compact Motor Base, with two locking tabs F. Blade Assembly, with : T. Two tabs on lower surface of top surface M. Spatula 2 MINI PREP PROCESSOR LO HI F B E A C D L H J I . Plastic Sheath, with : W. Central hub holding ribs (grips) X. Z. Prep Bowl, with two openings for locking tabs on opposite sides of motor base L.

DLC-1 Manual
Page 6
While holding D. the Motor Base, press the cover onto the Prep Bowl. Place one hand to support the Mini-Prep® during operation. Now press and release the HI SpeedControl Lever. 9. Overloading causes inconsistent results and it MINI PREP PROCESSOR counterclockwise HI LO until the descending tab on the...may have to operate the Mini-Prep® Processor for more consistent results. should not reach more than 10 seconds, use a pulse action every 10 seconds or so to allow food to drop to the powerful motor provided with this unit, Cuisinart recommends using the blunt edge...
While holding D. the Motor Base, press the cover onto the Prep Bowl. Place one hand to support the Mini-Prep® during operation. Now press and release the HI SpeedControl Lever. 9. Overloading causes inconsistent results and it MINI PREP PROCESSOR counterclockwise HI LO until the descending tab on the...may have to operate the Mini-Prep® Processor for more consistent results. should not reach more than 10 seconds, use a pulse action every 10 seconds or so to allow food to drop to the powerful motor provided with this unit, Cuisinart recommends using the blunt edge...

DLC-1 Manual
Page 7
...SpeedControl Lever - Note: Do not operate Mini-Prep® without food contents in the Prep Bowl. Removing Food from the Cuisinart® Customer Service Department, which you.... Remove the contents of the Mini-Prep® Processor. Lock the Cover into the center. Place the Prep Bowl firmly on the top of...cover from the sides of the Sheath. If both openings are blocked, liquid cannot flow smoothly into the bowl. This does not affect the performance of the bowl to support the Mini-Prep® during operation. 4. Never operate the Mini-Prep® continuously for Model DLC...
...SpeedControl Lever - Note: Do not operate Mini-Prep® without food contents in the Prep Bowl. Removing Food from the Cuisinart® Customer Service Department, which you.... Remove the contents of the Mini-Prep® Processor. Lock the Cover into the center. Place the Prep Bowl firmly on the top of...cover from the sides of the Sheath. If both openings are blocked, liquid cannot flow smoothly into the bowl. This does not affect the performance of the bowl to support the Mini-Prep® during operation. 4. Never operate the Mini-Prep® continuously for Model DLC...

DLC-1 Manual
Page 9
... Cuisinart® Service Representative. Avoid leaving it in the cutlery basket. Put the blade and spatula in soapy water where it is securely inserted into outlet. • Check that food won't dry onto them. Wipe the motor base clean with fork. The Mini-Prep® stores neatly on Prep Bowl cover ...dishwasher carefully to press only one time, or the pieces are not small enough. The Mini-Prep® is overprocessed. Cook at HI speed to know which foods are completely puréed, about 3 minutes. cover and simmer until peas are best for HOUSE-HOLD USE ONLY. Insert blade using ....
... Cuisinart® Service Representative. Avoid leaving it in the cutlery basket. Put the blade and spatula in soapy water where it is securely inserted into outlet. • Check that food won't dry onto them. Wipe the motor base clean with fork. The Mini-Prep® stores neatly on Prep Bowl cover ...dishwasher carefully to press only one time, or the pieces are not small enough. The Mini-Prep® is overprocessed. Cook at HI speed to know which foods are completely puréed, about 3 minutes. cover and simmer until peas are best for HOUSE-HOLD USE ONLY. Insert blade using ....

DLC-1 Manual
Page 11
..., about 1 cup (8 ounces, 250 ml). Run machine for about 30 seconds. With machine running at HI speed to one of the recessed areas in the cover so that oil flows through the feed hole in water (3-1/4 ounces, 92g) 1 2 ounce (56g) can anchovy filets 7 small cornichons (1 ounce, 30g) 2 tablespoons ...and process at HI speed, gradually add oil to blend well, about 1 minute, check consistency, and then continue. Add all ingredients except oil to Prep Bowl. Add garlic and process at HI speed to mince, about 15 seconds. Makes 1 cup (8 oz., 250 ml). *Oil should flow through ...
..., about 1 cup (8 ounces, 250 ml). Run machine for about 30 seconds. With machine running at HI speed to one of the recessed areas in the cover so that oil flows through the feed hole in water (3-1/4 ounces, 92g) 1 2 ounce (56g) can anchovy filets 7 small cornichons (1 ounce, 30g) 2 tablespoons ...and process at HI speed, gradually add oil to blend well, about 1 minute, check consistency, and then continue. Add all ingredients except oil to Prep Bowl. Add garlic and process at HI speed to mince, about 15 seconds. Makes 1 cup (8 oz., 250 ml). *Oil should flow through ...

DLC-1 Manual
Page 14
... Blend, 10 Freshly Ground Nutmeg, 11 12 Please pay by Cuisinart. This warranty excludes all incidental or consequential damages. Your Cuisinart® Mini-Prep® Processor has been manufactured to the strictest specifications and has been designed ...for shipping instructions.) Please be sure to include a return address, description of the product's defect, product serial number and any other information pertinent to the product's return. This warranty does not cover...
... Blend, 10 Freshly Ground Nutmeg, 11 12 Please pay by Cuisinart. This warranty excludes all incidental or consequential damages. Your Cuisinart® Mini-Prep® Processor has been manufactured to the strictest specifications and has been designed ...for shipping instructions.) Please be sure to include a return address, description of the product's defect, product serial number and any other information pertinent to the product's return. This warranty does not cover...


