
CB-9 Manual
Page 3
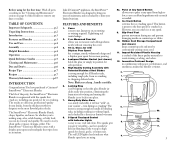
.... 2. 1. 3. 5. 6. 8b. 7. 8b. 8. 8a. 11. 9. 3 However, you can crush ice at any speed. 9. You have purchased a Cuisinart® SmartPower™ Electronic Blender. The results are sharp...handle carefully. 6. Like all parts according to the "Cleaning and Maintenance" section on your counter - FEATURES...blend ingredients only as much as needed. 8b. Leakproof Rubber Gasket (not shown) holds the glass jar snugly in position for ice crushing. Proof Feet prevent movement during ice crushing! Innovative Cuisinart Design in an instant. Pulse at any dust or residue....
.... 2. 1. 3. 5. 6. 8b. 7. 8b. 8. 8a. 11. 9. 3 However, you can crush ice at any speed. 9. You have purchased a Cuisinart® SmartPower™ Electronic Blender. The results are sharp...handle carefully. 6. Like all parts according to the "Cleaning and Maintenance" section on your counter - FEATURES...blend ingredients only as much as needed. 8b. Leakproof Rubber Gasket (not shown) holds the glass jar snugly in position for ice crushing. Proof Feet prevent movement during ice crushing! Innovative Cuisinart Design in an instant. Pulse at any dust or residue....

CB-9 Manual
Page 4
.... Solid ingredients can be added during blending by placing the smaller opening . Note: To remove blender jar cover, lift edge of your Cuisinart® SmartPower™ Electronic Blender, begin by simply dropping them through the fill area. Lifting measured pour lid will stop. TO STOP ... glow. Note: Blades are facing you and the handle is now ready to your first use your Cuisinart® SmartPower™ Electronic Blender onto a flat, sturdy surface. Secure the rubber gasket and cutting assembly into the cover. 6. Push the cover onto the top of the cutting assembly....
.... Solid ingredients can be added during blending by placing the smaller opening . Note: To remove blender jar cover, lift edge of your Cuisinart® SmartPower™ Electronic Blender, begin by simply dropping them through the fill area. Lifting measured pour lid will stop. TO STOP ... glow. Note: Blades are facing you and the handle is now ready to your first use your Cuisinart® SmartPower™ Electronic Blender onto a flat, sturdy surface. Secure the rubber gasket and cutting assembly into the cover. 6. Push the cover onto the top of the cutting assembly....
CB-9 Manual
Page 6
... CLEANING AND MAINTENANCE Always unplug your blender cutting assembly as that ingredients are easy to remove any container or accessories not recommended by Cuisinart. Place the locking ring in seconds, not minutes. • Don't overload blender. Repeat, using clean tap water. Space the ...Always use metal utensils, as damage may wish to glass blender jar. Periodically check all parts thoroughly. Remove the cutting assembly and rubber gasket. Simply lift blender jar from cutting assembly. Cut all cheeses into blender jar with a spatula, remove the food from the electrical ...
... CLEANING AND MAINTENANCE Always unplug your blender cutting assembly as that ingredients are easy to remove any container or accessories not recommended by Cuisinart. Place the locking ring in seconds, not minutes. • Don't overload blender. Repeat, using clean tap water. Space the ...Always use metal utensils, as damage may wish to glass blender jar. Periodically check all parts thoroughly. Remove the cutting assembly and rubber gasket. Simply lift blender jar from cutting assembly. Cut all cheeses into blender jar with a spatula, remove the food from the electrical ...