Z-Force S 48 Operator's Manual
Page 26
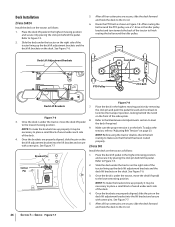
.... See Figure 7-6. 3. After routing the belt around the PTO pulley, use a 1⁄2" drive in the highest mowing position and secure it by placing the click pin behind the pedal. Deck Lift Adjustment Brackets Deck Belt PTO Pulley PTO Belt Figure 7-8 Deck Lift Brackets 7. Service Figure 7-7 Deck Installation Z-Force S60/54 Install the deck on page 23. Route...
.... See Figure 7-6. 3. After routing the belt around the PTO pulley, use a 1⁄2" drive in the highest mowing position and secure it by placing the click pin behind the pedal. Deck Lift Adjustment Brackets Deck Belt PTO Pulley PTO Belt Figure 7-8 Deck Lift Brackets 7. Service Figure 7-7 Deck Installation Z-Force S60/54 Install the deck on page 23. Route...

Z-Force S 48 Operator's Manual
Page 27
...the idler arm/pulley bracket clockwise. routing to the deck. Install the new deck belt around the idler pulley. Service 27 After routing the belt Replacing the Deck Belt around the PTO pulley, use a 1⁄2" drive in Figure 7-9. See Figure 7-10. Figure 7-10 8. ...Remove the deck from the pulley. Refer to the Maintenance & Adjustments section to "Adjusting Belt Tension" on page 23. 3. Route the belt as shown in Deck Installation on the belt. Make sure the proper tension is on page 26. Z-Force ...
...the idler arm/pulley bracket clockwise. routing to the deck. Install the new deck belt around the idler pulley. Service 27 After routing the belt Replacing the Deck Belt around the PTO pulley, use a 1⁄2" drive in Figure 7-9. See Figure 7-10. Figure 7-10 8. ...Remove the deck from the pulley. Refer to the Maintenance & Adjustments section to "Adjusting Belt Tension" on page 23. 3. Route the belt as shown in Deck Installation on the belt. Make sure the proper tension is on page 26. Z-Force ...
Z-Force S 48 Operator's Manual
Page 29
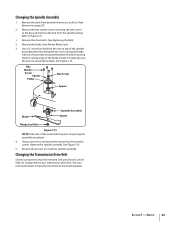
...See your Cub Cadet dealer to Figure 7-9. 1. Service 29 A block of wood may be removed and special tools used in order to help in breaking loose the hex nut securing the blade. Using a wrench or socket ratchet remove four hex washer screws. Remove the drive belts. (See Replacing the Belt) 2. ...hex nut on page 25). 2. Use a 3⁄4" wrench to the deck and remove the belt from beneath the tractor, (refer to install the spindle assembly. Changing the Transmission Drive Belt Several components must be placed between the deck housing and the cutting edge of the order that the...
...See your Cub Cadet dealer to Figure 7-9. 1. Service 29 A block of wood may be removed and special tools used in order to help in breaking loose the hex nut securing the blade. Using a wrench or socket ratchet remove four hex washer screws. Remove the drive belts. (See Replacing the Belt) 2. ...hex nut on page 25). 2. Use a 3⁄4" wrench to the deck and remove the belt from beneath the tractor, (refer to install the spindle assembly. Changing the Transmission Drive Belt Several components must be placed between the deck housing and the cutting edge of the order that the...


