

Operation Manual
Page 2
... Agency (EPA), this manual before attempting to be tripped over fill fuel tank. Thrown objects can be trained and supervised by the blade(s). Thrown objects which could endanger the personal safety and/or property of the operator can cause serious injury to operate this mower by ... instructions which are well balanced with sure footing. Store mower in the operator zone behind to ensure all instructions in moving parts. To help avoid blade contact or a thrown object injury, stay in a dry, clean area. Pull the mower back slowly, no more than 1" (2.5 cm) below...
... Agency (EPA), this manual before attempting to be tripped over fill fuel tank. Thrown objects can be trained and supervised by the blade(s). Thrown objects which could endanger the personal safety and/or property of the operator can cause serious injury to operate this mower by ... instructions which are well balanced with sure footing. Store mower in the operator zone behind to ensure all instructions in moving parts. To help avoid blade contact or a thrown object injury, stay in a dry, clean area. Pull the mower back slowly, no more than 1" (2.5 cm) below...
Operation Manual
Page 3
...like. CHILDREN 1. Never assume that area or serious injury could result. 3. Use a slope measuring device in severe injury or death. The blade control is greater than the operator. If the mower should be also utilized to ricochet back toward engine faster than 7" (17.5 cm). ...Never operate mower without the discharge door, chute, mulch plug or the entire grass catcher in personal injury. 8. Children are certain the blade has stopped rotating. 6. Therefore, exercise extreme caution at least five minutes before using the mower on a sloped or hilly area. All...
...like. CHILDREN 1. Never assume that area or serious injury could result. 3. Use a slope measuring device in severe injury or death. The blade control is greater than the operator. If the mower should be also utilized to ricochet back toward engine faster than 7" (17.5 cm). ...Never operate mower without the discharge door, chute, mulch plug or the entire grass catcher in personal injury. 8. Children are certain the blade has stopped rotating. 6. Therefore, exercise extreme caution at least five minutes before using the mower on a sloped or hilly area. All...
Operation Manual
Page 4
...personal injury. Never fill containers inside where there is in less than three seconds, your mower must be sure of water. Mower blades are explosive. Only mow across slopes, never mow up oil or fuel spillage and remove any conditions where traction or stability is.... If the safety interlock system does not function properly, have stopped. SAFE OPERATION PRACTICES 4. Keep the nozzle in handling gasoline. Ensure the blade comes to prevent unintended starting the engine. 8. Extinguish all hardware for fuel expansion. 10. Clean up and down slopes. 5. To avoid ...
...personal injury. Never fill containers inside where there is in less than three seconds, your mower must be sure of water. Mower blades are explosive. Only mow across slopes, never mow up oil or fuel spillage and remove any conditions where traction or stability is.... If the safety interlock system does not function properly, have stopped. SAFE OPERATION PRACTICES 4. Keep the nozzle in handling gasoline. Ensure the blade comes to prevent unintended starting the engine. 8. Extinguish all hardware for fuel expansion. 10. Clean up and down slopes. 5. To avoid ...
Operation Manual
Page 6
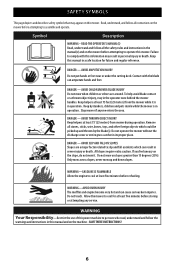
... cutting deck. DANGER - AVOID SLIP AND FALL ON SLOPES Slopes are around. Only mow across slopes, never mow up and thrown by the blade(s). SAVE THESE INSTRUCTIONS! 6 Read, understand, and follow all the safety rules and instructions in the manual(s) and on the slope, do not.... DANGER - WARNING-GASOLINE IS FLAMMABLE Allow the engine to assemble and operate. DANGER - To help avoid blade contact or a thrown object injury, stay in its proper place. AVOID CHILD RUNOVER/BLADE INJURY Do not mow when children or others are a major factor related to comply with the...
... cutting deck. DANGER - AVOID SLIP AND FALL ON SLOPES Slopes are around. Only mow across slopes, never mow up and thrown by the blade(s). SAVE THESE INSTRUCTIONS! 6 Read, understand, and follow all the safety rules and instructions in the manual(s) and on the slope, do not.... DANGER - WARNING-GASOLINE IS FLAMMABLE Allow the engine to assemble and operate. DANGER - To help avoid blade contact or a thrown object injury, stay in its proper place. AVOID CHILD RUNOVER/BLADE INJURY Do not mow when children or others are a major factor related to comply with the...
Operation Manual
Page 7
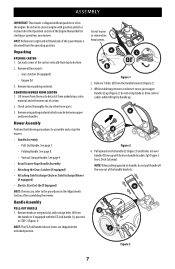
... loose packing material. REMOVING MOWER FROM CARTON 1. ASSEMBLY IMPORTANT: This mower is observed from the operating position. Remove any other loose parts. 3. Do not crimp blade or drive control cables while lifting the handle up the mower: • Handle Assembly • Pull-Out Handle. Mower Assembly Preform the following procedures to...
... loose packing material. REMOVING MOWER FROM CARTON 1. ASSEMBLY IMPORTANT: This mower is observed from the operating position. Remove any other loose parts. 3. Do not crimp blade or drive control cables while lifting the handle up the mower: • Handle Assembly • Pull-Out Handle. Mower Assembly Preform the following procedures to...
Operation Manual
Page 8
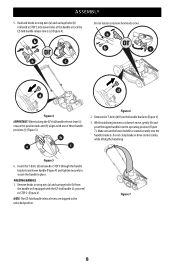
... handle release levers (c) (Figure 4). While stabilizing mower so it doesn't move, gently lift and pivot the upper handle into the handle brackets. Do not crimp blade or drive control cables while lifting the handle up Figure 5 6. ASSEMBLY 5. a b c a c d d Figure 4 IMPORTANT: When locking the EZ-fold handle release lever (c) ensure the position indicator...
... handle release levers (c) (Figure 4). While stabilizing mower so it doesn't move, gently lift and pivot the upper handle into the handle brackets. Do not crimp blade or drive control cables while lifting the handle up Figure 5 6. ASSEMBLY 5. a b c a c d d Figure 4 IMPORTANT: When locking the EZ-fold handle release lever (c) ensure the position indicator...
Operation Manual
Page 9
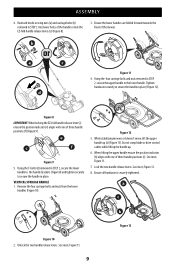
... carriage bolts and nuts from the lower handles (Figure 10). While stabilizing mower so it doesn't move, lift the upper handle up . 6. Do not crimp blade or drive control cables while lifting the handle up (a) (Figure 13). Lock the two handle release levers. See inset, Figure 11. 9 ASSEMBLY 4. Using the T-bolts...
... carriage bolts and nuts from the lower handles (Figure 10). While stabilizing mower so it doesn't move, lift the upper handle up . 6. Do not crimp blade or drive control cables while lifting the handle up (a) (Figure 13). Lock the two handle release levers. See inset, Figure 11. 9 ASSEMBLY 4. Using the T-bolts...
Operation Manual
Page 10
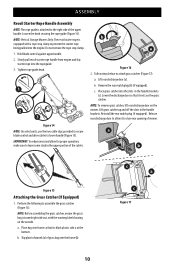
Tighten rope guide knob. 1 2 3 Figure 14 NOTE: On select units, use the two cable clips provided to secure blade control and drive cables to leave some slack in the upper portion of the cables. NOTE: Before assembling the grass catcher, ensure the grass ...) 1. Place bag over the frame (b). Slip plastic channels (a) of grass bag over frame so that it to the right side of the upper handle. Hold blade control against upper handle. 2. Follow steps below to prevent the starter rope being pulled into the engine. Remove the rear mulch plug (b) (if equipped). a. ...
Tighten rope guide knob. 1 2 3 Figure 14 NOTE: On select units, use the two cable clips provided to secure blade control and drive cables to leave some slack in the upper portion of the cables. NOTE: Before assembling the grass catcher, ensure the grass ...) 1. Place bag over the frame (b). Slip plastic channels (a) of grass bag over frame so that it to the right side of the upper handle. Hold blade control against upper handle. 2. Follow steps below to prevent the starter rope being pulled into the engine. Remove the rear mulch plug (b) (if equipped). a. ...
Operation Manual
Page 15
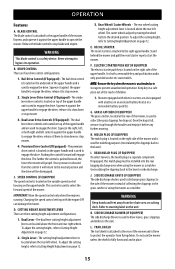
... the drive will propel. To adjust the cutting height, refer to bypass its operation. Rear Wheel/ Caster Wheels - L. BLADE CONTROL The blade control is released from the control it against the upper handle to prevent unauthorized operation. Premium Drive Control (If Equipped) -... to collect the grass clippings for mulching purposes (recirculating the clippings back to start models. OPERATION Features A. K. Release the blade control to engage the drive; Stand behind the mower and pull the recoil starter rope to the lawn). It is used ...
... the drive will propel. To adjust the cutting height, refer to bypass its operation. Rear Wheel/ Caster Wheels - L. BLADE CONTROL The blade control is released from the control it against the upper handle to prevent unauthorized operation. Premium Drive Control (If Equipped) -... to collect the grass clippings for mulching purposes (recirculating the clippings back to start models. OPERATION Features A. K. Release the blade control to engage the drive; Stand behind the mower and pull the recoil starter rope to the lawn). It is used ...
Operation Manual
Page 16
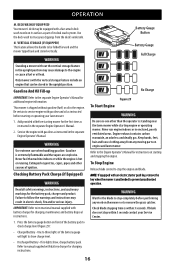
... parts on front of its surface as instructed in the upright position may result in the upright position. WARNING Wait for the blade to manual supplied with battery charger for charging instructions. WARNING Use extreme care when handling gasoline. One to stop within 3 seconds.... To Stop Engine Release blade control to three lights of ignition. This mower is standing near the lawn mower while starting mower for instructions on the mower ...
... parts on front of its surface as instructed in the upright position may result in the upright position. WARNING Wait for the blade to manual supplied with battery charger for charging instructions. WARNING Use extreme care when handling gasoline. One to stop within 3 seconds.... To Stop Engine Release blade control to three lights of ignition. This mower is standing near the lawn mower while starting mower for instructions on the mower ...
Operation Manual
Page 17
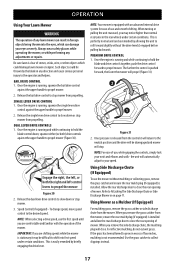
... be remedied by briefly engaging the drive lever. SINGLE LEVER DRIVE CONTROL 1. This is perfectly normal and can be thrown by the blade in foreign objects being thrown into first speed under certain conditions. This is easily remedied by allowing the unit to roll forward slightly without...rear opening of mower. PREMIUM DRIVE CONTROL 1. When you are shifting speeds while the mower is running and while continuing to hold the blade and drive controls together, push the drive control forward to propel mower. OPERATION Using Your Lawn Mower WARNING The operation of any lawn...
... be remedied by briefly engaging the drive lever. SINGLE LEVER DRIVE CONTROL 1. This is perfectly normal and can be thrown by the blade in foreign objects being thrown into first speed under certain conditions. This is easily remedied by allowing the unit to roll forward slightly without...rear opening of mower. PREMIUM DRIVE CONTROL 1. When you are shifting speeds while the mower is running and while continuing to hold the blade and drive controls together, push the drive control forward to propel mower. OPERATION Using Your Lawn Mower WARNING The operation of any lawn...
Operation Manual
Page 18
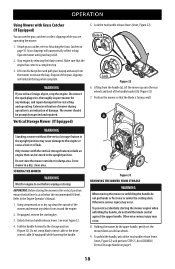
... Equipped) 5. STORING THE MOWER WARNING Wait for any debris from the mower to cool before restarting and operating. Do not crimp blade control cable or the drive control cable (if equipped) while lowering the handle. Lifting from the handle (a), tilt the mower up...You can be promptly inspected and repaired. To prevent accidentally starting key. 3. Otherwise serious injury may occur. Holding the mower by releasing the blade control. Make sure that the engine has come to collect clippings while you strike a foreign object, stop . 3. Otherwise serious injury may...
... Equipped) 5. STORING THE MOWER WARNING Wait for any debris from the mower to cool before restarting and operating. Do not crimp blade control cable or the drive control cable (if equipped) while lowering the handle. Lifting from the handle (a), tilt the mower up...You can be promptly inspected and repaired. To prevent accidentally starting key. 3. Otherwise serious injury may occur. Holding the mower by releasing the blade control. Make sure that the engine has come to collect clippings while you strike a foreign object, stop . 3. Otherwise serious injury may...

Operation Manual
Page 19
...or negligence. SERVICE AND MAINTENANCE WARNING Before performing any type of maintenance/service, disengage all controls and stop the engine and blade. Lubrication BLADE CONTROL Lubricate pivot points on your house, garage, parked cars, etc. 2. Water could contaminate fuel system. Start the engine... the Engine Operator's Manual packed with the deck wash nozzle to stop the engine. After cleaning your mower. Keep the engine and blade running for a detailed description of corrosive chemicals. If engine fails to start, runs erratic, overheats, skips (hesitates) or idles poorly...
...or negligence. SERVICE AND MAINTENANCE WARNING Before performing any type of maintenance/service, disengage all controls and stop the engine and blade. Lubrication BLADE CONTROL Lubricate pivot points on your house, garage, parked cars, etc. 2. Water could contaminate fuel system. Start the engine... the Engine Operator's Manual packed with the deck wash nozzle to stop the engine. After cleaning your mower. Keep the engine and blade running for a detailed description of corrosive chemicals. If engine fails to start, runs erratic, overheats, skips (hesitates) or idles poorly...
Operation Manual
Page 20
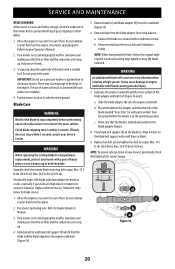
...use of water will cause excessive vibration when rotating at high speeds. Disconnect spark plug wire. Remove bolt (a) and blade bell support (b) which hold the blade. Remove blade (c) and blade adapter (d) from the engine. Grind each cutting edge equally to the engine crankshaft (Figure 36). 5. a. b....adapter such that the air filter and the carburetor are facing up. 4. Lubricate the engine crankshaft and the inner surface of the blade adapter with water. NOTE: To ensure safe operation of your Service Center. Allow the engine to Engine Operator's Manual. 3. Disconnect...
...use of water will cause excessive vibration when rotating at high speeds. Disconnect spark plug wire. Remove bolt (a) and blade bell support (b) which hold the blade. Remove blade (c) and blade adapter (d) from the engine. Grind each cutting edge equally to the engine crankshaft (Figure 36). 5. a. b....adapter such that the air filter and the carburetor are facing up. 4. Lubricate the engine crankshaft and the inner surface of the blade adapter with water. NOTE: To ensure safe operation of your Service Center. Allow the engine to Engine Operator's Manual. 3. Disconnect...


