RZT 42 Operator's Manual
Page 22
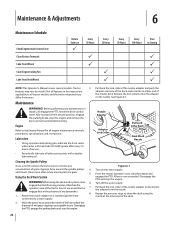
...the nozzle adapter and push the adapter onto one of the deck wash nozzles at the other end of any position other pivot points with Cub Cadet 251H EP grease after every 10 hours of wet grass clippings is acceptable to clean the deck using the deck wash system, never 6. Release...models. Using the Deck Wash System WARNING! Repeat the previous steps to you. features may differ from around the spindle pulleys 4. Do not use P Every 10 Hours P P Every 25 Hours P P Every 50 Hours Every 100 Hours Prior to run as needed. From the tractor operator's seat, start the engine and ...
...the nozzle adapter and push the adapter onto one of the deck wash nozzles at the other end of any position other pivot points with Cub Cadet 251H EP grease after every 10 hours of wet grass clippings is acceptable to clean the deck using the deck wash system, never 6. Release...models. Using the Deck Wash System WARNING! Repeat the previous steps to you. features may differ from around the spindle pulleys 4. Do not use P Every 10 Hours P P Every 25 Hours P P Every 50 Hours Every 100 Hours Prior to run as needed. From the tractor operator's seat, start the engine and ...
RZT 42 Operator's Manual
Page 24
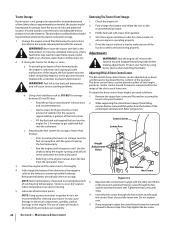
... lower arm and insert the hex screw through the control lever slot and the lower arm. NOTE: Remove the battery if exposed to electrical components, spindles, pulleys, bearings or the engine. Store in poorly ventilated enclosures, where fuel fumes may cause damage to prolonged periods of holes in storage, monitor fuel...
... lower arm and insert the hex screw through the control lever slot and the lower arm. NOTE: Remove the battery if exposed to electrical components, spindles, pulleys, bearings or the engine. Store in poorly ventilated enclosures, where fuel fumes may cause damage to prolonged periods of holes in storage, monitor fuel...
RZT 42 Operator's Manual
Page 27
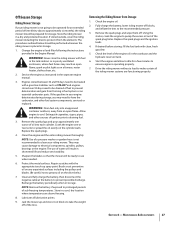
... Engine Manual. They may reach an open flame. Clean and fully charge the battery, then disconnect the negative cable at the battery to electrical components, spindles, pulleys, bearings or the engine. NOTE: Remove the battery if exposed to clean your riding mower. Drive the riding mower without a load to approximately six...
... Engine Manual. They may reach an open flame. Clean and fully charge the battery, then disconnect the negative cable at the battery to electrical components, spindles, pulleys, bearings or the engine. NOTE: Remove the battery if exposed to clean your riding mower. Drive the riding mower without a load to approximately six...
RZT 42 Operator's Manual
Page 30
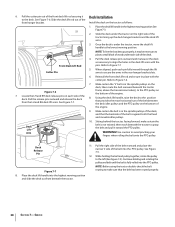
...the lowest mowing position. Service See Figure 7-6. Refer to Figure 7-6. 7. Using the deck lift handle, raise the deck to align the holes in the spindle pulleys of the deck, and that the backside of the tractor lining up the deck hanger brackets and the deck lift arms.. 3. See Figure 7-5. ... idler pulleys. Pull the deck release pins outward and maneuver the deck as follows: 1. Reinstall the front deck lift rod and secure in the spindle pulleys on the bottom of the engine. 7. Locate the LH and RH deck release pins on the bottom of the engine. 9. Deck Lift ...
...the lowest mowing position. Service See Figure 7-6. Refer to Figure 7-6. 7. Using the deck lift handle, raise the deck to align the holes in the spindle pulleys of the deck, and that the backside of the tractor lining up the deck hanger brackets and the deck lift arms.. 3. See Figure 7-5. ... idler pulleys. Pull the deck release pins outward and maneuver the deck as follows: 1. Reinstall the front deck lift rod and secure in the spindle pulleys on the bottom of the engine. 7. Locate the LH and RH deck release pins on the bottom of the engine. 9. Deck Lift ...
RZT 42 Operator's Manual
Page 31
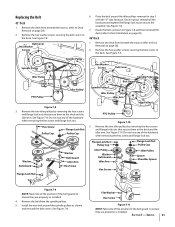
...Washer Belt Guard Idler Arm Hex Screw 6. Route the belt as shown and reinstall the belt covers. Hex Washer Screws Belt Cover Spindle Pulley Belt Guard Spindle Pulley Idler Pulley Idler Arm Idler Pulley PTO Pulley Figure 7-10 3. Install the new belt around the idler pulleys removed in step... two idler pulleys by removing the hex screws and flange lock nuts that secure them to the deck. Belt Cover Hex Washer Screws Spindle Pulley Spindle Pulley Idler Pulley Idler Arm PTO Pulley Belt Guards Idler Pulley Figure 7-8 3. Remove the hex washer screws securing the belt covers to...
...Washer Belt Guard Idler Arm Hex Screw 6. Route the belt as shown and reinstall the belt covers. Hex Washer Screws Belt Cover Spindle Pulley Belt Guard Spindle Pulley Idler Pulley Idler Arm Idler Pulley PTO Pulley Figure 7-10 3. Install the new belt around the idler pulleys removed in step... two idler pulleys by removing the hex screws and flange lock nuts that secure them to the deck. Belt Cover Hex Washer Screws Spindle Pulley Spindle Pulley Idler Pulley Idler Arm PTO Pulley Belt Guards Idler Pulley Figure 7-8 3. Remove the hex washer screws securing the belt covers to...
RZT 42 Operator's Manual
Page 32
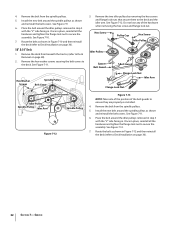
...step 3 with the "V" side facing in Figure 7-12 and then reinstall the deck (refer to ensure they are properly re-installed. 4. Hex Washer Screws Spindle Pulley Belt Cover 3. See Figure 7-11. See Figure 7-9. 6. Route the belt as shown in . Remove the two idler pulleys by removing the hex ...screws and flange lock nuts that secure them to Deck Installation on page 30). 50" & 54" Deck 1. Hex Screw Pulley Cap Hex Screw Idler Pulley Idler Pulley Spacer Belt Guard Belt Guard Flange Lock Nut Idler Arm Flange...
...step 3 with the "V" side facing in Figure 7-12 and then reinstall the deck (refer to ensure they are properly re-installed. 4. Hex Washer Screws Spindle Pulley Belt Cover 3. See Figure 7-11. See Figure 7-9. 6. Route the belt as shown in . Remove the two idler pulleys by removing the hex ...screws and flange lock nuts that secure them to Deck Installation on page 30). 50" & 54" Deck 1. Hex Screw Pulley Cap Hex Screw Idler Pulley Idler Pulley Spacer Belt Guard Belt Guard Flange Lock Nut Idler Arm Flange...
RZT 42 Operator's Manual
Page 33
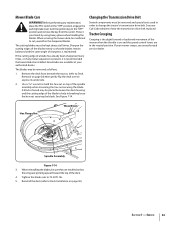
... hex nut securing the blade. Use a 15⁄16" wrench to Deck Installation on top of the deck. 4. If your Cub Cadet dealer to 70-90 ft. Hex Flange Nut Wood Block Spindle Assembly Figure 7-14 3. When reinstalling the blades, be kept sharp at your hands by using heavy gloves when handling the...
... hex nut securing the blade. Use a 15⁄16" wrench to Deck Installation on top of the deck. 4. If your Cub Cadet dealer to 70-90 ft. Hex Flange Nut Wood Block Spindle Assembly Figure 7-14 3. When reinstalling the blades, be kept sharp at your hands by using heavy gloves when handling the...
RZT 42 Operator's Manual
Page 34
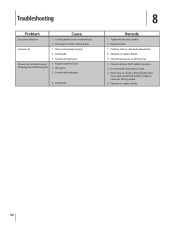
... Kit) Cause 1. Excessively high grass. 4. Mow once at a high cutting height, then mow again at desired height or make a narrower cutting swath. 4. Tighten blade and spindle. 2. Cutting blade loose or unbalanced. 2. Damaged or bent cutting blade. 1. Deck not leveled properly. 2. Engine speed too low. 2. Check tire pressure in FAST (rabbit) position...
... Kit) Cause 1. Excessively high grass. 4. Mow once at a high cutting height, then mow again at desired height or make a narrower cutting swath. 4. Tighten blade and spindle. 2. Cutting blade loose or unbalanced. 2. Damaged or bent cutting blade. 1. Deck not leveled properly. 2. Engine speed too low. 2. Check tire pressure in FAST (rabbit) position...
RZT 42 Operator's Manual
Page 35
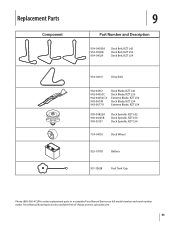
... Belt 942-04312 942-04053C 942-04053C-X 942-0677B 942-0677-X Deck Blade, RZT L42 Deck Blade, RZT L50 Extreme Blade, RZT L50 Deck Blade, RZT L54 Extreme Blade, RZT L54 918-04822A 918-04125B 918-05137 Deck Spindle, RZT L42 Deck Spindle, RZT L50 Deck Spindle, RZT L54 734-04155 Deck Wheel 925-1707D Battery 951-12428 Fuel Tank Cap...
... Belt 942-04312 942-04053C 942-04053C-X 942-0677B 942-0677-X Deck Blade, RZT L42 Deck Blade, RZT L50 Extreme Blade, RZT L50 Deck Blade, RZT L54 Extreme Blade, RZT L54 918-04822A 918-04125B 918-05137 Deck Spindle, RZT L42 Deck Spindle, RZT L50 Deck Spindle, RZT L54 734-04155 Deck Wheel 925-1707D Battery 951-12428 Fuel Tank Cap...
