
Series 2000 Brochure
Page 2
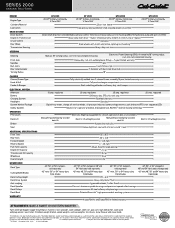
...SERIES 2000 GARDEN TRACTORS ENGINE Engine Type Cylinders/Material Lubrication DRIVE SYSTEM Drive System Engine to be used or relied upon as rated by engine manufacturer † See your local Cub Cadet .... Specifications and programs are not meant to Transmission Cruise Control Rear Wheel Transmission Housing STEERING Steering Front Axle Spindles Ball Joints Rear Axle Diameter Turning Radius CHASSIS Chassis...scalping Deck Spindles Deck Pulleys Deck Wash WARRANTY† GT 2000 20 HP* Kohler® Command® V-Twin OHV GT 2100 GTX 2000 23 HP* Kohler® Command® V-Twin OHV...
...SERIES 2000 GARDEN TRACTORS ENGINE Engine Type Cylinders/Material Lubrication DRIVE SYSTEM Drive System Engine to be used or relied upon as rated by engine manufacturer † See your local Cub Cadet .... Specifications and programs are not meant to Transmission Cruise Control Rear Wheel Transmission Housing STEERING Steering Front Axle Spindles Ball Joints Rear Axle Diameter Turning Radius CHASSIS Chassis...scalping Deck Spindles Deck Pulleys Deck Wash WARRANTY† GT 2000 20 HP* Kohler® Command® V-Twin OHV GT 2100 GTX 2000 23 HP* Kohler® Command® V-Twin OHV...
GTX 2100 Operator's Manual
Page 20
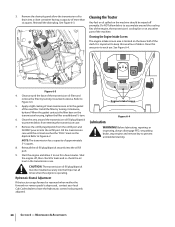
...Intake Screen Oil Filter The engine intake screen area is depressed, contact your local Cub Cadet dealer to prevent debris from the oil fill port and SLOWLY pour oil into the...Fill the transmission case until the oil level reaches the "FULL" mark on the transmission housing, tighten the filter an additional 1⁄2-turn. 6. Do NOT allow it clockwise, .... Maintenance & Adjustments Engine Intake Screen Figure 6-4 Lubrication WARNING! Hydrostatic Neutral Adjustment If the tractor creeps forward or rearward when neither the forward nor reverse pedal is located on any other...
...Intake Screen Oil Filter The engine intake screen area is depressed, contact your local Cub Cadet dealer to prevent debris from the oil fill port and SLOWLY pour oil into the...Fill the transmission case until the oil level reaches the "FULL" mark on the transmission housing, tighten the filter an additional 1⁄2-turn. 6. Do NOT allow it clockwise, .... Maintenance & Adjustments Engine Intake Screen Figure 6-4 Lubrication WARNING! Hydrostatic Neutral Adjustment If the tractor creeps forward or rearward when neither the forward nor reverse pedal is located on any other...
GTX 2100 Operator's Manual
Page 21
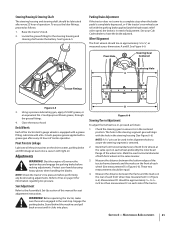
... Adjustment Refer to have the brake adjusted. Protect your Cub Cadet dealer to the Assembly & Set-Up section of the tractor. See Figure 6-6. Measure the distance between the frame and the marks on the rear of each side of this manual for the steering housing and steering shaft under the battery. Engage the parking...
... Adjustment Refer to have the brake adjusted. Protect your Cub Cadet dealer to the Assembly & Set-Up section of the tractor. See Figure 6-6. Measure the distance between the frame and the marks on the rear of each side of this manual for the steering housing and steering shaft under the battery. Engage the parking...

GTX 2100 Operator's Manual
Page 25
... before disconnecting. 3. Align the socket tab with the notch of the tractor. 2. To replace a fuse, pull the old fuse from the headlight socket terminals. Note which wire connects to remove from the reflector housing. If the electrical system does not function, check the fuses. then... bulb inward and turn clockwise to lock. See Figure 7-3. 6. Replace headlight bulbs as necessary to align the socket tab with the reflector housing notch; Align a locking post of head lamp bulbs is necessary. then push the socket inward and turn as follows: 1. Connect the ...
... before disconnecting. 3. Align the socket tab with the notch of the tractor. 2. To replace a fuse, pull the old fuse from the headlight socket terminals. Note which wire connects to remove from the reflector housing. If the electrical system does not function, check the fuses. then... bulb inward and turn clockwise to lock. See Figure 7-3. 6. Replace headlight bulbs as necessary to align the socket tab with the reflector housing notch; Align a locking post of head lamp bulbs is necessary. then push the socket inward and turn as follows: 1. Connect the ...
