
GTX 1054 Operator's Manual
Page 4
...excessive speed. Always turn on wet grass. manually on any adjustments. 21. where the operator may jack-knife and cause tractor to stabilize the machine by the machine manufacturer. Follow the manufacturer's recommendations for traffic when operating near drop-offs, ditches or.... Dry grass or leaves may lose traction on that area or serious injury could tip over accident. 2. Do not tow heavy pull behind before dismounting. 4. 22. Important Safe Operation Practices Never carry passengers. Disengage blade(s) before attempting to protect 7. backing to ...
...excessive speed. Always turn on wet grass. manually on any adjustments. 21. where the operator may jack-knife and cause tractor to stabilize the machine by the machine manufacturer. Follow the manufacturer's recommendations for traffic when operating near drop-offs, ditches or.... Dry grass or leaves may lose traction on that area or serious injury could tip over accident. 2. Do not tow heavy pull behind before dismounting. 4. 22. Important Safe Operation Practices Never carry passengers. Disengage blade(s) before attempting to protect 7. backing to ...
GTX 1054 Operator's Manual
Page 9
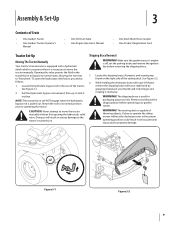
...throwing objects. Failure to lock it clockwise. Locate the hydrostatic bypass rod in serious personal injury and/or property damage. Pull the hydrostatic bypass rod outward, then up, to operate the riding mower without first opening the hydrostatic relief valve. CAUTION: ...to bypass its normal position prior to move the tractor manually without the discharge cover in the proper operating position could result in the rear of the tractor. Assembly & Set-Up 3 Contents of Crate • One Garden Tractor • One Garden Tractor Operator's Manual • One Oil Drain Tube...
...throwing objects. Failure to lock it clockwise. Locate the hydrostatic bypass rod in serious personal injury and/or property damage. Pull the hydrostatic bypass rod outward, then up, to operate the riding mower without first opening the hydrostatic relief valve. CAUTION: ...to bypass its normal position prior to move the tractor manually without the discharge cover in the proper operating position could result in the rear of the tractor. Assembly & Set-Up 3 Contents of Crate • One Garden Tractor • One Garden Tractor Operator's Manual • One Oil Drain Tube...
GTX 1054 Operator's Manual
Page 11
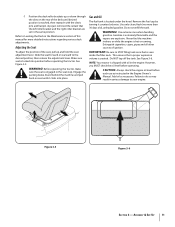
Adjusting the Seat To adjust the position of the deck until it counterclockwise. Stand behind the machine and pull back on the rear of the seat, pull up or down through the slots on seat until desired position is reached, then reattach with oil in the same position. ... pipes and all other sources of this manual for more than 30 days old), unleaded gasoline. then release the adjustment lever. WARNING! Before operating the tractor, make sure the seat is locked into place. Figure 3-5 Figure 3-6 Section 2 - Refer to your engine. Do NOT top off the tank. CAUTION...
Adjusting the Seat To adjust the position of the deck until it counterclockwise. Stand behind the machine and pull back on the rear of the seat, pull up or down through the slots on seat until desired position is reached, then reattach with oil in the same position. ... pipes and all other sources of this manual for more than 30 days old), unleaded gasoline. then release the adjustment lever. WARNING! Before operating the tractor, make sure the seat is locked into place. Figure 3-5 Figure 3-6 Section 2 - Refer to your engine. Do NOT top off the tank. CAUTION...
GTX 1054 Operator's Manual
Page 14
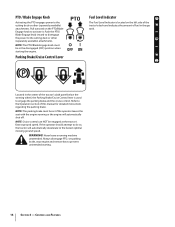
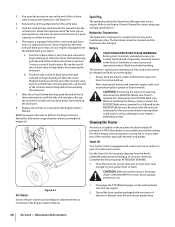
... Activating the PTO engages power to the cutting deck or other (separately available) attachments. If the operator should attempt to do so, the tractor will automatically shut off. Always disengage PTO, set if the operator leaves the seat with the engine running machine unattended. NOTE: The parking...the steering wheel, the Parking Brake/Cruise Control lever is located on the PTO/Blade Engage knob to activate it. Pull outward on the left side of the tractor's dash and indicates the amount of this manual for detailed instructions regarding the parking brake. NOTE: Cruise control can ...
... Activating the PTO engages power to the cutting deck or other (separately available) attachments. If the operator should attempt to do so, the tractor will automatically shut off. Always disengage PTO, set if the operator leaves the seat with the engine running machine unattended. NOTE: The parking...the steering wheel, the Parking Brake/Cruise Control lever is located on the PTO/Blade Engage knob to activate it. Pull outward on the left side of the tractor's dash and indicates the amount of this manual for detailed instructions regarding the parking brake. NOTE: Cruise control can ...
GTX 1054 Operator's Manual
Page 18
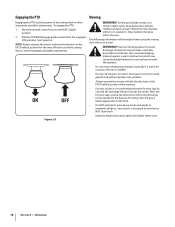
... while mowing • For best results it is prone to weed growth and yellows quickly in dry weather. • Always operate the tractor with the discharge thrown towards the center. Pull the PTO/Blade Engage knob outward into the engaged (ON) position. Short grass is in the FAST (rabbit) position for the...
... while mowing • For best results it is prone to weed growth and yellows quickly in dry weather. • Always operate the tractor with the discharge thrown towards the center. Pull the PTO/Blade Engage knob outward into the engaged (ON) position. Short grass is in the FAST (rabbit) position for the...
GTX 1054 Operator's Manual
Page 20
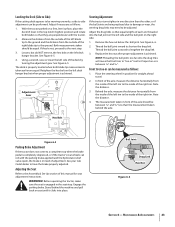
...the volume and weight of its deck wash system. Cleaning the Tractor Any fuel or oil spilled on the oil drain valve, then pull outward to the correct terminals; Complete the following steps AFTER EACH MOWING: 1. Drive the tractor to a level, clear spot on any other part of California...allow debris to accumulate around the cooling fins of the engine, the transmission's cooling fan or on your garden hose to cause cancer and reproductive harm. Thread the hose coupler (packaged with your garden hose. 20 Section 6 - 3. Pop open the protective cap on its terminal first, followed by ...
...the volume and weight of its deck wash system. Cleaning the Tractor Any fuel or oil spilled on the oil drain valve, then pull outward to the correct terminals; Complete the following steps AFTER EACH MOWING: 1. Drive the tractor to a level, clear spot on any other part of California...allow debris to accumulate around the cooling fins of the engine, the transmission's cooling fan or on your garden hose to cause cancer and reproductive harm. Thread the hose coupler (packaged with your garden hose. 20 Section 6 - 3. Pop open the protective cap on its terminal first, followed by ...
GTX 1054 Operator's Manual
Page 23
...3. Thread the ball joint outward to the Assembly & Set-Up section of adjustment. Adjusting the Seat Refer to lengthen the drag link. 3. Before operating the tractor, make sure the seat is achieved. Leveling the Deck (Side to Side) If the cutting deck appears to be mowing unevenly, a side to side adjustment...toe-in one direction than the measurement taken behind the machine and pull back on seat until it clicks into the ball joint on the left side and the ball joint on the left deck hanger bracket. See your Cub Cadet dealer to "toe-in need to the inside of the right ...
...3. Thread the ball joint outward to the Assembly & Set-Up section of adjustment. Adjusting the Seat Refer to lengthen the drag link. 3. Before operating the tractor, make sure the seat is achieved. Leveling the Deck (Side to Side) If the cutting deck appears to be mowing unevenly, a side to side adjustment...toe-in one direction than the measurement taken behind the machine and pull back on seat until it clicks into the ball joint on the left side and the ball joint on the left deck hanger bracket. See your Cub Cadet dealer to "toe-in need to the inside of the right ...
GTX 1054 Operator's Manual
Page 25
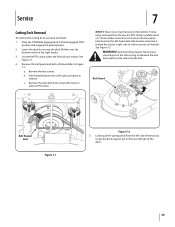
...b. NOTE: If there is too much tension on the belt for it toward the tractor's right side to remove. Belt Guard Belt Keeper Rod Figure 7-1 Figure 7-2 5. See Figure 7-1. 4. Avoid pinching injuries. Remove the hex screws. Pull the belt keeper rod to the right and down to relieve tension on the idler...set to loosen) into the bottom notch on the rear left -hand deck idler bracket and pivot it to be easily removed from around the tractor's electric PTO clutch. Remove the belt guard and belt as follows: 1. See Figure 7-2. Lower the deck by moving the deck lift lever ...
...b. NOTE: If there is too much tension on the belt for it toward the tractor's right side to remove. Belt Guard Belt Keeper Rod Figure 7-1 Figure 7-2 5. See Figure 7-1. 4. Avoid pinching injuries. Remove the hex screws. Pull the belt keeper rod to the right and down to relieve tension on the idler...set to loosen) into the bottom notch on the rear left -hand deck idler bracket and pivot it to be easily removed from around the tractor's electric PTO clutch. Remove the belt guard and belt as follows: 1. See Figure 7-2. Lower the deck by moving the deck lift lever ...
GTX 1054 Operator's Manual
Page 26
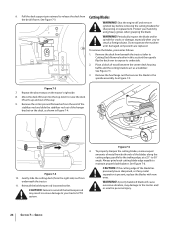
Pull the deck support pin outward to act as a stabilizer. WARNING! To properly sharpen the cutting blades, remove equal amounts of metal from both ends of wood between the center deck housing baffle and the cutting blade to release the deck from underneath the tractor. 11. CAUTION: ...hex flange nut that secures the blade to maintain proper blade balance. Figure 7-3 7. Remove the cotter pin and flat washer from beneath the tractor, (refer to your hands by using heavy gloves when grasping the blade WARNING! Always grind each cutting blade edge equally to the spindle assembly...
Pull the deck support pin outward to act as a stabilizer. WARNING! To properly sharpen the cutting blades, remove equal amounts of metal from both ends of wood between the center deck housing baffle and the cutting blade to release the deck from underneath the tractor. 11. CAUTION: ...hex flange nut that secures the blade to maintain proper blade balance. Figure 7-3 7. Remove the cotter pin and flat washer from beneath the tractor, (refer to your hands by using heavy gloves when grasping the blade WARNING! Always grind each cutting blade edge equally to the spindle assembly...

GTX 1054 Operator's Manual
Page 29
... 7 - See your Cub Cadet dealer to change the tractor's transmission drive belt. Changing the Transmission Drive Belt Several components must be removed and special tools used in order to have the transmission drive belt replaced. Continue holding the belt and pulley together, rotate the pulley to the left (See Figure 7-9). Pull the right side...
... 7 - See your Cub Cadet dealer to change the tractor's transmission drive belt. Changing the Transmission Drive Belt Several components must be removed and special tools used in order to have the transmission drive belt replaced. Continue holding the belt and pulley together, rotate the pulley to the left (See Figure 7-9). Pull the right side...


