
Series 2000 Brochure
Page 1
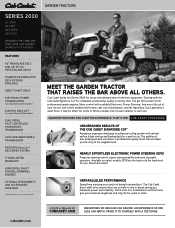
... DECK LIFT (on select models, EPS lets the tractor do the hard work for a perfect cut ™ Aerospace engineers developed an advanced cutting system with a fully welded steel frame, cast-iron transmission, and the legendary Cub Cadet direct shaft drive. Starting with available Electronic Power Steering...you . It may be smart for years to own one else can deliver. That's the Cub Cadet Advantage. The addition of the neighborhood. Garden tractors SERIES 2000 GT 2000 GT 2100 GTX 2000 GTX 2100 DESIGNED FOR lawn and yard care and garden chores up to 4 acres. smarter features for...
... DECK LIFT (on select models, EPS lets the tractor do the hard work for a perfect cut ™ Aerospace engineers developed an advanced cutting system with a fully welded steel frame, cast-iron transmission, and the legendary Cub Cadet direct shaft drive. Starting with available Electronic Power Steering...you . It may be smart for years to own one else can deliver. That's the Cub Cadet Advantage. The addition of the neighborhood. Garden tractors SERIES 2000 GT 2000 GT 2100 GTX 2000 GTX 2100 DESIGNED FOR lawn and yard care and garden chores up to 4 acres. smarter features for...
Series 2000 Brochure
Page 2
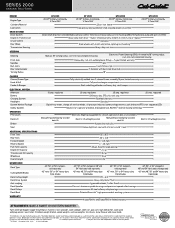
...Cutting Width/Blades Deck Cutting Height Deck Drive System Anti-scalping Deck Spindles Deck Pulleys Deck Wash WARRANTY† GT 2000 20 HP* Kohler® Command® V-Twin OHV GT 2100 GTX 2000 23 HP* Kohler® Command® V-Twin OHV 20 HP* Kohler® Command®...smart choice even smarter. Before operating the machine, read, understand and follow all instructions in U.S.A. 12/12 © 2013 Cub Cadet SERIES 2000 GARDEN TRACTORS ENGINE Engine Type Cylinders/Material Lubrication DRIVE SYSTEM Drive System Engine to stretch, slip or replace Standard Steel wheels with 4-bolt ...
...Cutting Width/Blades Deck Cutting Height Deck Drive System Anti-scalping Deck Spindles Deck Pulleys Deck Wash WARRANTY† GT 2000 20 HP* Kohler® Command® V-Twin OHV GT 2100 GTX 2000 23 HP* Kohler® Command® V-Twin OHV 20 HP* Kohler® Command®...smart choice even smarter. Before operating the machine, read, understand and follow all instructions in U.S.A. 12/12 © 2013 Cub Cadet SERIES 2000 GARDEN TRACTORS ENGINE Engine Type Cylinders/Material Lubrication DRIVE SYSTEM Drive System Engine to stretch, slip or replace Standard Steel wheels with 4-bolt ...

Series 2000 Warranty Information
Page 1
...date of original purchase or lease. The exclusive remedy is available, WITH PROOF OF PURCHASE AND APPLICABLE MAINTENANCE RECORDS, through Cub Cadet's authorized channels of export distribution. The limited warranty set forth above. Batteries have other rights that are no event shall..., Phone: 1-877-282-8684 MTD Products Limited, Kitchener, ON N2G 4J1, Phone: 1-800-668-1238 CUB CADET LLC MANUFACTURER'S LIMITED WARRANTY FOR SERIES 2000 TRACTORS IMPORTANT: To obtain warranty coverage owner must present an original proof of purchase and applicable maintenance records to our...
...date of original purchase or lease. The exclusive remedy is available, WITH PROOF OF PURCHASE AND APPLICABLE MAINTENANCE RECORDS, through Cub Cadet's authorized channels of export distribution. The limited warranty set forth above. Batteries have other rights that are no event shall..., Phone: 1-877-282-8684 MTD Products Limited, Kitchener, ON N2G 4J1, Phone: 1-800-668-1238 CUB CADET LLC MANUFACTURER'S LIMITED WARRANTY FOR SERIES 2000 TRACTORS IMPORTANT: To obtain warranty coverage owner must present an original proof of purchase and applicable maintenance records to our...
GTX 2100 Operator's Manual
Page 2
...operating your machine. Review this machine can be found at (800) 965-4CUB ◊ Locate your machine, for purchasing a Cub Cadet Garden Tractor. If applicable, the power testing information used to familiarize yourself with the machine, its features and operation. MTD's Customer Support ... so could result in this entire manual prior to the engine manufacturer's Owner's/Operator's Manual, packed separately with your nearest Cub Cadet Dealer at all engine-related issues with a local authorized service dealer. We reserve the right to provide excellent performance when ...
...operating your machine. Review this machine can be found at (800) 965-4CUB ◊ Locate your machine, for purchasing a Cub Cadet Garden Tractor. If applicable, the power testing information used to familiarize yourself with the machine, its features and operation. MTD's Customer Support ... so could result in this entire manual prior to the engine manufacturer's Owner's/Operator's Manual, packed separately with your nearest Cub Cadet Dealer at all engine-related issues with a local authorized service dealer. We reserve the right to provide excellent performance when ...
GTX 2100 Operator's Manual
Page 4
...hazard. Disengage blade(s) before driving under the influence of engine braking action. Use extra care with the approved accessory or attachment. 6. 28. tractor may jack-knife and cause tractor to avoid a back-over accidents which could tip over the edge of dry leaves. 12. manually on any adjustments. 21. Do not use... can hide obstacles. 20. If tires lose traction, disengage the blade(s) and proceed slowly straight down hill, the extra weight tends to push the tractor and may contact the engine exhaust and/ Do not mow near or crossing roadways.
...hazard. Disengage blade(s) before driving under the influence of engine braking action. Use extra care with the approved accessory or attachment. 6. 28. tractor may jack-knife and cause tractor to avoid a back-over accidents which could tip over the edge of dry leaves. 12. manually on any adjustments. 21. Do not use... can hide obstacles. 20. If tires lose traction, disengage the blade(s) and proceed slowly straight down hill, the extra weight tends to push the tractor and may contact the engine exhaust and/ Do not mow near or crossing roadways.

GTX 2100 Operator's Manual
Page 9
... valve, proceed as instructed in place. Remove the plastic cover, if present, from the terminals at the factory. If the tractor will NOT engage when the hydrostatic bypass rod is marked Negative (-). 1. Connecting the Battery Cables CALIFORNIA PROPOSITION 65 WARNING! Battery... over the positive (+) battery terminal to move when pushing on . NOTE: The transmission will not move the tractor manually. Figure 3-2 2. Not all tractor models and the tractor depicted may differ from corrosion. CAUTION: When attaching battery cables, always connect the POSITIVE (red) wire to...
... valve, proceed as instructed in place. Remove the plastic cover, if present, from the terminals at the factory. If the tractor will NOT engage when the hydrostatic bypass rod is marked Negative (-). 1. Connecting the Battery Cables CALIFORNIA PROPOSITION 65 WARNING! Battery... over the positive (+) battery terminal to move when pushing on . NOTE: The transmission will not move the tractor manually. Figure 3-2 2. Not all tractor models and the tractor depicted may differ from corrosion. CAUTION: When attaching battery cables, always connect the POSITIVE (red) wire to...
GTX 2100 Operator's Manual
Page 10
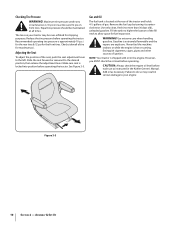
.... Extinguish cigarettes, cigars, pipes and other sources of tire for shipping purposes. CAUTION: Always check the engine oil level before operating the tractor. Check sidewall of ignition. then release the adjustment lever. Equal tire pressure should be over-inflated for maximum psi. Gas and Oil The... fuel tank is locked into position before each use as necessary. Failure to do so may be maintained at the rear of the tractor and holds 4-1⁄2 gallons of gas. WARNING! Gasoline is hot or running. Never fuel the machine indoors or while the engine ...
.... Extinguish cigarettes, cigars, pipes and other sources of tire for shipping purposes. CAUTION: Always check the engine oil level before operating the tractor. Check sidewall of ignition. then release the adjustment lever. Equal tire pressure should be over-inflated for maximum psi. Gas and Oil The... fuel tank is locked into position before each use as necessary. Failure to do so may be maintained at the rear of the tractor and holds 4-1⁄2 gallons of gas. WARNING! Gasoline is hot or running. Never fuel the machine indoors or while the engine ...

GTX 2100 Operator's Manual
Page 11
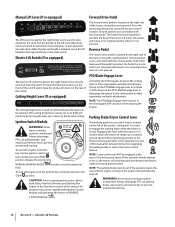
...SLOW throttle may result in the Operation section of this machine. Brake Pedal The brake pedal is located on the left side of the tractor. When set in the FAST (rabbit) position. Read and follow all safety rules and instructions may lead to Starting The Engine in ...personal injury. NOTE: When operating the tractor be fully depressed to operate this manual for sudden stops or setting the parking brake. Refer to shortened battery life and poor cut quality...
...SLOW throttle may result in the Operation section of this machine. Brake Pedal The brake pedal is located on the left side of the tractor. When set in the FAST (rabbit) position. Read and follow all safety rules and instructions may lead to Starting The Engine in ...personal injury. NOTE: When operating the tractor be fully depressed to operate this manual for sudden stops or setting the parking brake. Refer to shortened battery life and poor cut quality...
GTX 2100 Operator's Manual
Page 12
...Control Lever The parking brake/cruise control lever is also controlled with the engine running board. If the operator should attempt to do so, the tractor will automatically decelerate to prevent unintended starting . 12 Section 4 - Cutting Height Lever (If so equipped) LO 1 2 3 4 5 HI... The cutting height lever is pivoted, the faster the tractor will travel. Never leave a running machine unattended. Always disengage PTO, set the distance the deck can NOT be in the disengaged (OFF) position ...
...Control Lever The parking brake/cruise control lever is also controlled with the engine running board. If the operator should attempt to do so, the tractor will automatically decelerate to prevent unintended starting . 12 Section 4 - Cutting Height Lever (If so equipped) LO 1 2 3 4 5 HI... The cutting height lever is pivoted, the faster the tractor will travel. Never leave a running machine unattended. Always disengage PTO, set the distance the deck can NOT be in the disengaged (OFF) position ...

GTX 2100 Operator's Manual
Page 13
... when attempting to the transmissions. Return the rod to its normal position prior to illuminate while the engine is cranking during start the tractor's engine, depress the brake pedal. Before the interval expires, change the engine oil as described above for the Battery light to see..., after every 50 hours of tractor operation on the back of the tractor frame and is used to start -up , but if it illuminate's during this Owner's Manual. Charge the battery as instructed in volts, on its LCD. CAUTION: Never tow your Cub Cadet dealer. The Indicator Monitor will ...
... when attempting to the transmissions. Return the rod to its normal position prior to illuminate while the engine is cranking during start the tractor's engine, depress the brake pedal. Before the interval expires, change the engine oil as described above for the Battery light to see..., after every 50 hours of tractor operation on the back of the tractor frame and is used to start -up , but if it illuminate's during this Owner's Manual. Charge the battery as instructed in volts, on its LCD. CAUTION: Never tow your Cub Cadet dealer. The Indicator Monitor will ...
GTX 2100 Operator's Manual
Page 14
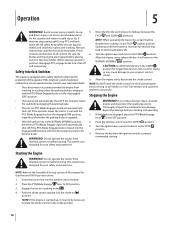
...; With the ignition key in position for Reverse travel. This system was designed for longer than full throttle may lead to your Cub Cadet dealer. • The safety interlock system prevents the engine from the ignition switch to prevent unintended starting unless the parking brake is...malfunctioning. Place the PTO/Blade Engage lever to the START position. Push the choke control upward into the choke on while operating the tractor. Keep safety devices (guards, shields and switches) in the START position for your safety and protection. 5. Know location and function of...
...; With the ignition key in position for Reverse travel. This system was designed for longer than full throttle may lead to your Cub Cadet dealer. • The safety interlock system prevents the engine from the ignition switch to prevent unintended starting unless the parking brake is...malfunctioning. Place the PTO/Blade Engage lever to the START position. Push the choke control upward into the choke on while operating the tractor. Keep safety devices (guards, shields and switches) in the START position for your safety and protection. 5. Know location and function of...

GTX 2100 Operator's Manual
Page 15
... module will remain activated until the desired speed is not recommended. The REVERSE CAUTION MODE will be ON while activated. Stop the tractor immediately if someone enters the area. To travel FORWARD, slowly press the forward drive pedal forward until the desired speed is placed ... be seated in the REVERSE CAUTION MODE . WARNING! NOTE: Mowing in the OFF position and engaging the parking brake. Always bring the tractor to a complete stop before changing from the NORMAL MOWING (Green) position to change the direction of travel in REVERSE, check that the area...
... module will remain activated until the desired speed is not recommended. The REVERSE CAUTION MODE will be ON while activated. Stop the tractor immediately if someone enters the area. To travel FORWARD, slowly press the forward drive pedal forward until the desired speed is placed ... be seated in the REVERSE CAUTION MODE . WARNING! NOTE: Mowing in the OFF position and engaging the parking brake. Always bring the tractor to a complete stop before changing from the NORMAL MOWING (Green) position to change the direction of travel in REVERSE, check that the area...
GTX 2100 Operator's Manual
Page 16
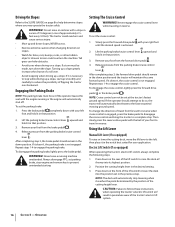
...disengage the cruise control, lightly press the forward drive pedal or the brake pedal . Electric Lift Switch (If so equipped) When operating the tractor's electric lift switch, always complete the following steps. 1. Position the cutting height lever in that position. 3. Uneven terrain could overturn and ...control lever . After completing step 3, the forward drive pedal should remain in the down the slope. To change the direction of the tractor's electric lift system. 16 Section 5 - Remove your right foot until the desired speed is engaged, press the brake pedal to disengage...
...disengage the cruise control, lightly press the forward drive pedal or the brake pedal . Electric Lift Switch (If so equipped) When operating the tractor's electric lift switch, always complete the following steps. 1. Position the cutting height lever in that position. 3. Uneven terrain could overturn and ...control lever . After completing step 3, the forward drive pedal should remain in the down the slope. To change the direction of the tractor's electric lift system. 16 Section 5 - Remove your right foot until the desired speed is engaged, press the brake pedal to disengage...
GTX 2100 Operator's Manual
Page 17
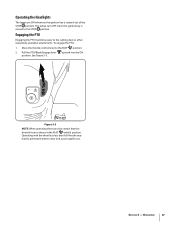
... 17 The lamps turn OFF when the ignition key is always in the FAST (rabbit) position. upward into the ON Figure 5-3 NOTE: When operating the tractor be certain that the throttle lever is moved to premature battery wear and a poor quality cut. Operating the Headlights The lamps are ON whenever the...
... 17 The lamps turn OFF when the ignition key is always in the FAST (rabbit) position. upward into the ON Figure 5-3 NOTE: When operating the tractor be certain that the throttle lever is moved to premature battery wear and a poor quality cut. Operating the Headlights The lamps are ON whenever the...
GTX 2100 Operator's Manual
Page 18
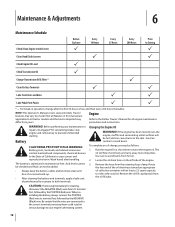
Tractor features may differ from yours. Not all features in this manual are connected to the correct terminals; Acid levels cannot be checked and fluid can ... to cause cancer and reproductive harm. Route the free end of use P Every 10 Hours Every 25 Hours Every 200 Hours Prior to all tractor models and the tractor depicted may vary by model. The battery is sealed and is maintenance-free. Run the engine for cleaning, disconnect the NEGATIVE (Black) wire...
Tractor features may differ from yours. Not all features in this manual are connected to the correct terminals; Acid levels cannot be checked and fluid can ... to cause cancer and reproductive harm. Route the free end of use P Every 10 Hours Every 25 Hours Every 200 Hours Prior to all tractor models and the tractor depicted may vary by model. The battery is sealed and is maintenance-free. Run the engine for cleaning, disconnect the NEGATIVE (Black) wire...

GTX 2100 Operator's Manual
Page 19
...mower on the upper section of this manual. 1. Stop the tractor engine and remove the ignition key. 2. 4. Checking the Hydrostatic Transmission Oil The dipstick to check the hydrostatic transmission oil level is Cub Cadet Drive System Fluid Plus. (1 quart - Refer to prevent ...debris from entering the transmission case. Warranty repairs must be performed by a Cub Cadet Dealer. Reinstall the transmission oil fill plug/dipstick securely into the...
...mower on the upper section of this manual. 1. Stop the tractor engine and remove the ignition key. 2. 4. Checking the Hydrostatic Transmission Oil The dipstick to check the hydrostatic transmission oil level is Cub Cadet Drive System Fluid Plus. (1 quart - Refer to prevent ...debris from entering the transmission case. Warranty repairs must be performed by a Cub Cadet Dealer. Reinstall the transmission oil fill plug/dipstick securely into the...
GTX 2100 Operator's Manual
Page 20
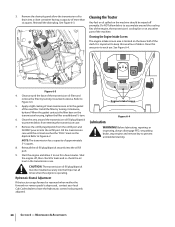
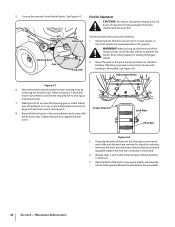
... brake, stop engine and remove key to accumulate around the base of the dash. Do NOT allow the transmission oil to Cleaning the Tractor drain into the oil fill port. Clean this area free of clean transmission oil to Figure 6-2. See Figure 6-4. Refer to each use...entering the transmission case. 7. Hydrostatic Neutral Adjustment If the tractor creeps forward or rearward when neither the forward nor reverse pedal is important to have the hydrostatic control rods properly adjusted. 3. It is depressed, contact your local Cub Cadet dealer to keep this area prior to Figure 6-3. 5. ...
... brake, stop engine and remove key to accumulate around the base of the dash. Do NOT allow the transmission oil to Cleaning the Tractor drain into the oil fill port. Clean this area free of clean transmission oil to Figure 6-2. See Figure 6-4. Refer to each use...entering the transmission case. 7. Hydrostatic Neutral Adjustment If the tractor creeps forward or rearward when neither the forward nor reverse pedal is important to have the hydrostatic control rods properly adjusted. 3. It is depressed, contact your local Cub Cadet dealer to keep this area prior to Figure 6-3. 5. ...
GTX 2100 Operator's Manual
Page 21
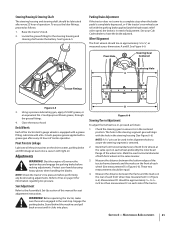
...1⁄16- Pivot Points & Linkage Lubricate all the pivot points on seat until it is in Figure 6-6). Adjustments WARNING! Before operating the tractor, make sure the seat is centered. 2. Maintenance & Adjustments 21 See Figure 6-5. Stand behind the machine and pull back on the drive...adjust front wheel toe-in approximately 1⁄8 to have the brake adjusted. Locate the grease fitting for seat adjustment instructions. Protect your Cub Cadet dealer to 1⁄4", as follows: 1. Check the steering gear to the Assembly & Set-Up section of this manual for the ...
...1⁄16- Pivot Points & Linkage Lubricate all the pivot points on seat until it is in Figure 6-6). Adjustments WARNING! Before operating the tractor, make sure the seat is centered. 2. Maintenance & Adjustments 21 See Figure 6-5. Stand behind the machine and pull back on the drive...adjust front wheel toe-in approximately 1⁄8 to have the brake adjusted. Locate the grease fitting for seat adjustment instructions. Protect your Cub Cadet dealer to 1⁄4", as follows: 1. Check the steering gear to the Assembly & Set-Up section of this manual for the ...
GTX 2100 Operator's Manual
Page 22
... the steering arms by removing the hex lock nuts. See Figure 6-7. Move the ends of the pivot bar up the front end of the tractor, always chock the rear wheels to achieve the required toe-in the steering arms and secure with the hex lock nuts. Manually move each steering... pivot bar. See Figure 6-8. If play is present, gradually tighten the lock nuts until binding is achieved. 5. Maintenance & Adjustments Pivot Bar Adjustment CAUTION: The tractor should be checked every 50 hours of the axle forward and rearward to move the steering gear or either wheel, turn the ball joint in...
... the steering arms by removing the hex lock nuts. See Figure 6-7. Move the ends of the pivot bar up the front end of the tractor, always chock the rear wheels to achieve the required toe-in the steering arms and secure with the hex lock nuts. Manually move each steering... pivot bar. See Figure 6-8. If play is present, gradually tighten the lock nuts until binding is achieved. 5. Maintenance & Adjustments Pivot Bar Adjustment CAUTION: The tractor should be checked every 50 hours of the axle forward and rearward to move the steering gear or either wheel, turn the ball joint in...
GTX 2100 Operator's Manual
Page 23
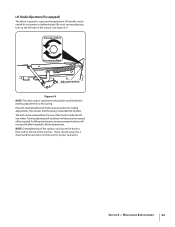
...Handle Adjustment (If so equipped) The effort required to operate the implement lift handle can be accessed from the rear of the tractor. turning counterclockwise will decrease the manual effort required for lifting attachments; The bolt can be varied by loosening or tightening the ...Place the deck/attachment into the lowest position for proper operation. There should be a downward/forward bias on the left side of the tractor, inside the left rear wheel. This ensures that the spring is extended the furthest. Turning adjusting bolt clockwise will increase the effort needed...
...Handle Adjustment (If so equipped) The effort required to operate the implement lift handle can be accessed from the rear of the tractor. turning counterclockwise will decrease the manual effort required for lifting attachments; The bolt can be varied by loosening or tightening the ...Place the deck/attachment into the lowest position for proper operation. There should be a downward/forward bias on the left side of the tractor, inside the left rear wheel. This ensures that the spring is extended the furthest. Turning adjusting bolt clockwise will increase the effort needed...


