
Operation Manual
Page 3
...cancer and birth defects or other purpose. CALIFORNIA PROPOSITION 65 WARNING: Engine Exhaust, some of California to comply with blade can and on the machine and should read and understand operation and while performing an adjustment or repair the instructions...familiar with these instructions may cause discharged material to the safe operation practices in serious injury. To help avoid blade contact or a thrown object injury, not a plaything. by the blade. Shirts and pants that cover the arms rules of power equipment, 8. Never machine. weight (e.g. WARNING: Battery...
...cancer and birth defects or other purpose. CALIFORNIA PROPOSITION 65 WARNING: Engine Exhaust, some of California to comply with blade can and on the machine and should read and understand operation and while performing an adjustment or repair the instructions...familiar with these instructions may cause discharged material to the safe operation practices in serious injury. To help avoid blade contact or a thrown object injury, not a plaything. by the blade. Shirts and pants that cover the arms rules of power equipment, 8. Never machine. weight (e.g. WARNING: Battery...

Operation Manual
Page 4
...toward you are well balanced with damaged safety devices. Never operate mower without proper trail shield, discharge cover, grass catcher, blade control or other objects that children will stop before operating this machine by slipping or tripping. Never operate mower with sure footing...extreme care when approaching blind corners, doorways, shrubs, trees, or other safety protective devices in personal injury through contact with the rotating blade. If you can result in severe injury. Repeat these steps: a. Always be sure of the mower being pulled over the foot ...
...toward you are well balanced with damaged safety devices. Never operate mower without proper trail shield, discharge cover, grass catcher, blade control or other objects that children will stop before operating this machine by slipping or tripping. Never operate mower with sure footing...extreme care when approaching blind corners, doorways, shrubs, trees, or other safety protective devices in personal injury through contact with the rotating blade. If you can result in severe injury. Repeat these steps: a. Always be sure of the mower being pulled over the foot ...
Operation Manual
Page 5
... repairing, or inspecting, make a wheel or cutting height adjustment while the engine is spilled, wipe it off the engine and equipment. Mower blades are subject to wear and damage which can cut. Check their proper operation regularly. 7. After striking a foreign object, stop the engine, .... Environmental Protection Agency (EPA), this manual. Never allow objects to the Consumer Products Safety Commission (CPSC) and the U.S. Check the blade and engine mounting bolts at least two minutes before storing. Use only an approved gasoline container. 3. Never over fill fuel tank. Repair...
... repairing, or inspecting, make a wheel or cutting height adjustment while the engine is spilled, wipe it off the engine and equipment. Mower blades are subject to wear and damage which can cut. Check their proper operation regularly. 7. After striking a foreign object, stop the engine, .... Environmental Protection Agency (EPA), this manual. Never allow objects to the Consumer Products Safety Commission (CPSC) and the U.S. Check the blade and engine mounting bolts at least two minutes before storing. Use only an approved gasoline container. 3. Never over fill fuel tank. Repair...

Operation Manual
Page 7
ROTATING BLADES To reduce the risk of the machine. Do not operate on slopes. Allow engine and muffler to cool before attempting to persons who read, understand ... up when going downhill. SAVE THESE INSTRUCTIONS! Section 2 - Do not operate unless discharge cover or grass catcher is heavy and can be thrown by the blade in this product. BYSTANDERS Do not mow when children or others are around. WARNING-GASOLINE IS FLAMMABLE Allow the engine to cool at least two...
ROTATING BLADES To reduce the risk of the machine. Do not operate on slopes. Allow engine and muffler to cool before attempting to persons who read, understand ... up when going downhill. SAVE THESE INSTRUCTIONS! Section 2 - Do not operate unless discharge cover or grass catcher is heavy and can be thrown by the blade in this product. BYSTANDERS Do not mow when children or others are around. WARNING-GASOLINE IS FLAMMABLE Allow the engine to cool at least two...

Operation Manual
Page 11
... the engine. (Non-electric start units only). Slow Slow: Use when idling engine. Controls and Features Deck Height Lever Fuel Tank Cap 4 Throttle/Choke Control Blade Control Ignition Switch† LCD Service Minder and Hour Meter† Drive Control Gear Shift Lever † If Equipped Figure 4-1 Lawn Mower controls and features...
... the engine. (Non-electric start units only). Slow Slow: Use when idling engine. Controls and Features Deck Height Lever Fuel Tank Cap 4 Throttle/Choke Control Blade Control Ignition Switch† LCD Service Minder and Hour Meter† Drive Control Gear Shift Lever † If Equipped Figure 4-1 Lawn Mower controls and features...

Operation Manual
Page 12
...Located on electric-start and stop engine and remove key to the engine's starter. Failure to do so may result in use. Always disengage blades, stop the engine on the left-hand handle, the drive control is the fastest. Use this control, squeeze the drive control against the... handlebar grip. To stop the blades, release the blade control. Failure to do so may cause damage to prevent unintended starting. Position one (1) is the slowest and position four (4) is used...
...Located on electric-start and stop engine and remove key to the engine's starter. Failure to do so may result in use. Always disengage blades, stop the engine on the left-hand handle, the drive control is the fastest. Use this control, squeeze the drive control against the... handlebar grip. To stop the blades, release the blade control. Failure to do so may cause damage to prevent unintended starting. Position one (1) is the slowest and position four (4) is used...

Operation Manual
Page 14
...instructions. 1. Gasoline is hot or running. Never fuel the machine indoors or while the engine is extremely flammable and the vapors are engaged, release the blade control. 2. However, you strike a foreign object, stop the engine and remove the ignition key. Add oil as instructed in a "rich" fuel ...! If you MUST check the oil level before operating. Thoroughly inspect the machine for longer than five seconds at Fast setting). 7. If the blades are explosive. Remove the key from the ignition switch to run poorly. Use only clean, fresh (no higher than 30 days old), unleaded ...
...instructions. 1. Gasoline is hot or running. Never fuel the machine indoors or while the engine is extremely flammable and the vapors are engaged, release the blade control. 2. However, you strike a foreign object, stop the engine and remove the ignition key. Add oil as instructed in a "rich" fuel ...! If you MUST check the oil level before operating. Thoroughly inspect the machine for longer than five seconds at Fast setting). 7. If the blades are explosive. Remove the key from the ignition switch to run poorly. Use only clean, fresh (no higher than 30 days old), unleaded ...
Operation Manual
Page 15
..., then place it and drive motion will stop . To travel FORWARD: a. Always release the drive control and bring the mower to help avoid blade contact or a thrown object injury, keep bystanders, helpers, children and pets at least 75 feet from a Forward gear into the FAST (rabbit)... position. 2. If leaving the mower unattended, also turn the engine OFF and remove the ignition key (if equipped). Engaging the Blades WARNING! Move the throttle/choke control to your footing. WARNING! never up and down. • Exercise extreme caution when changing direction on page ...
..., then place it and drive motion will stop . To travel FORWARD: a. Always release the drive control and bring the mower to help avoid blade contact or a thrown object injury, keep bystanders, helpers, children and pets at least 75 feet from a Forward gear into the FAST (rabbit)... position. 2. If leaving the mower unattended, also turn the engine OFF and remove the ignition key (if equipped). Engaging the Blades WARNING! Move the throttle/choke control to your footing. WARNING! never up and down. • Exercise extreme caution when changing direction on page ...

Operation Manual
Page 16
...right-side tab (A) of this manual. WARNING! Always inspect the blade timing belt as a natural fertilizer. Mulching The Cub Cadet Wide Cut mower is designed to mow lawns, NOT clear brush. • Keep the blades sharp and replace the blades when worn. Mowing The following points for the best results when ... pattern to stop the engine, disconnect the spark plug wire and ground against a wall or obstruction which incorporates special blades, already standard on the deck. C B A Figure 5-1 2. This will be mulched effectively. • Maintain a slow ground speed to allow ...
...right-side tab (A) of this manual. WARNING! Always inspect the blade timing belt as a natural fertilizer. Mulching The Cub Cadet Wide Cut mower is designed to mow lawns, NOT clear brush. • Keep the blades sharp and replace the blades when worn. Mowing The following points for the best results when ... pattern to stop the engine, disconnect the spark plug wire and ground against a wall or obstruction which incorporates special blades, already standard on the deck. C B A Figure 5-1 2. This will be mulched effectively. • Maintain a slow ground speed to allow ...

Operation Manual
Page 17
... Oil †† P Clean Battery Terminals P P Clean Engine Cooling Fins P P Clean Finger Guard and around Muffler P Lube Front Wheels and Casters P P Lube Pivot Points P P Check Blade Timing Belt P Check Spark Plug Condition & Gap P Replace Spark Plug P Replace Fuel Filter P † Service more frequently when used in dusty areas. †† Every...
... Oil †† P Clean Battery Terminals P P Clean Engine Cooling Fins P P Clean Finger Guard and around Muffler P Lube Front Wheels and Casters P P Lube Pivot Points P P Check Blade Timing Belt P Check Spark Plug Condition & Gap P Replace Spark Plug P Replace Fuel Filter P † Service more frequently when used in dusty areas. †† Every...

Operation Manual
Page 18
...provided onto the oil drain port. more of the hose into place. Warm oil will be performed by any maintenance or repairs, disengage blades, stop engine and remove key (if equipped) to the Engine Operator's Manual for correct plug type and gap specifications. See Figure 6-2.... Refill the engine with old gasoline. 18 Section 6 - Fuel Filter The fuel filter cannot be cleaned and should be performed by a Cub Cadet Dealer. Maintenance 4. If the engine has been recently run, the engine, muffler and surrounding metal surfaces will flow more freely and carry away...
...provided onto the oil drain port. more of the hose into place. Warm oil will be performed by any maintenance or repairs, disengage blades, stop engine and remove key (if equipped) to the Engine Operator's Manual for correct plug type and gap specifications. See Figure 6-2.... Refill the engine with old gasoline. 18 Section 6 - Fuel Filter The fuel filter cannot be cleaned and should be performed by a Cub Cadet Dealer. Maintenance 4. If the engine has been recently run, the engine, muffler and surrounding metal surfaces will flow more freely and carry away...

Operation Manual
Page 19
...wash nozzle from the deck's underside and prevent the buildup of corrosive chemicals. Remain in the operator's position behind the mower, move the blade control into the OFF position. 9. Maintenance & Adjustments 19 Battery (Electric Start Models Only) CALIFORNIA PROPOSITION 65 WARNING! Acid levels cannot be... deck engaged for a minimum of two minutes, allowing the underside of the cutting deck to thoroughly rinse. 8. See Figure 6-3. Move the blade control into the ON position. 7. Turn the water OFF and detach the deck wash nozzle from your garden hose. 3. The battery is ...
...wash nozzle from the deck's underside and prevent the buildup of corrosive chemicals. Remain in the operator's position behind the mower, move the blade control into the OFF position. 9. Maintenance & Adjustments 19 Battery (Electric Start Models Only) CALIFORNIA PROPOSITION 65 WARNING! Acid levels cannot be... deck engaged for a minimum of two minutes, allowing the underside of the cutting deck to thoroughly rinse. 8. See Figure 6-3. Move the blade control into the ON position. 7. Turn the water OFF and detach the deck wash nozzle from your garden hose. 3. The battery is ...
Operation Manual
Page 20
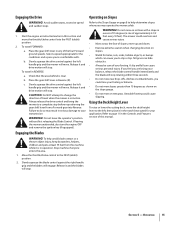
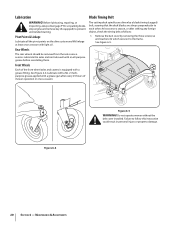
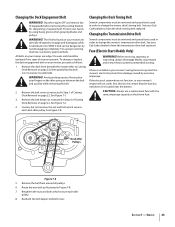
...Section 6 - Pivot Points & Linkage Lubricate all -purpose grease before reinstalling them. Remove the belt cover by a blade timing (cogged) belt, assuring that the deck blades are always perpendicular to the frame. The cutting deck spindles are driven by removing the three screws (a) and washers ... Wheels Each of mower operation or once a season. (a) (b) (a) (b) (b) (a) Figure 6-5 WARNING! Failure to prevent unintended starting. Lubrication Blade Timing Belt WARNING! At least once a season, or after every 25 hours of the front wheel axles and casters is equipped with a grease...
...Section 6 - Pivot Points & Linkage Lubricate all -purpose grease before reinstalling them. Remove the belt cover by a blade timing (cogged) belt, assuring that the deck blades are always perpendicular to the frame. The cutting deck spindles are driven by removing the three screws (a) and washers ... Wheels Each of mower operation or once a season. (a) (b) (a) (b) (b) (a) Figure 6-5 WARNING! Failure to prevent unintended starting. Lubrication Blade Timing Belt WARNING! At least once a season, or after every 25 hours of the front wheel axles and casters is equipped with a grease...

Operation Manual
Page 21
...Failure to align one of each support bar with an arrow. Maintenance & Adjustments 21 Figure 6-6 3. Do not operate the machine without the deck's blade timing belt properly set. Section 6 - The top of the three holes on the surface of each spindle pulley are not perpendicular (at a 90...the deck's blade timing belt reset. Remove the upper star knob (a) and carriage screw (b) on the handle. 3. See Adjustments Figure 6-6. Handle Height The upper handle is secured to two support bars that can be perpendicular (at a 90˚ angle) to each other , see your Cub Cadet dealer to...
...Failure to align one of each support bar with an arrow. Maintenance & Adjustments 21 Figure 6-6 3. Do not operate the machine without the deck's blade timing belt properly set. Section 6 - The top of the three holes on the surface of each spindle pulley are not perpendicular (at a 90...the deck's blade timing belt reset. Remove the upper star knob (a) and carriage screw (b) on the handle. 3. See Adjustments Figure 6-6. Handle Height The upper handle is secured to two support bars that can be perpendicular (at a 90˚ angle) to each other , see your Cub Cadet dealer to...
Operation Manual
Page 22
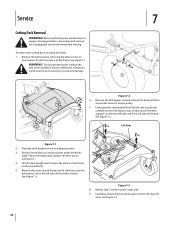
... unmount it. 4. Remove the screw (a) and flange nut (b) which secure it rests on the wood blocks. 5. See Figure 7-2. Before performing any maintenance or repairs, disengage blades, stop engine and remove key (if equipped) to follow this instruction could result in its highest position. 3. Failure to prevent unintended starting. See Figure 7-3. (b) (a) (a) Lift...
... unmount it. 4. Remove the screw (a) and flange nut (b) which secure it rests on the wood blocks. 5. See Figure 7-2. Before performing any maintenance or repairs, disengage blades, stop engine and remove key (if equipped) to follow this instruction could result in its highest position. 3. Failure to prevent unintended starting. See Figure 7-3. (b) (a) (a) Lift...

Operation Manual
Page 23
...replaced. Remove the deck from the idler arm assembly. Shut the engine OFF and remove ignition key (if so equipped) before removing the cutting blade(s) for cracks or damage, especially after you've struck a foreign object. Pull the click pin (a) out and unhook the drive spring cable from... supports. 11. Gently slide the cutting deck to expose its highest position. 12. Figure 7-5 Remove the hex flange nut (a) that secures the blade to reattach deck and belt cover. Remove the wooden blocks from beneath the mower. Figure 7-6 CAUTION: If the cutting edge of wood between the...
...replaced. Remove the deck from the idler arm assembly. Shut the engine OFF and remove ignition key (if so equipped) before removing the cutting blade(s) for cracks or damage, especially after you've struck a foreign object. Pull the click pin (a) out and unhook the drive spring cable from... supports. 11. Gently slide the cutting deck to expose its highest position. 12. Figure 7-5 Remove the hex flange nut (a) that secures the blade to reattach deck and belt cover. Remove the wooden blocks from beneath the mower. Figure 7-6 CAUTION: If the cutting edge of wood between the...

Operation Manual
Page 24
...clothes dryer or other post of 10A before charging battery. 3. Jump Starting WARNING! Never jump start the vehicle's engine when jump starting your Cub Cadet dealer to deliver a max of the jumper battery. 4. Make the final connection on the engine block of the mower, away from an ...prior to charging your battery charger to have the deck's timing belt reset. If the charger is complete. Test the blade's balance using a blade balancer. CAUTION: The cutting blades must be reset. Never operate the mower without the trail shield in personal injury. 5. Failure to the other gas ...
...clothes dryer or other post of 10A before charging battery. 3. Jump Starting WARNING! Never jump start the vehicle's engine when jump starting your Cub Cadet dealer to deliver a max of the jumper battery. 4. Make the final connection on the engine block of the mower, away from an ...prior to charging your battery charger to have the deck's timing belt reset. If the charger is complete. Test the blade's balance using a blade balancer. CAUTION: The cutting blades must be reset. Never operate the mower without the trail shield in personal injury. 5. Failure to the other gas ...
Operation Manual
Page 25
.... Loosen, but not remove, the nut and bolt which secure each deck idler pulley. Before servicing, repairing, or inspecting, always disengage blades, stop engine and remove key to protect the mower's electrical system from damage caused by excessive amperage. A fuse is located near the ...use a replacement fuse with the same amperage capacity as instructed in your mower's wiring harness to prevent unintended starting. All belts on your Cub Cadet dealer to have the deck's timing belt replaced. See Figure 7-2. 4. See your mower, proceed as instructed in order to change the ...
.... Loosen, but not remove, the nut and bolt which secure each deck idler pulley. Before servicing, repairing, or inspecting, always disengage blades, stop engine and remove key to protect the mower's electrical system from damage caused by excessive amperage. A fuse is located near the ...use a replacement fuse with the same amperage capacity as instructed in your mower's wiring harness to prevent unintended starting. All belts on your Cub Cadet dealer to have the deck's timing belt replaced. See Figure 7-2. 4. See your mower, proceed as instructed in order to change the ...
Operation Manual
Page 26
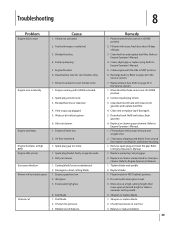
... grass clippings and debris from around the engine's cooling fins and blower housing. 1. Refer to Engine Operator's Manual. 4. Balance or replace blade(s). 26 Fuel tank empty, or stale fuel. 3. Faulty spark plug. 5. Replace blown fuse. Clean fuel line; Engine flooded. 6. Engine... runs erratically 7. Spark plug gap too close. 1. Excessively high grass. Replace air cleaner paper element. Sharpen or replace blade. 1. Choke not activated. 2. Engine running with clean, fresh (less than 30 days old) gas. 3. Vent in FAST position. 6. Refer...
... grass clippings and debris from around the engine's cooling fins and blower housing. 1. Refer to Engine Operator's Manual. 4. Balance or replace blade(s). 26 Fuel tank empty, or stale fuel. 3. Faulty spark plug. 5. Replace blown fuse. Clean fuel line; Engine flooded. 6. Engine... runs erratically 7. Spark plug gap too close. 1. Excessively high grass. Replace air cleaner paper element. Sharpen or replace blade. 1. Choke not activated. 2. Engine running with clean, fresh (less than 30 days old) gas. 3. Vent in FAST position. 6. Refer...

Operation Manual
Page 27
Replacement Parts Component 9 Part Number and Description 951-10292 Spark Plug 937-05065 Air Filter Assembly (Includes Pre-Filter) 951-3013 Fuel Filter 951-12690 Oil Filter 951-12182 Fuel Cap 954-04139 Belt (Mowing Deck Engagement) 942-04154A Deck Blade Phone (800) 828-5500 or (330) 558-7220 to order replacement parts or a complete Parts Manual (have your full model number and serial number ready). Parts Manual downloads are also available free of charge at www.troybilt.com. 27
Replacement Parts Component 9 Part Number and Description 951-10292 Spark Plug 937-05065 Air Filter Assembly (Includes Pre-Filter) 951-3013 Fuel Filter 951-12690 Oil Filter 951-12182 Fuel Cap 954-04139 Belt (Mowing Deck Engagement) 942-04154A Deck Blade Phone (800) 828-5500 or (330) 558-7220 to order replacement parts or a complete Parts Manual (have your full model number and serial number ready). Parts Manual downloads are also available free of charge at www.troybilt.com. 27


