Operation Manual
Page 1
Visit our website: www.craftsman.com FORMNO.769-05095 12/29/2009 o SAFETY ASSEMBLY OPERATION MAINTENANCE PARTS LIST o ESPANOL Sears, Roebuck and Co., Hoffman Estates, IL 60179, U.S.A. Operator's Manual CRRFTSMRN 24" SNOW THROWER Model No. 247.88957 CAUTION: Before using this product, read this manual and follow all safety rules and operating instructions.
Visit our website: www.craftsman.com FORMNO.769-05095 12/29/2009 o SAFETY ASSEMBLY OPERATION MAINTENANCE PARTS LIST o ESPANOL Sears, Roebuck and Co., Hoffman Estates, IL 60179, U.S.A. Operator's Manual CRRFTSMRN 24" SNOW THROWER Model No. 247.88957 CAUTION: Before using this product, read this manual and follow all safety rules and operating instructions.
Operation Manual
Page 8
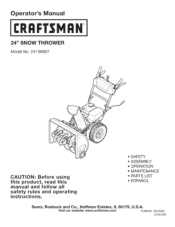
REMOVING FROM CARTON 1. ASSEMBLY 1. Placethe shiftleverin the Forward-6position. 2. NOTE:Makecertainthe upperends of eachcableare seatedproperly in the operatingposition(standing directlybehindthe snow thrower,facingthe handlepanel). Cut the cornersof thecarton and lay the sidesflat on the ground. Referto ReplacingShear Pinsin the Operationsectionfor more informationregardingshearpin replacement. f . Remove and discardany rubberbands,...
REMOVING FROM CARTON 1. ASSEMBLY 1. Placethe shiftleverin the Forward-6position. 2. NOTE:Makecertainthe upperends of eachcableare seatedproperly in the operatingposition(standing directlybehindthe snow thrower,facingthe handlepanel). Cut the cornersof thecarton and lay the sidesflat on the ground. Referto ReplacingShear Pinsin the Operationsectionfor more informationregardingshearpin replacement. f . Remove and discardany rubberbands,...

Operation Manual
Page 10
... tires as itcan easilypick up and throwloosegravel,causingpersonal njuryor damageto the snowthrowerand surroundng property. • Forclose snow removalon a smoothsurface,raiseskid shoes higheron the auger housing. SET-UP Chute Clean-Out Tool A chute .... See Figure7. 10 ChuteClean=outTool Figure6 Figure7 Tire Pressure Thetires are over-inflatedfor shippingpurposes.Checkthetire pressurebeforeoperatingthe snow thrower.Referto the tire sidewall for shippingpurposes.Adjustthemdownward,ifdesired,priorto operatingthe snowthrower. Do not underanycircumstanceexceed manufacturer'srecom- ...
... tires as itcan easilypick up and throwloosegravel,causingpersonal njuryor damageto the snowthrowerand surroundng property. • Forclose snow removalon a smoothsurface,raiseskid shoes higheron the auger housing. SET-UP Chute Clean-Out Tool A chute .... See Figure7. 10 ChuteClean=outTool Figure6 Figure7 Tire Pressure Thetires are over-inflatedfor shippingpurposes.Checkthetire pressurebeforeoperatingthe snow thrower.Referto the tire sidewall for shippingpurposes.Adjustthemdownward,ifdesired,priorto operatingthe snowthrower. Do not underanycircumstanceexceed manufacturer'srecom- ...
Operation Manual
Page 11
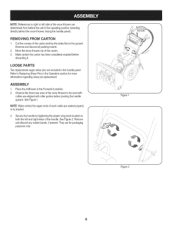
... the front of the machine. 6. It shouldNOTbe tight. 2. Whilestandingin the operator'sposition(behindthe snow thrower),engagethe auger. 4. With theauger controlin thedisengaged"up " position,the cableshouldhavevery little slack. In...upwardor downwardbeforeretighteningthewing knob,See Figure8, Auger Control Priorto operatingyoursnowthrower,carefullyreadand follow all instructionsbelow,Performall adjustmentsto verifyyour snow throweris operatingsafelyand properly, Checktheadjustmentof the augercontrolas follows: 1. Positionthe bracketupwardto providemoreslack(or downward to remainengagedfor ...
... the front of the machine. 6. It shouldNOTbe tight. 2. Whilestandingin the operator'sposition(behindthe snow thrower),engagethe auger. 4. With theauger controlin thedisengaged"up " position,the cableshouldhavevery little slack. In...upwardor downwardbeforeretighteningthewing knob,See Figure8, Auger Control Priorto operatingyoursnowthrower,carefullyreadand follow all instructionsbelow,Performall adjustmentsto verifyyour snow throweris operatingsafelyand properly, Checktheadjustmentof the augercontrolas follows: 1. Positionthe bracketupwardto providemoreslack(or downward to remainengagedfor ...
Operation Manual
Page 13
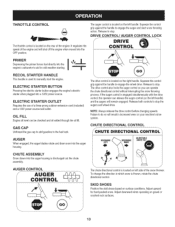
... / AUGER CONTROL & # _ J The chute directional control is thrown, rotate the chute directional control. The augercontrol is locatedon the left side of the snow thrower, To change the direction in which snow is located on the left handle) and the augerswill remainengaged.Releaseboth controlsto stop the augersand wheeldrive. OIL FILL Engineoil levelcan be checkedand...
... / AUGER CONTROL & # _ J The chute directional control is thrown, rotate the chute directional control. The augercontrol is locatedon the left side of the snow thrower, To change the direction in which snow is located on the left handle) and the augerswill remainengaged.Releaseboth controlsto stop the augersand wheeldrive. OIL FILL Engineoil levelcan be checkedand...

Operation Manual
Page 14
... 2. Makecertainboththe augercontrol and drivecontrolare in . 3. insertkeyinto slot. DONOT useelectricstarterinthe rain. Whilestandingin the operator'sposition(behindthesnow thrower),engagethe auger controlfora few minutesafter starting. NOTE:Be sureto checkthe engineon a levelsurfacewith the engine stopped. 1. Replaceand ...Use the shovel-shapedend of theclean-outtool to the rear of theauger housing,reinsertthe ignitionkey and startthe snow thrower'sengine. 6. BEFORE STARTING ENGINE Read,understand,and followall instructionsand warningson the machineand in the engine....
... 2. Makecertainboththe augercontrol and drivecontrolare in . 3. insertkeyinto slot. DONOT useelectricstarterinthe rain. Whilestandingin the operator'sposition(behindthesnow thrower),engagethe auger controlfora few minutesafter starting. NOTE:Be sureto checkthe engineon a levelsurfacewith the engine stopped. 1. Replaceand ...Use the shovel-shapedend of theclean-outtool to the rear of theauger housing,reinsertthe ignitionkey and startthe snow thrower'sengine. 6. BEFORE STARTING ENGINE Read,understand,and followall instructionsand warningson the machineand in the engine....
Operation Manual
Page 15
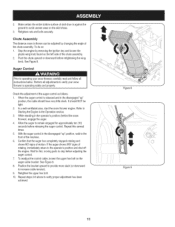
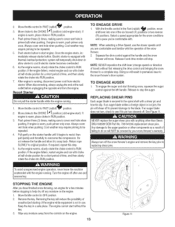
....Coolweathermay requireprimingto be repeated. 5. TO ENGAGE DRIVE 1. Toavoid unsupervisedengineoperation,neverleavethemachine unattendedwith the enginerunning.Turnthe engineoff after use the slowerspeedsuntil you are comfortableand familiarwiththe operationof the snow thrower. 2. Movethrottlecontrolto OFF position. 2. Figure11 As theenginewarms,slowlyrotatethe chokecontrol to snapback.Returnrope SLOWLYto original position.If required,repeatthis step. 5. NOTE: When selectinga DriveSpeed,use and removekey...
....Coolweathermay requireprimingto be repeated. 5. TO ENGAGE DRIVE 1. Toavoid unsupervisedengineoperation,neverleavethemachine unattendedwith the enginerunning.Turnthe engineoff after use the slowerspeedsuntil you are comfortableand familiarwiththe operationof the snow thrower. 2. Movethrottlecontrolto OFF position. 2. Figure11 As theenginewarms,slowlyrotatethe chokecontrol to snapback.Returnrope SLOWLYto original position.If required,repeatthis step. 5. NOTE: When selectinga DriveSpeed,use and removekey...
Operation Manual
Page 18
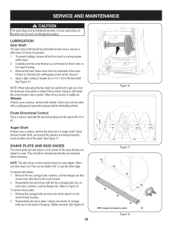
... shaveplate,makingsureheadsof carriage bolts are to the / snowthrowerhousing. / / / 2. Removethe lowerframecover fromthe undersideof the snow throwerby removingthe self-tappingscrewswhich secureit. 4. SHAVE PLATE AND SKID SHOES The shaveplateand skid shoeson the bottomof the ...eachside), washers,and hex flangenuts.Referto Figure18. Removethe two carriagebolts,washers,and hex flangenutsthat secureeachskid shoeto the snow thrower. 2. Reassemblenew skid shoeswith the fourcarriagebolts (two on f thealuminumdriveplateor rubberfrictionwheel. Topreventspillage,removeall fuel fromtank by ...
... shaveplate,makingsureheadsof carriage bolts are to the / snowthrowerhousing. / / / 2. Removethe lowerframecover fromthe undersideof the snow throwerby removingthe self-tappingscrewswhich secureit. 4. SHAVE PLATE AND SKID SHOES The shaveplateand skid shoeson the bottomof the ...eachside), washers,and hex flangenuts.Referto Figure18. Removethe two carriagebolts,washers,and hex flangenutsthat secureeachskid shoeto the snow thrower. 2. Reassemblenew skid shoeswith the fourcarriagebolts (two on f thealuminumdriveplateor rubberfrictionwheel. Topreventspillage,removeall fuel fromtank by ...

Operation Manual
Page 20
BELT REPLACEMENT Auger Belt To removeand replaceyoursnow thrower'sauger belt, proceedas follows: 1. ing the two self-tappingscrews.See Figure22. 3. f 4. See Figure 24. J Figure22 Figure 23 f // J Figure24 2O Rollthe auger beltoff theengine pulley.See Figure23. Topreventspillage,removeall fuel fromtank ... skid shoes. Removethe plasticbelt coveron the front of the engineby remov- Removethe frame coverfrom the undersideof the snow thrower by runningengine until itstops. 2. Auger Control Referto the Assemblysectionfor instructionosn adjustingtheauger controlcable.
BELT REPLACEMENT Auger Belt To removeand replaceyoursnow thrower'sauger belt, proceedas follows: 1. ing the two self-tappingscrews.See Figure22. 3. f 4. See Figure 24. J Figure22 Figure 23 f // J Figure24 2O Rollthe auger beltoff theengine pulley.See Figure23. Topreventspillage,removeall fuel fromtank ... skid shoes. Removethe plasticbelt coveron the front of the engineby remov- Removethe frame coverfrom the undersideof the snow thrower by runningengine until itstops. 2. Auger Control Referto the Assemblysectionfor instructionosn adjustingtheauger controlcable.
Operation Manual
Page 22
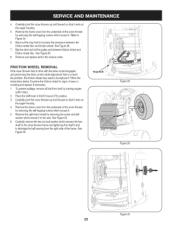
....Examinethe frictionwheelfor signsof wearor crackingand replaceif necessary. 1. Placethe shiftleverin third Forward(F3) position. 3. Stop Bolt Figure28 J Figure29 f J Figure30 22 Removethe frame coverfrom the undersideof the snow thrower by runningengine until it restson theauger housing. 4. See Figure29. 6. 4, Carefupllyivotthesnowthrowueprandforwarsdothatitrestosn theaugehrousing. 5. Slipthedrivebelot ffthepulleayndbetweefrnictiownheealnd frictiownheedliscS, eeFigur2e8, 8, Removaendreplacbeelitnthereversoerder, FRiCTiON WHEEL REMOVAL If the snowthrowerfailsto drive with...
....Examinethe frictionwheelfor signsof wearor crackingand replaceif necessary. 1. Placethe shiftleverin third Forward(F3) position. 3. Stop Bolt Figure28 J Figure29 f J Figure30 22 Removethe frame coverfrom the undersideof the snow thrower by runningengine until it restson theauger housing. 4. See Figure29. 6. 4, Carefupllyivotthesnowthrowueprandforwarsdothatitrestosn theaugehrousing. 5. Slipthedrivebelot ffthepulleayndbetweefrnictiownheealnd frictiownheedliscS, eeFigur2e8, 8, Removaendreplacbeelitnthereversoerder, FRiCTiON WHEEL REMOVAL If the snowthrowerfailsto drive with...
Operation Manual
Page 24
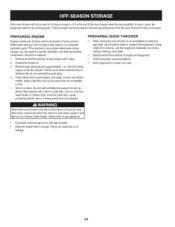
... the snowthrowerwillnot be usedfor30 daysor longer,or if it stops. • 2. PREPARING ENGINE PREPARING SNOW THROWER Enginesstoredover30 days need to prevent deteriorationand gumfrom formingin fuel systemor on essential carburetorparts.If thegasolinein yourenginedeterioratesduring storage...8226; If possible,avoidstorageareaswith high humidity. • Keepthe enginelevelin storage.Tiltingcan causefuel or oil leakage. 24 Cleandebrisfrom aroundengine,and under,around,and behind muffler.Applya lightfilm of clean engineoil intothe cylinder.Pullthe recoilstarterseveraltimesto ...
... the snowthrowerwillnot be usedfor30 daysor longer,or if it stops. • 2. PREPARING ENGINE PREPARING SNOW THROWER Enginesstoredover30 days need to prevent deteriorationand gumfrom formingin fuel systemor on essential carburetorparts.If thegasolinein yourenginedeterioratesduring storage...8226; If possible,avoidstorageareaswith high humidity. • Keepthe enginelevelin storage.Tiltingcan causefuel or oil leakage. 24 Cleandebrisfrom aroundengine,and under,around,and behind muffler.Applya lightfilm of clean engineoil intothe cylinder.Pullthe recoilstarterseveraltimesto ...
Operation Manual
Page 27
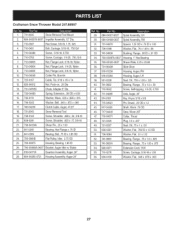
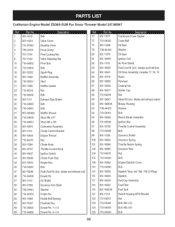
Craftsman Snow Thrower IViodel 247.88957 731-2635 D= 00 SnowRemovalToolMount 2. 684-04057A-0637 ImpellerAssembly,12"Dia. 3. 710-0347 ... x 1.50 22. 941-0245 Bearing,Hex Flangex .75ID 23. 941-0309 Bearing,Ball,.75ID x 1.85OD 24. 756-0981B Flat Pulley,Idler, 2.75OD 25. 790-00075 Housing,Bearing,1.85ID 26. 790-00080A-0637 Bracket,AugerIdlerw/Brake...Auger,RH Housing,Auger,LH Seal,Oil, .750x 1.00x .125 Bearing,Flange,.75x 1.0x .59 Screw,Self-tapping,1/4-20,0.750 Axle,Auger,24" Key,Hi-pro3/16x 5/8 Pin, Dowel,.25OD x 1.2 Shaft,Worm.75OD Gear,Worm20T Collar,Thrust Plug,1/4 x .437 Seal,Oil, ...
Craftsman Snow Thrower IViodel 247.88957 731-2635 D= 00 SnowRemovalToolMount 2. 684-04057A-0637 ImpellerAssembly,12"Dia. 3. 710-0347 ... x 1.50 22. 941-0245 Bearing,Hex Flangex .75ID 23. 941-0309 Bearing,Ball,.75ID x 1.85OD 24. 756-0981B Flat Pulley,Idler, 2.75OD 25. 790-00075 Housing,Bearing,1.85ID 26. 790-00080A-0637 Bracket,AugerIdlerw/Brake...Auger,RH Housing,Auger,LH Seal,Oil, .750x 1.00x .125 Bearing,Flange,.75x 1.0x .59 Screw,Self-tapping,1/4-20,0.750 Axle,Auger,24" Key,Hi-pro3/16x 5/8 Pin, Dowel,.25OD x 1.2 Shaft,Worm.75OD Gear,Worm20T Collar,Thrust Plug,1/4 x .437 Seal,Oil, ...
Operation Manual
Page 29
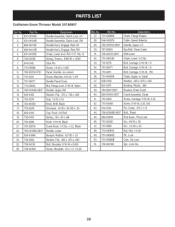
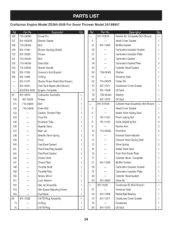
x 3.2, Black 22. 749-04138A-0637 Handle,Lower 23. 935-0199A 24. 736-0262 Bumper,Rubber,.62 ODx .22 Washer,Fiat,.385x .870x .092 25. 738-04118 26. 738-... x .3038 ClickPin 8. 710-04586 Screw,1/4-20x 1.625 9. 790-00219-0721 Panel,Handle,(no cutout) 10. 710-1233 Screw,Machine,#10-24,1.375 11. 731-06471 HandlePanelCover 12. 712-04063 Nut,FlangeLock,5/16-18,Nylon 13. . 749-04190A-06371Hand!e,Upper,RH 14. 936-0185 Washer.... 732-0193 20. 720-0284 21. 720-0201A Spring,.39 x .60 x .88 Knob,5/16-18,Black CrankKnob,1.0Dia. Craftsman Snow Thrower IViodel 247.88957 631-04133A D= 0!
x 3.2, Black 22. 749-04138A-0637 Handle,Lower 23. 935-0199A 24. 736-0262 Bumper,Rubber,.62 ODx .22 Washer,Fiat,.385x .870x .092 25. 738-04118 26. 738-... x .3038 ClickPin 8. 710-04586 Screw,1/4-20x 1.625 9. 790-00219-0721 Panel,Handle,(no cutout) 10. 710-1233 Screw,Machine,#10-24,1.375 11. 731-06471 HandlePanelCover 12. 712-04063 Nut,FlangeLock,5/16-18,Nylon 13. . 749-04190A-06371Hand!e,Upper,RH 14. 936-0185 Washer.... 732-0193 20. 720-0284 21. 720-0201A Spring,.39 x .60 x .88 Knob,5/16-18,Black CrankKnob,1.0Dia. Craftsman Snow Thrower IViodel 247.88957 631-04133A D= 0!
Operation Manual
Page 31
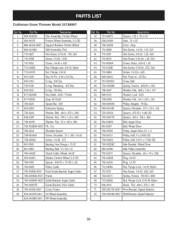
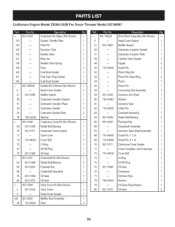
... 1.00x .060 21. 790-00289A-0637 Pit.,Cvr. 22. 748-0234 23. 738-04184A ShoulderSpacer Screw,Shoulder,.37x .105,1/4-20 24. 738-0924A 25. 941-0245 Screw,1/4-28,.375 L Bearing,Hex Flangex .75 ID 26. 941-0563 27. 746-04229 Bearing,...-18,Nylon Wash.,Flat, .469x .875x .105 71. 790-00217A-0637 PivotBracket,SpeedSelector 72. 790-00218A-0637 Shift Bracket,SpeedSelector 31 Craftsman Snow Thrower IViodel 247.88957 656-04025A I= 00 DiscAssembly,FrictionWheel 2. 684-04153 FrictionWheelAssembly,5.50D 3. 684-04154-0637 SupportBracket,FrictionWheel 4. 684-04156A Shift Assembly,Rod 5. ...
... 1.00x .060 21. 790-00289A-0637 Pit.,Cvr. 22. 748-0234 23. 738-04184A ShoulderSpacer Screw,Shoulder,.37x .105,1/4-20 24. 738-0924A 25. 941-0245 Screw,1/4-28,.375 L Bearing,Hex Flangex .75 ID 26. 941-0563 27. 746-04229 Bearing,...-18,Nylon Wash.,Flat, .469x .875x .105 71. 790-00217A-0637 PivotBracket,SpeedSelector 72. 790-00218A-0637 Shift Bracket,SpeedSelector 31 Craftsman Snow Thrower IViodel 247.88957 656-04025A I= 00 DiscAssembly,FrictionWheel 2. 684-04153 FrictionWheelAssembly,5.50D 3. 684-04154-0637 SupportBracket,FrictionWheel 4. 684-04156A Shift Assembly,Rod 5. ...
Operation Manual
Page 33
...60 69 715-04089 Dowel Pin,9 x 14 125 710-04943 Bolt 33 intakeand exhaustrod) 113 951-10656 DipstickTube,incl. Craftsman Engine IViodel ZS365=SUB For Snow Thrower IViodel 247.88957 1 951-11012 Bolt 70 951-11371 CrankcaseCoverGasket 2 951-11054 ValveCover 72 710-04932 CoverBolt 3 731-07059 BreatherHose 75 ...,includes77,78,79 Stator Flywheel CoolingFan 22 712-04214 Nut 88 951-10911 StarterCup 23 710-05002 Bolt 89 712-04209 Nut 24 951-11111 ExhaustPipe Shield 90 951-10647 ValveKit (incl. intakeand exhaustvalve) 25 710-04940 Bolt 92 951-10663A BlowerHousing 26 710...
...60 69 715-04089 Dowel Pin,9 x 14 125 710-04943 Bolt 33 intakeand exhaustrod) 113 951-10656 DipstickTube,incl. Craftsman Engine IViodel ZS365=SUB For Snow Thrower IViodel 247.88957 1 951-11012 Bolt 70 951-11371 CrankcaseCoverGasket 2 951-11054 ValveCover 72 710-04932 CoverBolt 3 731-07059 BreatherHose 75 ...,includes77,78,79 Stator Flywheel CoolingFan 22 712-04214 Nut 88 951-10911 StarterCup 23 710-05002 Bolt 89 712-04209 Nut 24 951-11111 ExhaustPipe Shield 90 951-10647 ValveKit (incl. intakeand exhaustvalve) 25 710-04940 Bolt 92 951-10663A BlowerHousing 26 710...
Operation Manual
Page 34
... -- FuelDrain PlugGasket 1 142 -- CarburetorGasketPlate 2 46 -- CylinderHeadGasket 1 60 736-04461 Washer 1 61 -- CylinderHeadAssembly(Not Shown) -- RockerArm 2 10 710-04902 PivotBolt 2 11 -- CylinderHead- Craftsman Engine IViodel ZS365-SUB For Snow Thrower IViodel 247.88957 |= 0 o e 126 715-04088 DowelPin 127 951-10645A ElectricStarter 128 710-05003 Bolt 129 951-11109 130 951-10639 131 710-04945 132...
... -- FuelDrain PlugGasket 1 142 -- CarburetorGasketPlate 2 46 -- CylinderHeadGasket 1 60 736-04461 Washer 1 61 -- CylinderHeadAssembly(Not Shown) -- RockerArm 2 10 710-04902 PivotBolt 2 11 -- CylinderHead- Craftsman Engine IViodel ZS365-SUB For Snow Thrower IViodel 247.88957 |= 0 o e 126 715-04088 DowelPin 127 951-10645A ElectricStarter 128 710-05003 Bolt 129 951-11109 130 951-10639 131 710-04945 132...
Operation Manual
Page 35
..., External(Not Shown) -- 55 PistonPin 1 5 -- NeedleValve 137 -- CarburetorInsulatorPlate 1 61 GovernorSeal 1 32 -- HeadCoverGasket 1 145 951-10657 MufflerStudAssembly 20 710-05001 Stud 2 35 Craftsman Engine IViodel ZS365=SUB For Snow Thrower IViodel 247.88957 D= 00 m D= 0O m -- 951-11020 CarburetorKit, Major(Not Shown) -- 951-11062A ShortBlockAssembly(Not Shown) 133 -- Oil Fill Plug 1 75 951-11368 Oil Seal...
..., External(Not Shown) -- 55 PistonPin 1 5 -- NeedleValve 137 -- CarburetorInsulatorPlate 1 61 GovernorSeal 1 32 -- HeadCoverGasket 1 145 951-10657 MufflerStudAssembly 20 710-05001 Stud 2 35 Craftsman Engine IViodel ZS365=SUB For Snow Thrower IViodel 247.88957 D= 00 m D= 0O m -- 951-11020 CarburetorKit, Major(Not Shown) -- 951-11062A ShortBlockAssembly(Not Shown) 133 -- Oil Fill Plug 1 75 951-11368 Oil Seal...
Operation Manual
Page 36
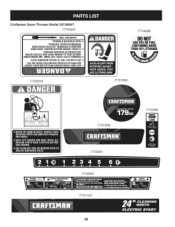
Craftsman Snow Thrower Model 247.88957 777S32636 777S32236 777X43688 ....D. OHOT........... USEE85 ORFUEL COHTAiHJHMGORE THAH 10% ETHAHOL J 777D12682 777D12648 777123031 777123030 777Dl1427 36 777122363
Craftsman Snow Thrower Model 247.88957 777S32636 777S32236 777X43688 ....D. OHOT........... USEE85 ORFUEL COHTAiHJHMGORE THAH 10% ETHAHOL J 777D12682 777D12648 777123031 777123030 777Dl1427 36 777122363


