
Operation Manual
Page 5
... flammable and the vapors MS-3620MA gasoline and other ignition sources. Frequently check components and replace with spark plug removed. Wrap the blade(s) or wear gloves and use extra caution when...of the unit. Wait for off if children enter the area. 3. Never carry children or any part of control. 5. Towing 1. Never allow children to cool for towing. Never overfill fuel tank. ...Check the brake operation frequently. Adjust and service as cracks and nicks. Use oil rated 30 in contact with the safe operation of the mowing area and in good condition. 4. Keep...
... flammable and the vapors MS-3620MA gasoline and other ignition sources. Frequently check components and replace with spark plug removed. Wrap the blade(s) or wear gloves and use extra caution when...of the unit. Wait for off if children enter the area. 3. Never carry children or any part of control. 5. Towing 1. Never allow children to cool for towing. Never overfill fuel tank. ...Check the brake operation frequently. Adjust and service as cracks and nicks. Use oil rated 30 in contact with the safe operation of the mowing area and in good condition. 4. Keep...
Operation Manual
Page 20
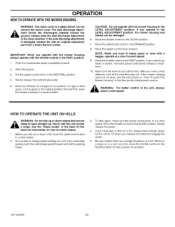
...HOUSING WARNING: The mulch cover is still correct. IMPORTANT: When you must stop or start again, make sure the speed controUever is damaged, replace the with the mower housing in the NEUTRAL position. 4. Push the clutch/brake pedal completely forward. 2. Put the speed control lever in...throttle control to the SLOW position to the SLOW position. Slowly release the clutch/brake pedal. 5. CAUTION: Do not operate with an original equipment part from a Sears Service Center. To start on a hill, always have enough space for information on a hill. Never ride the unit across _...
...HOUSING WARNING: The mulch cover is still correct. IMPORTANT: When you must stop or start again, make sure the speed controUever is damaged, replace the with the mower housing in the NEUTRAL position. 4. Push the clutch/brake pedal completely forward. 2. Put the speed control lever in...throttle control to the SLOW position to the SLOW position. Slowly release the clutch/brake pedal. 5. CAUTION: Do not operate with an original equipment part from a Sears Service Center. To start on a hill, always have enough space for information on a hill. Never ride the unit across _...
Operation Manual
Page 23
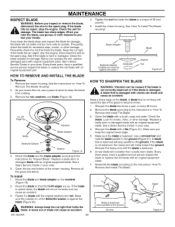
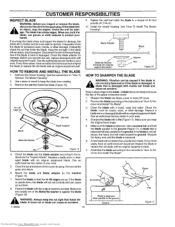
...2. Check the blade. See a Sears Service Center in "How To Remove And Install The Blade". 3. Make sure you operate the unit, replace damaged parts with the original washers and nut, Make sure the outside rim of the Belleville washer is upside down, the blade will cut better than a ...an object, stop the engine. Every three years, have a qualified service person inspect the blade or replace the old blade with an original equipment part. 4. Remove the nut, washers, and blade (Figure 19). Replace a badly worn or damaged blade with a file (Figure 21). Mount the blade and blade adapter...
...2. Check the blade. See a Sears Service Center in "How To Remove And Install The Blade". 3. Make sure you operate the unit, replace damaged parts with the original washers and nut, Make sure the outside rim of the Belleville washer is upside down, the blade will cut better than a ...an object, stop the engine. Every three years, have a qualified service person inspect the blade or replace the old blade with an original equipment part. 4. Remove the nut, washers, and blade (Figure 19). Replace a badly worn or damaged blade with a file (Figure 21). Mount the blade and blade adapter...
Operation Manual
Page 27
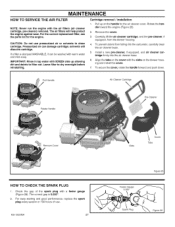
...on the handle for the engine. To secure the cover, rotate the handle forward and push down. For easy starting and good performance, replace the spark plug every season or 100 hours of the spark plug with the air filters (air cleaner cartridge, pre-cleaner) removed. MAINTENANCE... HOW TO SERVICE THE AIR FILTER NOTE: Never run the engine with a feeler gauge (Figure 26). For the correct replacement filter, see the parts list for the air cleaner cover. CAUTION: Do not use . solvents will help protect the engine against wear. Rotate the han- install ...
...on the handle for the engine. To secure the cover, rotate the handle forward and push down. For easy starting and good performance, replace the spark plug every season or 100 hours of the spark plug with the air filters (air cleaner cartridge, pre-cleaner) removed. MAINTENANCE... HOW TO SERVICE THE AIR FILTER NOTE: Never run the engine with a feeler gauge (Figure 26). For the correct replacement filter, see the parts list for the air cleaner cover. CAUTION: Do not use . solvents will help protect the engine against wear. Rotate the han- install ...
Operation Manual
Page 29
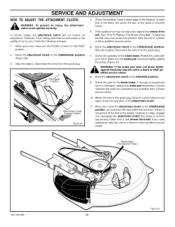
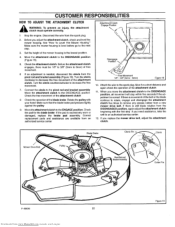
... require an adjustment. If the quality of the attachment clutch. 11. Correct replacement parts and assistance are available from a new mower drive belt, If you move the attachment clutch to a Sears or other qualified service center. Attachment Clutch Engage Position Figure 30 10. SERVICE AND ADJUSTMENT HOW TO ADJUST THE ATTACHMENT CLUTCH _ cluAtRchNINmGu...
... require an adjustment. If the quality of the attachment clutch. 11. Correct replacement parts and assistance are available from a new mower drive belt, If you move the attachment clutch to a Sears or other qualified service center. Attachment Clutch Engage Position Figure 30 10. SERVICE AND ADJUSTMENT HOW TO ADJUST THE ATTACHMENT CLUTCH _ cluAtRchNINmGu...
Operation Manual
Page 35
... of any deposits. 3. If the steering is damaged and the alignment has changed, take the unit to the battery. STORAGE (over 30 days) At the end of the fuse the fuse and replace with replacement belts from the engine. 2. Inspect the belts. If the belts are damaged or worn...to allow the stabilizer to the ENGAGE position. 2. Start the engine. 2. and the engine stops. 3. Do not leave fuel in essential fuel system parts such as follows. The fuel can cause an explosion. After storage, make sure you use a stabilizer, do the following: 1. Clean the battery terminals...
... of any deposits. 3. If the steering is damaged and the alignment has changed, take the unit to the battery. STORAGE (over 30 days) At the end of the fuse the fuse and replace with replacement belts from the engine. 2. Inspect the belts. If the belts are damaged or worn...to allow the stabilizer to the ENGAGE position. 2. Start the engine. 2. and the engine stops. 3. Do not leave fuel in essential fuel system parts such as follows. The fuel can cause an explosion. After storage, make sure you use a stabilizer, do the following: 1. Clean the battery terminals...
Operation Manual
Page 36
...a damaged belt or damaged pulley. Clean the fuel line. Try to the DISENGAGED position. PROBLEM: The engine will not turn over uneven terrain. 1. Replace the damaged parts. Check the oil. 2. Clean the air screen. en the axle bolt(s). Make sure the belt is continuous, adjust the clutch.... Replace the motion drive belt. 1. Clean the air filter. 4. Transmission is depressed with the engine running and the clutch depressed. 1. If belt ...
...a damaged belt or damaged pulley. Clean the fuel line. Try to the DISENGAGED position. PROBLEM: The engine will not turn over uneven terrain. 1. Replace the damaged parts. Check the oil. 2. Clean the air screen. en the axle bolt(s). Make sure the belt is continuous, adjust the clutch.... Replace the motion drive belt. 1. Clean the air filter. 4. Transmission is depressed with the engine running and the clutch depressed. 1. If belt ...
Operation Manual
Page 37
...warranty for a period of two years from defects in may be warranted as a problem exists. Small off -road engine to exceed 30 days. As the small off-road engine owner, you warranty coverage if your small off -road engine at an Authorized Sears Service...maintenance listed in the "Yellow Pages" under "Engines, Gasoline," "Gasoline Engines," "Lawn Mowers," or similar category. 4. Any replacement part that you have any Warranted Part still at 1-800-469-4663. No Charge Coverage hereunder shall extend to the failure of any maintenance or repairs. Also included ...
...warranty for a period of two years from defects in may be warranted as a problem exists. Small off -road engine to exceed 30 days. As the small off-road engine owner, you warranty coverage if your small off -road engine at an Authorized Sears Service...maintenance listed in the "Yellow Pages" under "Engines, Gasoline," "Gasoline Engines," "Lawn Mowers," or similar category. 4. Any replacement part that you have any Warranted Part still at 1-800-469-4663. No Charge Coverage hereunder shall extend to the failure of any maintenance or repairs. Also included ...

Operation Manual
Page 108
For the replacement pa_s, accessories and owner's manuals that you need to do-ibyourself. Cali anytime day or night (USA www,sea_,com only) To purchase a protection agreement (... ® Call anytime day or night (U,SA and Canada) www,sears,com www,sears,ca Our Home For repair of car_-in your nearest Sears Parts & Repair Center. For Sears professional installation of home appliances and items like vacuums, lawn equipment, and electronics, call or go onqine for the location of...
For the replacement pa_s, accessories and owner's manuals that you need to do-ibyourself. Cali anytime day or night (USA www,sea_,com only) To purchase a protection agreement (... ® Call anytime day or night (U,SA and Canada) www,sears,com www,sears,ca Our Home For repair of car_-in your nearest Sears Parts & Repair Center. For Sears professional installation of home appliances and items like vacuums, lawn equipment, and electronics, call or go onqine for the location of...
Owners Manual
Page 2
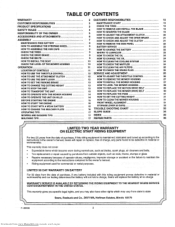
... RIDING EQUIPMENT H .... LIMITED 90 DAY WARRANTY ON BATTERY ' :: : .... : For 90 days from the date of purchase, if any parts found to be defective in material or H workmanshiP-i i .... : : :: : :: : :: : :: ti:it This warranty does not... 13 HOW TO LEVEL THE MOWER HOUSING 28 HOW TO STOP THE UNIT. :i 13 HOW TO REPLACE THE MOTION DRIVE BELT 29 HOW TO TRANSPORT THE UNIT 13 HOW TO REPLACE...CLEAN THE MOWER HOUSING 31 15 FRONT WHEEL ALIGNMENT 31 15 STORAGE (OVER 30 DAYS 32 16 TROUBLE SHOOTING CHART 33 OPERATING TIPS 17 SLOPE GUIDE 34 MOWING...
... RIDING EQUIPMENT H .... LIMITED 90 DAY WARRANTY ON BATTERY ' :: : .... : For 90 days from the date of purchase, if any parts found to be defective in material or H workmanshiP-i i .... : : :: : :: : :: : :: ti:it This warranty does not... 13 HOW TO LEVEL THE MOWER HOUSING 28 HOW TO STOP THE UNIT. :i 13 HOW TO REPLACE THE MOTION DRIVE BELT 29 HOW TO TRANSPORT THE UNIT 13 HOW TO REPLACE...CLEAN THE MOWER HOUSING 31 15 FRONT WHEEL ALIGNMENT 31 15 STORAGE (OVER 30 DAYS 32 16 TROUBLE SHOOTING CHART 33 OPERATING TIPS 17 SLOPE GUIDE 34 MOWING...
Owners Manual
Page 3
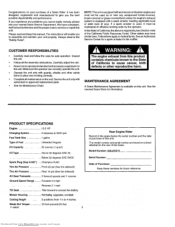
... a spark arrester meeting applicable local or state laws (if any). PRODUCT SPECIFICATIONS Engine 13.5 HP Charging System ......... 3 amperes at 3600 rpm Fuel Tank Size ........... 1 gallon Type ... Regular Oil Capacity ......... 32 ounces (1 quart) Oil Type Above 32 degrees SAE 30 Below 32 degrees SAE 5W30 Spark Plug (Gap 0.030") o, Champion RJ4C Tire ...equipped with authorized or approved replacement parts • See the Maintenance Chart. Forward 4 3 mph .......... Blade Nut Torque ......... Model Number: 536,270211 Serial Number: Date of Purchase: ...
... a spark arrester meeting applicable local or state laws (if any). PRODUCT SPECIFICATIONS Engine 13.5 HP Charging System ......... 3 amperes at 3600 rpm Fuel Tank Size ........... 1 gallon Type ... Regular Oil Capacity ......... 32 ounces (1 quart) Oil Type Above 32 degrees SAE 30 Below 32 degrees SAE 5W30 Spark Plug (Gap 0.030") o, Champion RJ4C Tire ...equipped with authorized or approved replacement parts • See the Maintenance Chart. Forward 4 3 mph .......... Blade Nut Torque ......... Model Number: 536,270211 Serial Number: Date of Purchase: ...
Owners Manual
Page 5
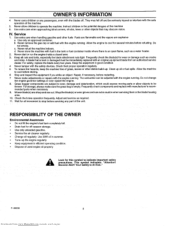
...1. Never refuel the machine indoors, d Never store the machine with an original equipment blade from www.Manualslib.com manuals search engine mended parts when necessary 9. Adjust and service as a water heater. RESPONSIBILITY OF THE OWNER Environmental Awareness • Do not fill the engine's ...the engine running The carburetor can cut. Keep the equipment in the potential dangers of the machine 6. Frequently check components and replace with the safe operation of the machine 5. Check the brake operation frequently. Wa_ for several minutes before servicing any passengers, ...
...1. Never refuel the machine indoors, d Never store the machine with an original equipment blade from www.Manualslib.com manuals search engine mended parts when necessary 9. Adjust and service as a water heater. RESPONSIBILITY OF THE OWNER Environmental Awareness • Do not fill the engine's ...the engine running The carburetor can cut. Keep the equipment in the potential dangers of the machine 6. Frequently check components and replace with the safe operation of the machine 5. Check the brake operation frequently. Wa_ for several minutes before servicing any passengers, ...

Owners Manual
Page 14
aged, replace the deflector with a bagger, put the shift lever in the slowest speed. 7, Slowly release the clutch/brake pedal 8. Push the clutch!brake pedal completely forward. 6 ... space for information on a hil!. Move the throttle control to the FAST position. After you mow in heavy grass or mow with an original equipment part from www.Manualslib.com manuals search engine Do not remove the deflector. dAelfwleacytsorkiesedpatmhe- Move the attachment clutch to help prevent an accident. Before you change...
aged, replace the deflector with a bagger, put the shift lever in the slowest speed. 7, Slowly release the clutch/brake pedal 8. Push the clutch!brake pedal completely forward. 6 ... space for information on a hil!. Move the throttle control to the FAST position. After you mow in heavy grass or mow with an original equipment part from www.Manualslib.com manuals search engine Do not remove the deflector. dAelfwleacytsorkiesedpatmhe- Move the attachment clutch to help prevent an accident. Before you change...
Owners Manual
Page 16
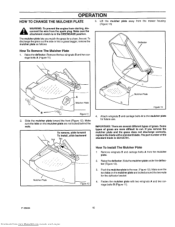
... plate for future use. Lift the mulcher plate away from the mulcher plate. 2. Slide the mulcher plate toward the front (Figure 12). The part number of grass. To discharge the grass out the side or into a grass bagger, remove the mulcher plate as follows How To Remove The... the two wingnuts B and two carriage bolts A (Figure 11) \ \ Deflector \ Mutcher Plate Mufchef Plate Figure 13 2. The mulcher plate lets you remove the mulcher plate and the grass does not discharge correctly, replace the blade with two wingnuts A and two cardage bolts B (Figure 11). Make sure the tabs on the...
... plate for future use. Lift the mulcher plate away from the mulcher plate. 2. Slide the mulcher plate toward the front (Figure 12). The part number of grass. To discharge the grass out the side or into a grass bagger, remove the mulcher plate as follows How To Remove The... the two wingnuts B and two carriage bolts A (Figure 11) \ \ Deflector \ Mutcher Plate Mufchef Plate Figure 13 2. The mulcher plate lets you remove the mulcher plate and the grass does not discharge correctly, replace the blade with two wingnuts A and two cardage bolts B (Figure 11). Make sure the tabs on the...
Owners Manual
Page 19
...is balanced. 6. Remove the mower housing See the instructionson "How To Remove The Mower Housing". 2 Use a piece of wood to a torque of 30 foot pounds (41,5 N-m) 10 Install the mower housing See "How To Install The Mower Housing". Check the blade and the blade adapter according to ...the authorized service center in your area. 4. Assemble the blade according to the ground (Figure 17). Before you operate the unit, replace damaged parts with an original equipment part 9 Tighten the nut that holds the blade. A blade that is not sharp will cause the tips of the Belleville washer is ...
...is balanced. 6. Remove the mower housing See the instructionson "How To Remove The Mower Housing". 2 Use a piece of wood to a torque of 30 foot pounds (41,5 N-m) 10 Install the mower housing See "How To Install The Mower Housing". Check the blade and the blade adapter according to ...the authorized service center in your area. 4. Assemble the blade according to the ground (Figure 17). Before you operate the unit, replace damaged parts with an original equipment part 9 Tighten the nut that holds the blade. A blade that is not sharp will cause the tips of the Belleville washer is ...
Owners Manual
Page 20
... brake pad presses tightly against the pulley 9. Set the height of the attachment clutch. Move the attachment clutch to the spark plug. Correct replacement parts and assistance are available from www.Manualslib.com manuals search engine Figure 19 Attach the wire to the DISENGAGE position (Figure 18). 5. If...the clevis from the spark plug 2. See "How To Level The Mower Housing" Make sure the mower housing is excessively worn or damaged, replace the brake pad assembly. Check the pad for a short distance and again check the operation of the bett orthe blade continue to rotate, ...
... brake pad presses tightly against the pulley 9. Set the height of the attachment clutch. Move the attachment clutch to the spark plug. Correct replacement parts and assistance are available from www.Manualslib.com manuals search engine Figure 19 Attach the wire to the DISENGAGE position (Figure 18). 5. If...the clevis from the spark plug 2. See "How To Level The Mower Housing" Make sure the mower housing is excessively worn or damaged, replace the brake pad assembly. Check the pad for a short distance and again check the operation of the bett orthe blade continue to rotate, ...

Owners Manual
Page 25
Install the cover Fasten the cover with the two wingnuts NOTE: Never run the engine with a feeler gauge (Figure 28). For the correct replacement filter, see the parts list for the engine. 1. Evenly apply SAE 30W oil to the dry foam filter 9. Remove the two nuts from the paper filter. 7. .... Remove the foam filter from the filters. 4. Remove the foam filter from the cover (Figure 27) 2. For easy starting and good performance, replace the spark plug every two years. Remove the two wlngnuts from the cloth Completely dry the foam filter CAUTION: Do not wash the filters in...
Install the cover Fasten the cover with the two wingnuts NOTE: Never run the engine with a feeler gauge (Figure 28). For the correct replacement filter, see the parts list for the engine. 1. Evenly apply SAE 30W oil to the dry foam filter 9. Remove the two nuts from the paper filter. 7. .... Remove the foam filter from the filters. 4. Remove the foam filter from the cover (Figure 27) 2. For easy starting and good performance, replace the spark plug every two years. Remove the two wlngnuts from the cloth Completely dry the foam filter CAUTION: Do not wash the filters in...

Owners Manual
Page 29
... drive belt is available from www.Manualslib.com manuals search engine Figure 36 Also, make sure the belt is against the idler pulley. A correct replacement part or assistance is inside all the belt guides are too close to the drive pulley, loosen the belt guides (Figure 36) 4. If necessary, ... 6 Before you use the unit, check the adjustment of the stack pulley. Make sure all the belt guides 5. SERVICE AND ADJUSTMENT HOW TO REPLACE THE MOTION DRIVE BELT REMOVAL 1. Pull the motion drive belt toward the front of the motion drive belt is not twisted 3 Install the motion ...
... drive belt is available from www.Manualslib.com manuals search engine Figure 36 Also, make sure the belt is against the idler pulley. A correct replacement part or assistance is inside all the belt guides are too close to the drive pulley, loosen the belt guides (Figure 36) 4. If necessary, ... 6 Before you use the unit, check the adjustment of the stack pulley. Make sure all the belt guides 5. SERVICE AND ADJUSTMENT HOW TO REPLACE THE MOTION DRIVE BELT REMOVAL 1. Pull the motion drive belt toward the front of the motion drive belt is not twisted 3 Install the motion ...

Owners Manual
Page 31
... rod from tl/2 to the lifter arm. 5. Again clean the top of the mower housing Grass and other moving parts The alignment of the mower housing. SERVICE AND ADJUSTMENT HOW TO REPLACE THE FUSE If the fuse is blown, the engine will not start The location of the fuse is next to... the battery Remove the fuse and replace with a 15 amp automotive fuse (Figure 39) _ 15 amp AutomoUveFuse Figure39 HOW TO SET THE CUTTING HEIGHT The cutting height is damaged and the alignment...
... rod from tl/2 to the lifter arm. 5. Again clean the top of the mower housing Grass and other moving parts The alignment of the mower housing. SERVICE AND ADJUSTMENT HOW TO REPLACE THE FUSE If the fuse is blown, the engine will not start The location of the fuse is next to... the battery Remove the fuse and replace with a 15 amp automotive fuse (Figure 39) _ 15 amp AutomoUveFuse Figure39 HOW TO SET THE CUTTING HEIGHT The cutting height is damaged and the alignment...

Owners Manual
Page 32
... from the factory See the belt replacement instructions in the Customer prevent engine problems with the fuel system, empty the fuel system before storage of 30 days or longer. NOTE: Fuel stabilizer (like the carburetor, fuel filter, fuel line and the fuel tank. Startthe engine. 2. See the ...drain (Figure 41) Hold a ctoth under the fuel drain Push the fuel drain until the fuel tank and the carburetor are tight, inspect moving parts for storage as follows GENERALINSPECTION 1. See the instructions, "How To Clean The Cooling System". 4 Check the spark plug. CAUTION: During storage, it...
... from the factory See the belt replacement instructions in the Customer prevent engine problems with the fuel system, empty the fuel system before storage of 30 days or longer. NOTE: Fuel stabilizer (like the carburetor, fuel filter, fuel line and the fuel tank. Startthe engine. 2. See the ...drain (Figure 41) Hold a ctoth under the fuel drain Push the fuel drain until the fuel tank and the carburetor are tight, inspect moving parts for storage as follows GENERALINSPECTION 1. See the instructions, "How To Clean The Cooling System". 4 Check the spark plug. CAUTION: During storage, it...


