
Owners Manual
Page 2
... bent crackshafts and the failure to assemble, operate or maintain this Lawn Mower according to all supplied product instructions. This warranty gives you specific legal rights, and you may also have other Craftsman outlet for this symbol to point out important safety precautions. Warranty ...11 Maintenance 11-13 Service and Adjustments 14 Storage 15-16 Troubleshooting 16-17 Repair Parts 34-41 Sears Service Back Cover 2-YEAR FULL WARRANTY ON CRAFTSMAN LAWN MOWER If this Craftsman Lawn Mower fails due to manufacturer defects in material or workmanship within two years from the date...
... bent crackshafts and the failure to assemble, operate or maintain this Lawn Mower according to all supplied product instructions. This warranty gives you specific legal rights, and you may also have other Craftsman outlet for this symbol to point out important safety precautions. Warranty ...11 Maintenance 11-13 Service and Adjustments 14 Storage 15-16 Troubleshooting 16-17 Repair Parts 34-41 Sears Service Back Cover 2-YEAR FULL WARRANTY ON CRAFTSMAN LAWN MOWER If this Craftsman Lawn Mower fails due to manufacturer defects in material or workmanship within two years from the date...
Owners Manual
Page 4
...repairs with a portable container, rather than from the truck or trailer and refuel it should not be found on a decal on the rear of the fuel tank or container opening at all times until fueling is complete. Disconnect the spark plug wire, and keep the wire ...which could expose moving parts or allow objects to prevent accidental starting. • Keep nuts and bolts, especially blade attachment bolts, tight and keep equipment in space provided above is equipped with a plastic liner. Frequently check components and replace with the rim of the lawn mower housing. In the...
...repairs with a portable container, rather than from the truck or trailer and refuel it should not be found on a decal on the rear of the fuel tank or container opening at all times until fueling is complete. Disconnect the spark plug wire, and keep the wire ...which could expose moving parts or allow objects to prevent accidental starting. • Keep nuts and bolts, especially blade attachment bolts, tight and keep equipment in space provided above is equipped with a plastic liner. Frequently check components and replace with the rim of the lawn mower housing. In the...
Owners Manual
Page 5
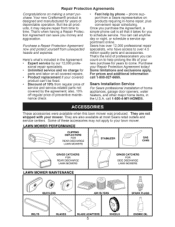
...on all covered repairs. • Product replacement if your lawn mower. LAWN MOWER PERFORMANCE CLIPPING DEFLECTORS FOR REAR DISCHARGE LAWN MOWERS STABILIZER CGAANSS GRASS CATCHERS FOR REAR DISCHARGE LAWN MOWERS LAWN MOWER MAINTENANCE GRASS CATCHERS FOR SIDE DISCHARGE LAWN MOWERS MUFFLERS AIR FILTERS SPARK PLUGS BELTS BLADES BLADE ADAPTERS 5 ...to come. These accessories were available when this lawn mower was produced. Your new Craftsman® product is all products, it takes for years of service and service-related parts not covered by our 12,000 profe- For ...
...on all covered repairs. • Product replacement if your lawn mower. LAWN MOWER PERFORMANCE CLIPPING DEFLECTORS FOR REAR DISCHARGE LAWN MOWERS STABILIZER CGAANSS GRASS CATCHERS FOR REAR DISCHARGE LAWN MOWERS LAWN MOWER MAINTENANCE GRASS CATCHERS FOR SIDE DISCHARGE LAWN MOWERS MUFFLERS AIR FILTERS SPARK PLUGS BELTS BLADES BLADE ADAPTERS 5 ...to come. These accessories were available when this lawn mower was produced. Your new Craftsman® product is all products, it takes for years of service and service-related parts not covered by our 12,000 profe- For ...
Owners Manual
Page 6
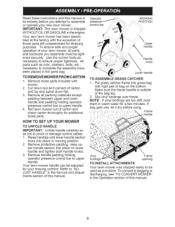
... attempt to assemble or operate your new lawn mower. IMPORTANT: This lawn mower is outside of this manual. 6 Remove loose parts included with rigid part of your mowing comfort. Slip vinyl bindings over frame. Use the correct tools as necessary to complete the assembly have been placed in the parts bag. packing materials except padding between upper and...
... attempt to assemble or operate your new lawn mower. IMPORTANT: This lawn mower is outside of this manual. 6 Remove loose parts included with rigid part of your mowing comfort. Slip vinyl bindings over frame. Use the correct tools as necessary to complete the assembly have been placed in the parts bag. packing materials except padding between upper and...
Owners Manual
Page 12
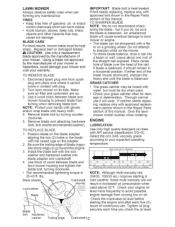
...-viscosity oils will result in the Repair Parts section of continuous use it will cause eventual damage to avoid possible engine damage from running low on the adapter. 2. Use a wood block between blade and lawn mower housing and tighten the blade bolt, turning...safety rules when performing any maintenance. Ibs. TIRES . A CAUTION: Use only a replacement blade approved by turning counterclockwise. 5. Turn lawn mower on a grinding wheel. NOTE: Protect your grass catcher often for damage or deterioration. ENGINE LUBRICATION TO REPLACE BLADE 1. bolt Hardened...
...-viscosity oils will result in the Repair Parts section of continuous use it will cause eventual damage to avoid possible engine damage from running low on the adapter. 2. Use a wood block between blade and lawn mower housing and tighten the blade bolt, turning...safety rules when performing any maintenance. Ibs. TIRES . A CAUTION: Use only a replacement blade approved by turning counterclockwise. 5. Turn lawn mower on a grinding wheel. NOTE: Protect your grass catcher often for damage or deterioration. ENGINE LUBRICATION TO REPLACE BLADE 1. bolt Hardened...
Owners Manual
Page 14
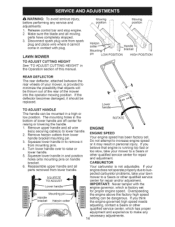
...engine speed. Overspeeding the engine above the factory high speed setting can be thrown out of the rear of your lawn SQUEEZE TO ADJUST Lower mower to minimize the possibility that engine is factory set . If you believe that objects will be...adjustments: 1. Remove upper handle and all parts removed from mounting pins. 4. Mowing r-'q Mowing position iI iI I iI j'l Hairpin Handle Mounting bracket pin LOW POSITION HIGH POSITION REAR DEFLECTOR The rear deflector, attached between the rear wheels of the mower into the operator mowing position. ,_ WARNING...
...engine speed. Overspeeding the engine above the factory high speed setting can be thrown out of the rear of your lawn SQUEEZE TO ADJUST Lower mower to minimize the possibility that engine is factory set . If you believe that objects will be...adjustments: 1. Remove upper handle and all parts removed from mounting pins. 4. Mowing r-'q Mowing position iI iI I iI j'l Hairpin Handle Mounting bracket pin LOW POSITION HIGH POSITION REAR DEFLECTOR The rear deflector, attached between the rear wheels of the mower into the operator mowing position. ,_ WARNING...
Owners Manual
Page 15
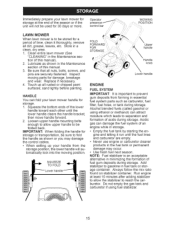
...other until the fuel lines and carburetor are securely fastened. Clean entire lawn mower (See "CLEANING" in essential fuel system parts such as carburetor, fuel filter, fuel hose, or tank during storage. Inspect moving parts for storage. 1. HANDLE You can fold your handle from forming in...gasohol or using fuel stabilizer. tank or permanent damage may damage the control cables. . buretor. Operator control bar MOWING POSITION LAWN MOWER When lawn mower is to be stored for storage or transportation, be folded back. Loosen upper handle mounting bolts enough to allow the stabilizer to...
...other until the fuel lines and carburetor are securely fastened. Clean entire lawn mower (See "CLEANING" in essential fuel system parts such as carburetor, fuel filter, fuel hose, or tank during storage. Inspect moving parts for storage. 1. HANDLE You can fold your handle from forming in...gasohol or using fuel stabilizer. tank or permanent damage may damage the control cables. . buretor. Operator control bar MOWING POSITION LAWN MOWER When lawn mower is to be stored for storage or transportation, be folded back. Loosen upper handle mounting bolts enough to allow the stabilizer to...
Owners Manual
Page 16
...; If possible, store your unit to protect it from one ounce (29 ml) of fuel. 3. IMPORTANT: Never cover mower while engine and exhaust areas are still warm. • I,CAUTION: Never store the lawn mower with gasoline in your gasoline will cause your unit indoors and cover it to rust. Allow the engine to.... Remove spark plug. 2. Replace with new spark plug. Fuel valve lever (if so equipped) in the Maintenance section of this manual). Connect battery to a Sears Parts & Repair Center.
...; If possible, store your unit to protect it from one ounce (29 ml) of fuel. 3. IMPORTANT: Never cover mower while engine and exhaust areas are still warm. • I,CAUTION: Never store the lawn mower with gasoline in your gasoline will cause your unit indoors and cover it to rust. Allow the engine to.... Remove spark plug. 2. Replace with new spark plug. Fuel valve lever (if so equipped) in the Maintenance section of this manual). Connect battery to a Sears Parts & Repair Center.
Owners Manual
Page 17
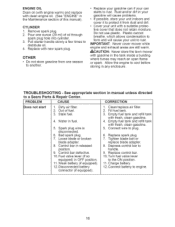
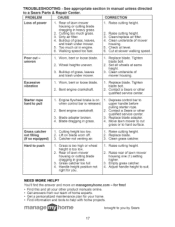
...Parts & Repair Center. Lift on when control bar is too low. 2. Raise cutting height. 2. Empty grass catcher. 4. Adjust handle height to upper handle before pulling starter rope. 2. Raise cutting height. 2. Clean underside of lawn mower housing or cutting blade dragging in grass. 1. Excessive vibration 1. Depress control bar to suit. Rear of mower...worn off. 3. Bent engine crankshaft. 3. Blade adapter broken. 4. Replace blade adapter. 4. Move lawn mower to push 1. Grass catcher not filling (if so equipped) 1. Cutting height too low. 2. Catcher not venting...
...Parts & Repair Center. Lift on when control bar is too low. 2. Raise cutting height. 2. Empty grass catcher. 4. Adjust handle height to upper handle before pulling starter rope. 2. Raise cutting height. 2. Clean underside of lawn mower housing or cutting blade dragging in grass. 1. Excessive vibration 1. Depress control bar to suit. Rear of mower...worn off. 3. Bent engine crankshaft. 3. Blade adapter broken. 4. Replace blade adapter. 4. Move lawn mower to push 1. Grass catcher not filling (if so equipped) 1. Cutting height too low. 2. Catcher not venting...
Owners Manual
Page 35
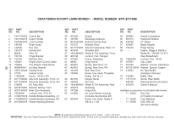
..., Rear 50 423079 Grassbag 51 147286 Hinge Rod 52 413465 Kit, Lawn Mower Housing (Includes Key Number 46) 53 851084 Screw, Hex Head, Grade 8 3/8-24 x 1-318 KEY PART NO. inches. 1 inch = 25.4 mm IMPORTANT: Use only Original Equipment Manufacturer (O.E.M.) replacement parts. Failure to do so could be hazardous, damage your lawn mower and void your warranty. CRAFTSMAN ROTARY LAWN MOWER...
..., Rear 50 423079 Grassbag 51 147286 Hinge Rod 52 413465 Kit, Lawn Mower Housing (Includes Key Number 46) 53 851084 Screw, Hex Head, Grade 8 3/8-24 x 1-318 KEY PART NO. inches. 1 inch = 25.4 mm IMPORTANT: Use only Original Equipment Manufacturer (O.E.M.) replacement parts. Failure to do so could be hazardous, damage your lawn mower and void your warranty. CRAFTSMAN ROTARY LAWN MOWER...

