

Operation Manual
Page 1
... 5 am - 5 pm, Mon- Sat SEARS, ROEBUCKAND CO., HOFFMAN ESTATES, Visit our Craftsman website:www.sears.com/craftsman 426152 Rev. 2 IL 60179 U.S.A. *As rated by the engine manufacturer Operator's Manual ICRIIFTSMI N°I LAW TRACTO 24.0 HR* 46" Mower Electric Start Automatic Transmission Model No. 28928 • EspaSol, p. 34 This product has a low emission engine which operates...
... 5 am - 5 pm, Mon- Sat SEARS, ROEBUCKAND CO., HOFFMAN ESTATES, Visit our Craftsman website:www.sears.com/craftsman 426152 Rev. 2 IL 60179 U.S.A. *As rated by the engine manufacturer Operator's Manual ICRIIFTSMI N°I LAW TRACTO 24.0 HR* 46" Mower Electric Start Automatic Transmission Model No. 28928 • EspaSol, p. 34 This product has a low emission engine which operates...
Operation Manual
Page 3
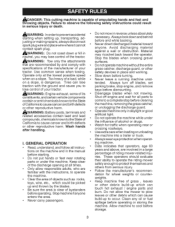
... crossing gravel _I_WARNING: Tow only the attachments surfaces. safety devices in may lose control of riding mower-related injuries. on the machine and in a large percentage of the tractor. Always turn off engine and wait for all parts to come to a complete stop engine, .... GENERAL OPERATION • Read, understand, and follow all times. • Only allow the mower to plow leaves or other tractor. Operate only at all instructions on a slope, is capable of your tractor. Stop machine ifanyone enters the area. • Never carry passengers. • AIways wear eye...
... crossing gravel _I_WARNING: Tow only the attachments surfaces. safety devices in may lose control of riding mower-related injuries. on the machine and in a large percentage of the tractor. Always turn off engine and wait for all parts to come to a complete stop engine, .... GENERAL OPERATION • Read, understand, and follow all times. • Only allow the mower to plow leaves or other tractor. Operate only at all instructions on a slope, is capable of your tractor. Stop machine ifanyone enters the area. • Never carry passengers. • AIways wear eye...
Operation Manual
Page 5
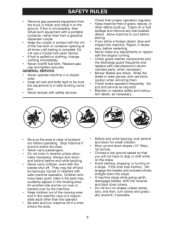
... of a responsible adult other debris build-up and down for another ride and be seriously injured or interfere with manufacturer's recommended parts, when necessary. • Mower blades are sharp.
... of a responsible adult other debris build-up and down for another ride and be seriously injured or interfere with manufacturer's recommended parts, when necessary. • Mower blades are sharp.
Operation Manual
Page 8
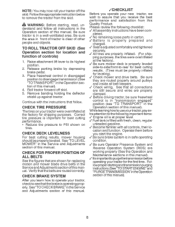
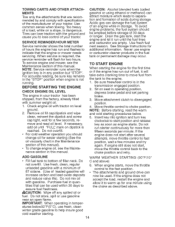
... section of this manual). 4. tion of this manual. ,/CHECKLIST Before you operate your new tractor, we wish to operate your tractor were overinflated at the factory for leveling). / Check mower and drive belts. Continue with all belt keepers. / Check wiring. Correct tire pressure is ...important items: / Engine oil is at the factory). / Be sure mower deck is properly prepared and charged. NOTE: You may now roll your tractor, pay ex- Followthe appropriate instruction below to remove the tractor from this manual). / It is adjusted comfortably and tightened securely. ...
... section of this manual). 4. tion of this manual. ,/CHECKLIST Before you operate your new tractor, we wish to operate your tractor were overinflated at the factory for leveling). / Check mower and drive belts. Continue with all belt keepers. / Check wiring. Correct tire pressure is ...important items: / Engine oil is at the factory). / Be sure mower deck is properly prepared and charged. NOTE: You may now roll your tractor, pay ex- Followthe appropriate instruction below to remove the tractor from this manual). / It is adjusted comfortably and tightened securely. ...
Operation Manual
Page 9
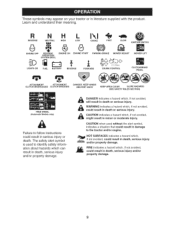
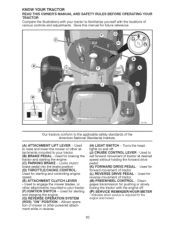
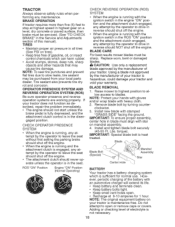
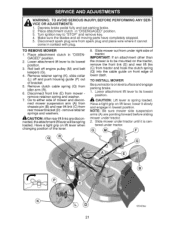
...follow instructions could result in serious injury or death. DANGER indicates a hazard which , if not avoided might result in damage to the tractor and/or engine. FIRE indicates a hazard which , if not avoided could result in death or serious injury. R N N L...e LOW G CHOKE FAST (@) SLOW IGNITION SWITCH -@ ENGINE OFF REVERSE OPERATION SYSTEM (ROS) ENGINE ON ENGINE START PARKING BRAKE MOWER HEIGHT MOWER LIFT LIGHTS ON FUEL t BATTERY REVERSE FORWARD CRUISE CONTROL CLUTCH/BRAKE PEDAL @@®@@ ATTACHMENT CLUTCH DISENGAGED ATTACHMENT CLUTCH ENGAGED DANGER, KEEP...
...follow instructions could result in serious injury or death. DANGER indicates a hazard which , if not avoided might result in damage to the tractor and/or engine. FIRE indicates a hazard which , if not avoided could result in death or serious injury. R N N L...e LOW G CHOKE FAST (@) SLOW IGNITION SWITCH -@ ENGINE OFF REVERSE OPERATION SYSTEM (ROS) ENGINE ON ENGINE START PARKING BRAKE MOWER HEIGHT MOWER LIFT LIGHTS ON FUEL t BATTERY REVERSE FORWARD CRUISE CONTROL CLUTCH/BRAKE PEDAL @@®@@ ATTACHMENT CLUTCH DISENGAGED ATTACHMENT CLUTCH ENGAGED DANGER, KEEP...
Operation Manual
Page 10
... ATTACHMENT LIFT LEVER - tachments mounted to your tractor. (F) IGNITION SWITCH - Used for braking the tractor and starting and stopping the engine. (G) REVERSE OPERATION SYSTEM (ROS) "ON" POSITION - Used to raise and lower the mower or other powered attachment while in reverse. ...Used for forward movement of tractor. (M) FREEWHEEL CONTROL - Used for reverse movement of tractor. (L) REVERSE DRIVE PEDAL - Disengages transmission for the engine and mower. 10 YOUR of ® 03108 Our tractors conform to the applicable safety standards of mower or other at desired ...
... ATTACHMENT LIFT LEVER - tachments mounted to your tractor. (F) IGNITION SWITCH - Used for braking the tractor and starting and stopping the engine. (G) REVERSE OPERATION SYSTEM (ROS) "ON" POSITION - Used to raise and lower the mower or other powered attachment while in reverse. ...Used for forward movement of tractor. (M) FREEWHEEL CONTROL - Used for reverse movement of tractor. (L) REVERSE DRIVE PEDAL - Disengages transmission for the engine and mower. 10 YOUR of ® 03108 Our tractors conform to the applicable safety standards of mower or other at desired ...
Operation Manual
Page 11
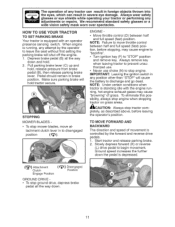
...cause "browning" of grass. Slowly depress forward (K) or reverse (L) drive pedal to begin movement. HOW TO USE YOUR TRACTOR TO SET PARKING BRAKE Your tractor is equipped with the engine running , any adjustments or repairs. NOTE: Failure to move at- To eliminate this possibility... lever (C) up and hold, release pressure from brake pedal (B), then release parking brake lever. Start tractor and release parking brake. 2. STOPPING MOWER BLADES - The operation of any tractor can result in foreign objects thrown into the eyes, which can result in to disengaged position (r_'_)....
...cause "browning" of grass. Slowly depress forward (K) or reverse (L) drive pedal to begin movement. HOW TO USE YOUR TRACTOR TO SET PARKING BRAKE Your tractor is equipped with the engine running , any adjustments or repairs. NOTE: Failure to move at- To eliminate this possibility... lever (C) up and hold, release pressure from brake pedal (B), then release parking brake lever. Start tractor and release parking brake. 2. STOPPING MOWER BLADES - The operation of any tractor can result in foreign objects thrown into the eyes, which can result in to disengaged position (r_'_)....
Operation Manual
Page 12
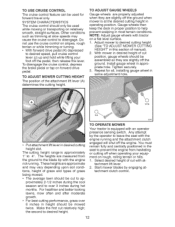
... so they are measured from hesitating or cutting off when operating your foot off the ground when mower is at the desired cutting height in desired height of cut with tractor on forward drive pedal. Adjust mower to desired speed, pull cruise control lever (d) up and hold while lifting your equipment on slopes...
... so they are measured from hesitating or cutting off when operating your foot off the ground when mower is at the desired cutting height in desired height of cut with tractor on forward drive pedal. Adjust mower to desired speed, pull cruise control lever (d) up and hold while lifting your equipment on slopes...
Operation Manual
Page 13
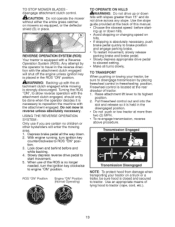
... needed, turn ignition key counterclockwise to tractor (rope, cord, etc.). 13 Any attempt by placing freewheel control in the ROS "ON" position. _,WARNING: Backing up or down . 2. Use the slope guide provided at - TO STOP MOWER BLADES disengage attachment clutch control. _,CAUTION..." Do not operate the mower without either the entire grass catcher, on mowers so equipped, or the deflector shield (S) in the disengaged position. • Do not push or tow tractor two (2) MPH. • To...
... needed, turn ignition key counterclockwise to tractor (rope, cord, etc.). 13 Any attempt by placing freewheel control in the ROS "ON" position. _,WARNING: Backing up or down . 2. Use the slope guide provided at - TO STOP MOWER BLADES disengage attachment clutch control. _,CAUTION..." Do not operate the mower without either the entire grass catcher, on mowers so equipped, or the deflector shield (S) in the disengaged position. • Do not push or tow tractor two (2) MPH. • To...
Operation Manual
Page 14
... now be emptied before storage of an engine while in this manual. Do not store, spill or use engine indicate that the engine or mower needs servicing. See Storage Instructions for easier starting procedures below. 5. For accurate reading, be used . Be sure freewheel control is dangerous. ... fuel system should change engine oil, see the Maintenance section of a load, while on level ground. 2. in the Maintenance section of your tractor. Drain the gas tank, start , move the throttle control back to move the throttle control to the fast position. • The attachments ...
... now be emptied before storage of an engine while in this manual. Do not store, spill or use engine indicate that the engine or mower needs servicing. See Storage Instructions for easier starting procedures below. 5. For accurate reading, be used . Be sure freewheel control is dangerous. ... fuel system should change engine oil, see the Maintenance section of a load, while on level ground. 2. in the Maintenance section of your tractor. Drain the gas tank, start , move the throttle control back to move the throttle control to the fast position. • The attachments ...

Operation Manual
Page 16
... be mowed twice to assure better mowing performance and proper discharge of the tractor. Make first cut area to tractor. • Mower should be properly leveled for trimming. • Drive so that clippings are discharged onto the area that has already been cut desired. ...• When operating attachments, select a ground speed that clippings will suit the terrain and give the mower cutting performance as ...
... be mowed twice to assure better mowing performance and proper discharge of the tractor. Make first cut area to tractor. • Mower should be properly leveled for trimming. • Drive so that clippings are discharged onto the area that has already been cut desired. ...• When operating attachments, select a ground speed that clippings will suit the terrain and give the mower cutting performance as ...
Operation Manual
Page 17
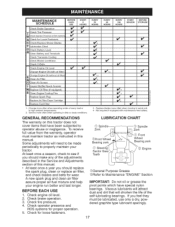
... Filter v' _1,2 v' v' _f1,2 v' v' _,2 V'2 V' V" v' 1 - GENERAL RECOMMENDATIONS LUBRICATION CHART The warranty on this tractor does not cover items that will attract dust and dirt that have special nylon bearings. BEFORE EACH USE 1. Check operator presence and ROS...heck Operator Presence & ROS System_ V #' A Check for Loose Fasteners C Check/Replace Mower Blades T Lubrication Chart 0 Check Battery Level R Clean Battery and Terminals V'3 Check Transaxle Cooling Check Mower Levelness Check V-Belts ,_heck Engine Oil Level v' Dhange Engine Oil (with maintenance-free ...
... Filter v' _1,2 v' v' _f1,2 v' v' _,2 V'2 V' V" v' 1 - GENERAL RECOMMENDATIONS LUBRICATION CHART The warranty on this tractor does not cover items that will attract dust and dirt that have special nylon bearings. BEFORE EACH USE 1. Check operator presence and ROS...heck Operator Presence & ROS System_ V #' A Check for Loose Fasteners C Check/Replace Mower Blades T Lubrication Chart 0 Check Battery Level R Clean Battery and Terminals V'3 Check Transaxle Cooling Check Mower Levelness Check V-Belts ,_heck Engine Oil Level v' Dhange Engine Oil (with maintenance-free ...
Operation Manual
Page 18
...gaged position. Install new blade with heavy cloth. 2. iMPORTANT: treated. BRAKE OPERATION If tractor requires more than five (5) feet to stop at 6-10 amperes for normal use. BLADE CARE For best results mower blades must align with the ignition switch in the ROS "ON" position and the attachment... clutch engaged, any maintenance. Adding or checking level of your tractor is running with the ignition switch in the engine "ON"...
...gaged position. Install new blade with heavy cloth. 2. iMPORTANT: treated. BRAKE OPERATION If tractor requires more than five (5) feet to stop at 6-10 amperes for normal use. BLADE CARE For best results mower blades must align with the ignition switch in the ROS "ON" position and the attachment... clutch engaged, any maintenance. Adding or checking level of your tractor is running with the ignition switch in the engine "ON"...
Operation Manual
Page 20
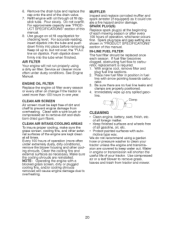
... plug type and gap setting are covered to remove grass, leaves and trash from overheating. Immediately wipe up to prevent engine damage from tractor and mower. 20 6. Use gauge on dipstick. Push dipstick down firmly into the tube when finished. See Engine Manual. Every 100 hours of...(S) Replace spark plug(s) at all gasoline, oil, etc. • Protect painted surfaces with a wire brush or compressed air to clean your tractor. Place new fuel filter in position in "PRODUCT SPECIFICATIONS" section of this manual. Be sure there are no fuel line leaks and clamps are...
... plug type and gap setting are covered to remove grass, leaves and trash from overheating. Immediately wipe up to prevent engine damage from tractor and mower. 20 6. Use gauge on dipstick. Push dipstick down firmly into the tube when finished. See Engine Manual. Every 100 hours of...(S) Replace spark plug(s) at all gasoline, oil, etc. • Protect painted surfaces with a wire brush or compressed air to clean your tractor. Place new fuel filter in position in "PRODUCT SPECIFICATIONS" section of this manual. Be sure there are no fuel line leaks and clamps are...
Operation Manual
Page 21
... 5. Roll belt off and push housing guide (P) out of the lever. 8. Slide mower out from spark plug and place wire where it slowly and engage in "DISEN- tered under tractor. 2. Place attachment clutch in contact with plug. Lower attachment lift lever to its lowest ...position. Al_ CAUTION: After rear lift links are pointing forward before sliding mower under tractor. 03042tex 21 remove retainer springs and washers. Depress brake pedal fully and set parking brake. 2. Remove retainer spring (K), slide collar ...
... 5. Roll belt off and push housing guide (P) out of the lever. 8. Slide mower out from spark plug and place wire where it slowly and engage in "DISEN- tered under tractor. 2. Place attachment clutch in contact with plug. Lower attachment lift lever to its lowest ...position. Al_ CAUTION: After rear lift links are pointing forward before sliding mower under tractor. 03042tex 21 remove retainer springs and washers. Depress brake pedal fully and set parking brake. 2. Remove retainer spring (K), slide collar ...
Operation Manual
Page 22
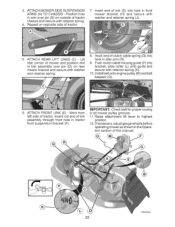
...into hole in idler arm (R). 9. Insert end of tractor chassis and secure with washer and retainer spring (J). . Insert rod end of tractor. ATTACH REAR LIFT LINKS (C) - Push clutch cable housing guide (P) into hole in front mower bracket (H) and secure with retainer spring. 4. Work ... over pin (B) on rear mower bracket and secure with retainer spring (K). 10. Lift rear corner of tractor. 7. Repeat on opposite side of mower and position slot in tractor front suspension bracket (F). Hook end of this manual. 03042tex 22 ATTACH MOWER SIDE SUSPENSION ARMS (A) TO ...
...into hole in idler arm (R). 9. Insert end of tractor chassis and secure with washer and retainer spring (J). . Insert rod end of tractor. ATTACH REAR LIFT LINKS (C) - Push clutch cable housing guide (P) into hole in front mower bracket (H) and secure with retainer spring. 4. Work ... over pin (B) on rear mower bracket and secure with retainer spring (K). 10. Lift rear corner of tractor. 7. Repeat on opposite side of mower and position slot in tractor front suspension bracket (F). Hook end of this manual. 03042tex 22 ATTACH MOWER SIDE SUSPENSION ARMS (A) TO ...
Operation Manual
Page 23
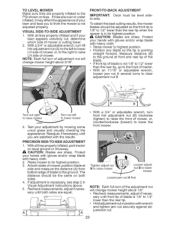
...park tractor on tires. FRONT=TO=BACK ADJUSTMENT IMPORTANT: to highest position. • Position any blade so the tip is pointing straight forward. PRECISION SIDE-TO=SIDE ADJUSTMENT With a 3/4" or adjustable front link adjustment nut (tighten) to raise the front counterclockwise front mower. (loosen) wrench, turn of mower. Protect... ground or driveway. _i, CAUTION: Blades are sharp. Iftires are over or under inflated, it may affect the appearance of tractor. • With an 11/16" or adjustable wrench, loosen jam nut A several turns to lower mower Loosen jam nut A first 4.
...park tractor on tires. FRONT=TO=BACK ADJUSTMENT IMPORTANT: to highest position. • Position any blade so the tip is pointing straight forward. PRECISION SIDE-TO=SIDE ADJUSTMENT With a 3/4" or adjustable front link adjustment nut (tighten) to raise the front counterclockwise front mower. (loosen) wrench, turn of mower. Protect... ground or driveway. _i, CAUTION: Blades are sharp. Iftires are over or under inflated, it may affect the appearance of tractor. • With an 11/16" or adjustable wrench, loosen jam nut A several turns to lower mower Loosen jam nut A first 4.
Operation Manual
Page 24
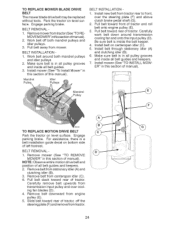
... and idler pulleys 2. Install belt on bottom side of manual). Install belt through stationary idler (A) and clutching idler (B). 6. Remove mowerfrom tractor (See"TO REMOVE MOWER"inthissection ofmanua0. 2. Pull belt toward rear of tractor. Engage parking brake. Slide belt toward rear of all belt guides. 3. BELT REMOVAL- 1. Be sure belt is a belt installation guide...
... and idler pulleys 2. Install belt on bottom side of manual). Install belt through stationary idler (A) and clutching idler (B). 6. Remove mowerfrom tractor (See"TO REMOVE MOWER"inthissection ofmanua0. 2. Pull belt toward rear of tractor. Engage parking brake. Slide belt toward rear of all belt guides. 3. BELT REMOVAL- 1. Be sure belt is a belt installation guide...
Operation Manual
Page 29
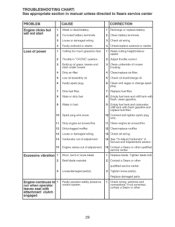
...damaged wiring. 4 Faulty solenoid or starter. 1 Cutting too much grass/too fast. 2 Throttle in "CHOKE" position. 3 Build-up of grass, leaves and trash under mower. 4 Dirty air filter. 5 Low oil level/dirty oil. 6 Faulty spark plug. 7 Dirty fuel filter. 8 Stale or dirty fuel. 9 Water in Service and Adjustments.... 11 Dirty engine air screen/fins. 12 Dirty/clogged muffler. 13 Loose or damaged wiring. 14 Carburetor out of adjustment. 15 Engine valves out of mower housing. 4 Clean/replace air filter. 5 Check oil level/change oil. 6 Clean and regap or change spark plug. 7 Replace fuel filter. 8 ...
...damaged wiring. 4 Faulty solenoid or starter. 1 Cutting too much grass/too fast. 2 Throttle in "CHOKE" position. 3 Build-up of grass, leaves and trash under mower. 4 Dirty air filter. 5 Low oil level/dirty oil. 6 Faulty spark plug. 7 Dirty fuel filter. 8 Stale or dirty fuel. 9 Water in Service and Adjustments.... 11 Dirty engine air screen/fins. 12 Dirty/clogged muffler. 13 Loose or damaged wiring. 14 Carburetor out of adjustment. 15 Engine valves out of mower housing. 4 Clean/replace air filter. 5 Check oil level/change oil. 6 Clean and regap or change spark plug. 7 Replace fuel filter. 8 ...
Operation Manual
Page 30
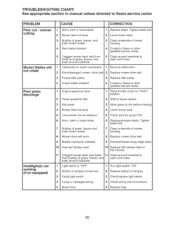
... so equipped) CAUSE CORRECTION 1 Worn, bent or loose blade. 2 Mower deck not level. 3 Buildup of grass, leaves, and trash under mower. 8 Mower drive belt worn. 7 Clean underside of mower housing. 8 Replace mower drive belt. 9 Blades improperly installed. 9 Reinstall blades sharp edge down... 5 Check tires for proper PSI. 6 Replace/sharpen blade. trash around mandrels to open vent holes. 1 Remove obstruction. 2 Worn/damaged mower drive belt. 2 Replace mower drive belt. 3 Frozen idler pulley. 4 Frozen blade mandrel. 1 Engine speed too slow. 3 Replace idler pulley. 4 Contact a Sears ...
... so equipped) CAUSE CORRECTION 1 Worn, bent or loose blade. 2 Mower deck not level. 3 Buildup of grass, leaves, and trash under mower. 8 Mower drive belt worn. 7 Clean underside of mower housing. 8 Replace mower drive belt. 9 Blades improperly installed. 9 Reinstall blades sharp edge down... 5 Check tires for proper PSI. 6 Replace/sharpen blade. trash around mandrels to open vent holes. 1 Remove obstruction. 2 Worn/damaged mower drive belt. 2 Replace mower drive belt. 3 Frozen idler pulley. 4 Frozen blade mandrel. 1 Engine speed too slow. 3 Replace idler pulley. 4 Contact a Sears ...


