
Operation Manual
Page 2
...part of purchase if defective in the operator's manual. Warranty 2 Safety Rules 3 Product Specifications 6 Assembly/Pre-Operation 7 Operation 9 Maintenance Schedule 17 Maintenance 17 Service and Adjustments 21 Storage 28 Troubleshooting 29 Sears Service Back Cover Craftsman Riding Equipment Warranty: Lawn Tractors, Garden Tractors, Zero Turn Riders CRAFTSMAN... is void if this riding equipment fails due to a defect in material or workmanship, visit www.craftsman.com or call 1-800-659-5917 to arrange for 90 days from outside objects, such as nails...
...part of purchase if defective in the operator's manual. Warranty 2 Safety Rules 3 Product Specifications 6 Assembly/Pre-Operation 7 Operation 9 Maintenance Schedule 17 Maintenance 17 Service and Adjustments 21 Storage 28 Troubleshooting 29 Sears Service Back Cover Craftsman Riding Equipment Warranty: Lawn Tractors, Garden Tractors, Zero Turn Riders CRAFTSMAN... is void if this riding equipment fails due to a defect in material or workmanship, visit www.craftsman.com or call 1-800-659-5917 to arrange for 90 days from outside objects, such as nails...
Operation Manual
Page 3
...unloading the machine into a trailer or truck. Use common sense when towing. on the machine and in a large percentage of your tractor. constituents, and certain vehicle components contain or emit chemicals known to the State Shut off blades, set traction with the ground and ...follow all instructions on a slope, is dangerous. Material _]LWARNING: Do not coast down before operating. Operate only at all parts to come to plow leaves or other tractor. Wash hands after handling. dation for wheel weights or counterweights. • Keep machine free of alcohol or drugs. •...
...unloading the machine into a trailer or truck. Use common sense when towing. on the machine and in a large percentage of your tractor. constituents, and certain vehicle components contain or emit chemicals known to the State Shut off blades, set traction with the ground and ...follow all instructions on a slope, is dangerous. Material _]LWARNING: Do not coast down before operating. Operate only at all parts to come to plow leaves or other tractor. Wash hands after handling. dation for wheel weights or counterweights. • Keep machine free of alcohol or drugs. •...
Operation Manual
Page 5
• Remove gas-powered equipment from a gasoline dispenser nozzle. • Keep the nozzle in safe working condition. • Never tamper with manufacturer's recommended parts, when necessary. • Mower blades are sharp. Replace gas cap and tighten securely. Allow machine to be sure the equipment is in contact with safe ...
• Remove gas-powered equipment from a gasoline dispenser nozzle. • Keep the nozzle in safe working condition. • Never tamper with manufacturer's recommended parts, when necessary. • Mower blades are sharp. Replace gas cap and tighten securely. Allow machine to be sure the equipment is in contact with safe ...
Operation Manual
Page 6
...; Federal laws apply on your purchase of your covered product can count on to help by our 12,000 profe- Your new Craftsman® product is designed and manufactured for the muffler is available through your Repair Protection Agreement today! also, 10% off regular ...nance" and "Storage" sections of 10% from time to assemble and maintain your tractor. • Follow the instructions under "Mainte- Other states may require repair from regular price of service and service-related parts not covered by law (Section 4442 of home appliances, garage door openers, water heaters...
...; Federal laws apply on your purchase of your covered product can count on to help by our 12,000 profe- Your new Craftsman® product is designed and manufactured for the muffler is available through your Repair Protection Agreement today! also, 10% off regular ...nance" and "Storage" sections of 10% from time to assemble and maintain your tractor. • Follow the instructions under "Mainte- Other states may require repair from regular price of service and service-related parts not covered by law (Section 4442 of home appliances, garage door openers, water heaters...
Operation Manual
Page 7
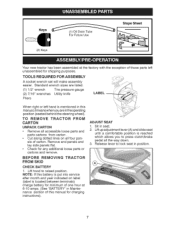
TO REMOVE TRACTOR FROM CARTON UNPACK CARTON • Remove all accessible loose parts and parts cartons from carton. • Cut along dotted lines on label (label is mentioned in this manual, itmeans when you to press clutch/brake pedal all ...; Check for shipping purposes. Lift hood to lock seat in seat. 2. ADJUST SEAT 1. Keys (2) Keys (1) Oil Drain Tube For Future Use Slope Sheet Your new tractor has been assembled at 6-10 amps. (See "BATTERY" in Maintenance section of this battery is put into service after month and year indicated on all...
TO REMOVE TRACTOR FROM CARTON UNPACK CARTON • Remove all accessible loose parts and parts cartons from carton. • Cut along dotted lines on label (label is mentioned in this manual, itmeans when you to press clutch/brake pedal all ...; Check for shipping purposes. Lift hood to lock seat in seat. 2. ADJUST SEAT 1. Keys (2) Keys (1) Oil Drain Tube For Future Use Slope Sheet Your new tractor has been assembled at 6-10 amps. (See "BATTERY" in Maintenance section of this battery is put into service after month and year indicated on all...
Operation Manual
Page 8
...See "TO START ENGINE" and "PU RG ETRANSMISSION" in the Service and Adjustments section of this manual. ,/CHECKLIST Before you operate your tractor were overinflated at proper level. / Fuel tank is filled with fresh, clean, regular unleaded gasoline. / Become familiar with the instructions that... results, mower housing should be properly inflated for shipping purposes. Be sure the area in carton. J No remaining loose parts in front of tractor is important for replacing motion and mower blade drive belts in the Operation section of this manual). / It is at ...
...See "TO START ENGINE" and "PU RG ETRANSMISSION" in the Service and Adjustments section of this manual. ,/CHECKLIST Before you operate your tractor were overinflated at proper level. / Fuel tank is filled with fresh, clean, regular unleaded gasoline. / Become familiar with the instructions that... results, mower housing should be properly inflated for shipping purposes. Be sure the area in carton. J No remaining loose parts in front of tractor is important for replacing motion and mower blade drive belts in the Operation section of this manual). / It is at ...
Operation Manual
Page 18
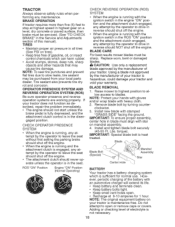
If your local parts dealer. Using a blade not approved by the operator to open . •...counterclockwise. 3. Remove blade bolt by the manufacturer of the battery with stamped "GRASS SIDE" facing the ground. TRACTOR Always observe safety rules when performing any attempt by the operator to drive in the seat. NOTE: To seal...: treated. Blade Bolt (Special) Center Hole Assembly ROS "ON" Position Engine "ON" Position (Normal Operating) BATTERY Your tractor has a battery charging system which can harm rubber. • Avoid stumps, stones, deep ruts, sharp objects and other ...
If your local parts dealer. Using a blade not approved by the operator to open . •...counterclockwise. 3. Remove blade bolt by the manufacturer of the battery with stamped "GRASS SIDE" facing the ground. TRACTOR Always observe safety rules when performing any attempt by the operator to drive in the seat. NOTE: To seal...: treated. Blade Bolt (Special) Center Hole Assembly ROS "ON" Position Engine "ON" Position (Normal Operating) BATTERY Your tractor has a battery charging system which can harm rubber. • Avoid stumps, stones, deep ruts, sharp objects and other ...
Operation Manual
Page 21
Make sure the blades and all moving parts have completely stopped. 5. GAGED" position. 2. Roll belt off and push housing guide (P) out of mower and disconnect mower suspension arm (A) from chassis pin (B) and rear lift link (C) from tractor and hook the clutch spring (Q) into the cable guide on ...a tight grip on front edge of the lever. 8. NOTE: Be sure mower side suspension arms (A) are discon- TO INSTALL MOWER Be sure tractor is to be spring loaded. TO REMOVE MOWER 1. Place attachment clutch in lowest position. Have a tight grip on level surface and engage parking brake...
Make sure the blades and all moving parts have completely stopped. 5. GAGED" position. 2. Roll belt off and push housing guide (P) out of mower and disconnect mower suspension arm (A) from chassis pin (B) and rear lift link (C) from tractor and hook the clutch spring (Q) into the cable guide on ...a tight grip on front edge of the lever. 8. NOTE: Be sure mower side suspension arms (A) are discon- TO INSTALL MOWER Be sure tractor is to be spring loaded. TO REMOVE MOWER 1. Place attachment clutch in lowest position. Have a tight grip on level surface and engage parking brake...
Operation Manual
Page 26
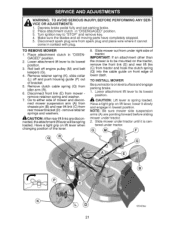
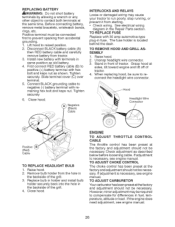
...THROTTLE CONTROL The throttle control has been preset at the factory and adjustment should not be connected first to prevent sparking from tractor. 3. TO ADJUST CHOKE CONTROL The choke control has been preset at the factory and adjustment should not be required to ...to reconnect the headlight wire connector. First connect RED battery cable (B) to positive (+) battery terminal with terminals in the Repair Parts section. sides, tilt toward engine tractor. If adjustment is necessary, see engine manual. 26 Close hood. (Black) Cable (_ Negative INTERLOCKS AND RELAYS Loose or...
...THROTTLE CONTROL The throttle control has been preset at the factory and adjustment should not be connected first to prevent sparking from tractor. 3. TO ADJUST CHOKE CONTROL The choke control has been preset at the factory and adjustment should not be required to ...to reconnect the headlight wire connector. First connect RED battery cable (B) to positive (+) battery terminal with terminals in the Repair Parts section. sides, tilt toward engine tractor. If adjustment is necessary, see engine manual. 26 Close hood. (Black) Cable (_ Negative INTERLOCKS AND RELAYS Loose or...
Operation Manual
Page 27
... in the Maintenance section of this manual). 2. Clean entire tractor (See "CLEANING" in the tank inside a building where fumes may reach an open flame or spark. Be sure that does not retain mois- Inspect moving parts for a few seconds to distribute oil, 4. nected and ...BATTERY • Fully charge the battery for storage. • After a period of acids during storage. NOTE: Fuel stabilizer is removed from tractor for storage, do not store battery directly on stabilizer container. tor. Plastic cannot breathe which leads to separation and formation of time in storage,...
... in the Maintenance section of this manual). 2. Clean entire tractor (See "CLEANING" in the tank inside a building where fumes may reach an open flame or spark. Be sure that does not retain mois- Inspect moving parts for a few seconds to distribute oil, 4. nected and ...BATTERY • Fully charge the battery for storage. • After a period of acids during storage. NOTE: Fuel stabilizer is removed from tractor for storage, do not store battery directly on stabilizer container. tor. Plastic cannot breathe which leads to separation and formation of time in storage,...
Operation Manual
Page 29
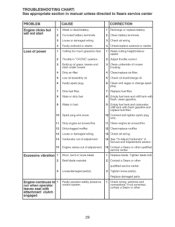
...center. 1 Replace blade. Tighten blade bolt 2 Contact a Sears or other 29 If not corrected, contact a Sears or other qualified service center. 3 Tighten loose part(s). presence CORRECTION 1 Recharge or replace battery. 2 Clean battery terminals. 3 Check all wiring. 14 See "To Adjust Carburetor" in fuel. 10 Spark plug wire loose... height/reduce speed. 2 Adjust throttle control. 3 Clean underside of adjustment. Excessive vibration 1 Worn, bent or loose blade. 2 Bent blade mandrel. 3 Loose/damaged part(s). Replace damaged parts. 1 Check wiring, switches and connections.
...center. 1 Replace blade. Tighten blade bolt 2 Contact a Sears or other 29 If not corrected, contact a Sears or other qualified service center. 3 Tighten loose part(s). presence CORRECTION 1 Recharge or replace battery. 2 Clean battery terminals. 3 Check all wiring. 14 See "To Adjust Carburetor" in fuel. 10 Spark plug wire loose... height/reduce speed. 2 Adjust throttle control. 3 Clean underside of adjustment. Excessive vibration 1 Worn, bent or loose blade. 2 Bent blade mandrel. 3 Loose/damaged part(s). Replace damaged parts. 1 Check wiring, switches and connections.

Operation Manual
Page 64
only) www.sears.com To purchase a protection agreement (U.S.A.) or maintenance agreement (Canada) on -line for the nearest Sears Parts and Repair Center. 1-800-488-1222 Anytime, day or night (U.S.A. For the replacement parts, accessories and owner's manuals that you need to do-it ! For Sears professional installation of home appliances and items like...
only) www.sears.com To purchase a protection agreement (U.S.A.) or maintenance agreement (Canada) on -line for the nearest Sears Parts and Repair Center. 1-800-488-1222 Anytime, day or night (U.S.A. For the replacement parts, accessories and owner's manuals that you need to do-it ! For Sears professional installation of home appliances and items like...


