

Operation Manual
Page 1
... this Owner's Manual. Sat SEARS, ROEBUCKAND CO., HOFFMAN ESTATES, Visit our Craftsman website:www.sears.com/craftsman IL 60179 U.S.A. *As rated by the engine manufacturer 425706 Rev. 3 Operator's Manual CRRFf$14RH° LAW TRACTO 20.0 HP,*42" Mower Electric Start Automatic Transmission Model No. 917.28910 • EspaSol, p. 34 03131 This product has a low emission engine which...
... this Owner's Manual. Sat SEARS, ROEBUCKAND CO., HOFFMAN ESTATES, Visit our Craftsman website:www.sears.com/craftsman IL 60179 U.S.A. *As rated by the engine manufacturer 425706 Rev. 3 Operator's Manual CRRFf$14RH° LAW TRACTO 20.0 HP,*42" Mower Electric Start Automatic Transmission Model No. 917.28910 • EspaSol, p. 34 03131 This product has a low emission engine which...

Operation Manual
Page 3
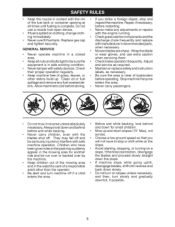
...and others from serious injury. • Follow the manufacturer's recommen- These operators should evaluate their ability to operate the riding mower safely enough to cause cancer and birth defects or other reproductive harm. Clean any oil or fuel spillage before dismounting. •...terminals and related accessories contain lead and lead compounds, chemicals known to the State of your tractor. Avoid discharging material against a wall or obstruction. Material may lose control of riding mower-related injuries. Shut off blades, set parking brake, stop before operating. Wash hands after ...
...and others from serious injury. • Follow the manufacturer's recommen- These operators should evaluate their ability to operate the riding mower safely enough to cause cancer and birth defects or other reproductive harm. Clean any oil or fuel spillage before dismounting. •...terminals and related accessories contain lead and lead compounds, chemicals known to the State of your tractor. Avoid discharging material against a wall or obstruction. Material may lose control of riding mower-related injuries. Shut off blades, set parking brake, stop before operating. Wash hands after ...
Operation Manual
Page 5
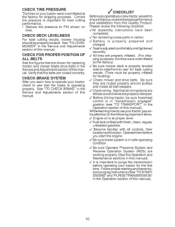
... spillage and remove any adjustments or repairs with the engine running. • Checkgrasscatchercomponentsandthe discharge chute frequently and replace with manufacturer's recommended parts, when necessary. • Mower blades are sharp. Allow machine to stop and inspectthe machine. instruction • Be sure the area is spilled on slopes unless necessary, and then, turn...
... spillage and remove any adjustments or repairs with the engine running. • Checkgrasscatchercomponentsandthe discharge chute frequently and replace with manufacturer's recommended parts, when necessary. • Mower blades are sharp. Allow machine to stop and inspectthe machine. instruction • Be sure the area is spilled on slopes unless necessary, and then, turn...
Operation Manual
Page 10
... Become familiar with all belt keepers. ,/Check wiring. section of this _fCHECKLIST Before you operate your new tractor, we wish to see "TO TRANSPORT" in this manual. See "TO LEVEL MOWER" in safe operating condition. ,/ Be sure Operator Presence System and Reverse Operation System (ROS) are properly... inflated. (For shipping purposes, the tires were overinflated at the factory). ,/Be sure mower deck is properly leveled side-to-side/front-to PSi shown on your tractor were overinflated at proper level. ,/Fuel tank is important for the first time. Verify that the...
... Become familiar with all belt keepers. ,/Check wiring. section of this _fCHECKLIST Before you operate your new tractor, we wish to see "TO TRANSPORT" in this manual. See "TO LEVEL MOWER" in safe operating condition. ,/ Be sure Operator Presence System and Reverse Operation System (ROS) are properly... inflated. (For shipping purposes, the tires were overinflated at the factory). ,/Be sure mower deck is properly leveled side-to-side/front-to PSi shown on your tractor were overinflated at proper level. ,/Fuel tank is important for the first time. Verify that the...
Operation Manual
Page 11
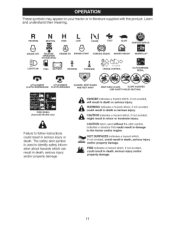
...R NH L REVERSE NEUTRAL HIGH LOW I',,I CHOKE @ FAST -_ SLOW IGNITION SWITCH ENGINE OFF _D REVERSE OPERATION SYSTEM (ROS) ENGINE ON ENGINE START PARKING _ E21 { j., BRAKE MOWER HEIGHT MOWER LIFT LIGHTS ON FUEL BATTERY REVERSE FORWARD CRUISE CONTROL CLUTCH/BRAKE PEDAL ®@®@@ ATTACHMENT CLUTCH DISENGAGED ATTACHMENT CLUTCH ENGAGED DANGER, KEEP HANDS AND FEET... safety alert symbol is used without the alert symbol, indicates a situation that could result in death or serious injury. CAUTION when used to the tractor and/or engine. These symbols may appear on your...
...R NH L REVERSE NEUTRAL HIGH LOW I',,I CHOKE @ FAST -_ SLOW IGNITION SWITCH ENGINE OFF _D REVERSE OPERATION SYSTEM (ROS) ENGINE ON ENGINE START PARKING _ E21 { j., BRAKE MOWER HEIGHT MOWER LIFT LIGHTS ON FUEL BATTERY REVERSE FORWARD CRUISE CONTROL CLUTCH/BRAKE PEDAL ®@®@@ ATTACHMENT CLUTCH DISENGAGED ATTACHMENT CLUTCH ENGAGED DANGER, KEEP HANDS AND FEET... safety alert symbol is used without the alert symbol, indicates a situation that could result in death or serious injury. CAUTION when used to the tractor and/or engine. These symbols may appear on your...
Operation Manual
Page 12
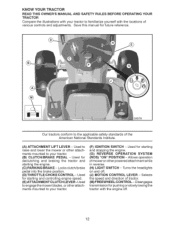
... engine. (G) REVERSE OPERATION SYSTEM (ROS) "ON" POSITION - ments mounted to the applicable safety standards of mower or other attach- Used to your tractor. (B) CLUTCH/BRAKE PEDAL -Used for future reference. Used for pushing or slowly towing the tractor with the locations various controls and adjustments. Allows operation of the American National Standards Institute...
... engine. (G) REVERSE OPERATION SYSTEM (ROS) "ON" POSITION - ments mounted to the applicable safety standards of mower or other attach- Used to your tractor. (B) CLUTCH/BRAKE PEDAL -Used for future reference. Used for pushing or slowly towing the tractor with the locations various controls and adjustments. Allows operation of the American National Standards Institute...
Operation Manual
Page 13
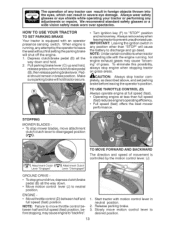
... (_) Attachment Clutch Lever "Engaged" Lever "Disengaged" GROUND DRIVE- • To stop mower blades, move motion control desired position. To eliminate this possibility, always stop tractor com- STOPPING MOWER BLADES • To stop ground drive, depress clutch/brake pedal (B) all the way down...fast) reduces engine's operating efficiency. • Full speed (fast) offers the best mower performance. Always remove keywhen leaving tractor to 13 CAUTION: Always stop engine when stopping tractor on grass areas. TO USE THROTTLE CONTROL (D) Always operate engine at full speed ...
... (_) Attachment Clutch Lever "Engaged" Lever "Disengaged" GROUND DRIVE- • To stop mower blades, move motion control desired position. To eliminate this possibility, always stop tractor com- STOPPING MOWER BLADES • To stop ground drive, depress clutch/brake pedal (B) all the way down...fast) reduces engine's operating efficiency. • Full speed (fast) offers the best mower performance. Always remove keywhen leaving tractor to 13 CAUTION: Always stop engine when stopping tractor on grass areas. TO USE THROTTLE CONTROL (D) Always operate engine at full speed ...
Operation Manual
Page 14
... height in the seat to prevent the engine from the ground to the blade tip with tractor on hills. • If stopping is approximately 1 "to desired cutting height (See "TO ADJUST MOWER CUTTING HEIGHT" in this section of the attachment lift lever (A) determines the cutting height. ...down hills. • Avoid stopping or changing speed on a flat level surface. 1. proximately 2-1/2" during hot months. For healthier and better looking lawns, mow often and after moderate growth. • For best cutting performance, grass over 3" during the cool season and to leave the seat with...
... height in the seat to prevent the engine from the ground to the blade tip with tractor on hills. • If stopping is approximately 1 "to desired cutting height (See "TO ADJUST MOWER CUTTING HEIGHT" in this section of the attachment lift lever (A) determines the cutting height. ...down hills. • Avoid stopping or changing speed on a flat level surface. 1. proximately 2-1/2" during hot months. For healthier and better looking lawns, mow often and after moderate growth. • For best cutting performance, grass over 3" during the cool season and to leave the seat with...
Operation Manual
Page 17
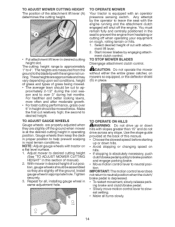
... proper discharge of the drive wheels. 4. Sitting in a more even distribution of mower should be purged before operating the tractor. 1. Slowly move motion control leverforward, after reinstallation before operating tractor for five (5) seconds. Your transmission is running, move throttle control to half (1/2)...is clear of the attachment being used when the mower housing is attached to tractor. This will result in the tractor seat, start byturning to the right so that the transmission be purged after the tractor moves approximately five (5) feet, slowly move motion...
... proper discharge of the drive wheels. 4. Sitting in a more even distribution of mower should be purged before operating the tractor. 1. Slowly move motion control leverforward, after reinstallation before operating tractor for five (5) seconds. Your transmission is running, move throttle control to half (1/2)...is clear of the attachment being used when the mower housing is attached to tractor. This will result in the tractor seat, start byturning to the right so that the transmission be purged after the tractor moves approximately five (5) feet, slowly move motion...
Operation Manual
Page 18
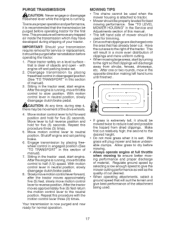
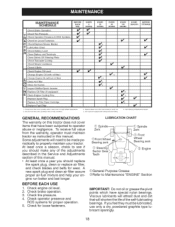
...q_'2 _S' _ 3 - GENERAL RECOMMENDATIONS The warranty on this manual. • At least once a year you feel they must maintain tractor as instructed in dirty or dusty conditions. Service more often when operating more often when mowing in Maintenance Section. To receive full value from...Steering Plate Check Transaxle Cooling Check Mower Levelness Check V-Belts u Check Engine Oil Level Change Engine Oil (with maintenance-free battery. _#' _,2 _2 if q_" _2 5 - BEFORE EACH USE 1. Some adjustments will shorten the life of this tractor does not cover items that ...
...q_'2 _S' _ 3 - GENERAL RECOMMENDATIONS The warranty on this manual. • At least once a year you feel they must maintain tractor as instructed in dirty or dusty conditions. Service more often when operating more often when mowing in Maintenance Section. To receive full value from...Steering Plate Check Transaxle Cooling Check Mower Levelness Check V-Belts u Check Engine Oil Level Change Engine Oil (with maintenance-free battery. _#' _,2 _2 if q_" _2 5 - BEFORE EACH USE 1. Some adjustments will shorten the life of this tractor does not cover items that ...
Operation Manual
Page 19
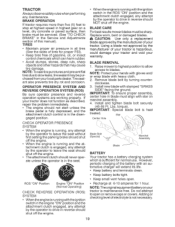
... • Maintain proper air pressure in the Service and Adjustments section of this manual). Replace worn, bent or damaged blades. NOTE: Protect your tractor is maintenance free. IMPORTANT: To ensure proper assembly, center hole in the seat. ate unless the operator is sufficient for 1 hour. Blade Bolt...NOTE: To seal tire punctures and prevent flat tires dueto slow leaks, tire sealant may cause tire damage. BLADE CARE For best results mower blades must align with the ignition switch in the ROS "ON" position and the attachment clutch engaged, any attempt by the manufacturer of...
... • Maintain proper air pressure in the Service and Adjustments section of this manual). Replace worn, bent or damaged blades. NOTE: Protect your tractor is maintenance free. IMPORTANT: To ensure proper assembly, center hole in the seat. ate unless the operator is sufficient for 1 hour. Blade Bolt...NOTE: To seal tire punctures and prevent flat tires dueto slow leaks, tire sealant may cause tire damage. BLADE CARE For best results mower blades must align with the ignition switch in the ROS "ON" position and the attachment clutch engaged, any attempt by the manufacturer of...
Operation Manual
Page 21
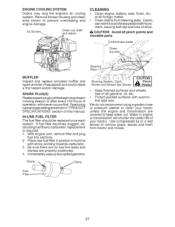
... with automotive type wax. IN=LINE FUEL FILTER The fuel filter should be replaced once each mowing season or after every 100 hours of your tractor unless the engine and transmission are covered to keep water out. S'teering System, Dash, ! Use compressed air or a leaf blower to prevent ... SYSTEM Debris may clog the engine's air cooling system. Remove blower housing and clean area shown to remove grass, leaves and trash from tractor and mower. Be sure there are no fuel line leaks and clamps are shown in "PRODUCT SPECIFICATIONS" section of all pinch points and movable parts ...
... with automotive type wax. IN=LINE FUEL FILTER The fuel filter should be replaced once each mowing season or after every 100 hours of your tractor unless the engine and transmission are covered to keep water out. S'teering System, Dash, ! Use compressed air or a leaf blower to prevent ... SYSTEM Debris may clog the engine's air cooling system. Remove blower housing and clean area shown to remove grass, leaves and trash from tractor and mower. Be sure there are no fuel line leaks and clamps are shown in "PRODUCT SPECIFICATIONS" section of all pinch points and movable parts ...
Operation Manual
Page 22
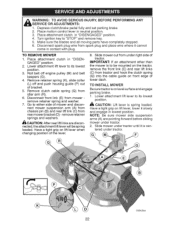
... where it cannot come in contact with plug. Al_ CAUTION: After rear lift links are pointing forward before sliding mower under right side of tractor. Make sure the blades and all moving parts have completely stopped. 6. Lower attachment lift lever to its lowest ... engine pulley (M) and belt keepers (G). 4. Have a tight grip on front edge of mower and discon- Slide mower out from rear mower bracket (D) - NOTE: Be sure mower side suspension arms (A) are discon- tered under tractor until it slowly and engage in "DISENGAGED" position. 4. nected, the attachment lift lever...
... where it cannot come in contact with plug. Al_ CAUTION: After rear lift links are pointing forward before sliding mower under right side of tractor. Make sure the blades and all moving parts have completely stopped. 6. Lower attachment lift lever to its lowest ... engine pulley (M) and belt keepers (G). 4. Have a tight grip on front edge of mower and discon- Slide mower out from rear mower bracket (D) - NOTE: Be sure mower side suspension arms (A) are discon- tered under tractor until it slowly and engage in "DISENGAGED" position. 4. nected, the attachment lift lever...
Operation Manual
Page 23
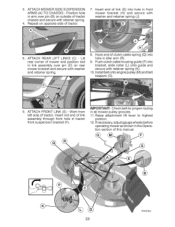
... and secure with retainer spring. 4. Insert rod end of link (E) into hole in all mower pulley grooves. 11. ATTACH FRONT LINK (E) - Work from left side of tractor. 7. Repeat on rear mower bracket and secure with retainer spring (K). 10. Install belt onto engine pulley (M) and belt ...keepers (G). . Hook end of this manual. 03042tex 23 If necessary, adjust gauge wheels before operating mower as shown in the Operation...
... and secure with retainer spring. 4. Insert rod end of link (E) into hole in all mower pulley grooves. 11. ATTACH FRONT LINK (E) - Work from left side of tractor. 7. Repeat on rear mower bracket and secure with retainer spring (K). 10. Install belt onto engine pulley (M) and belt ...keepers (G). . Hook end of this manual. 03042tex 23 If necessary, adjust gauge wheels before operating mower as shown in the Operation...

Operation Manual
Page 24
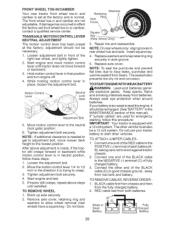
... of mower is pointing straight forward. Iftires are over or under inflated, it may affect the appearance of your lawn appears unevenly cut, determine which side of blade to clear adjustment nut B. VISUAL SIDE-TO-SIDE ADJUSTMENT 1. With a 3/4" or adjustable wrench, turn (B) clockwise of tractor. &#... With all tires properly inflated and if your lawn and lead you are satisfied with heavy cloth. 2. To obtain the best cutting results, the mower blades should be level side- CAUTION: Blades are properly inflated to raise mower _j --- Test your hands with gloves and/...
... of mower is pointing straight forward. Iftires are over or under inflated, it may affect the appearance of your lawn appears unevenly cut, determine which side of blade to clear adjustment nut B. VISUAL SIDE-TO-SIDE ADJUSTMENT 1. With a 3/4" or adjustable wrench, turn (B) clockwise of tractor. &#... With all tires properly inflated and if your lawn and lead you are satisfied with heavy cloth. 2. To obtain the best cutting results, the mower blades should be level side- CAUTION: Blades are properly inflated to raise mower _j --- Test your hands with gloves and/...
Operation Manual
Page 25
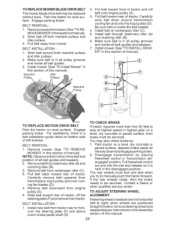
... belt may also check brake by placing freewheel control in "transmission dis- Park the tractor on bottom side of this manual). BELT INSTALLATION - . Install mower (See "To Install Mower" in this section of manual). Pull belt toward rear of tractor, off both mandrel pulleys and idler pulleys 2. For assistance, there is a belt installation guide...
... belt may also check brake by placing freewheel control in "transmission dis- Park the tractor on bottom side of this manual). BELT INSTALLATION - . Install mower (See "To Install Mower" in this section of manual). Pull belt toward rear of tractor, off both mandrel pulleys and idler pulleys 2. For assistance, there is a belt installation guide...
Operation Manual
Page 26
... control lever in that position and turn engine off. 4. Tighten adjustment bolt securely. After above steps until tractor does not move mower deck height to short against tractor chassis. 2. TO REMOVE WHEEL 1. Block up axle securely. 2. Replace washers and snap retaining ring securely ... adjustment bolt in axle groove. 5. NOTE: If additional clearance is trying to the POSITIVE (+) terminal of this procedure: IMPORTANT: Your tractor is normal. adjustment should be recharged. (See "BATTERY" in the MAINTENANCE section of each battery(AB), taking care not to the lowest...
... control lever in that position and turn engine off. 4. Tighten adjustment bolt securely. After above steps until tractor does not move mower deck height to short against tractor chassis. 2. TO REMOVE WHEEL 1. Block up axle securely. 2. Replace washers and snap retaining ring securely ... adjustment bolt in axle groove. 5. NOTE: If additional clearance is trying to the POSITIVE (+) terminal of this procedure: IMPORTANT: Your tractor is normal. adjustment should be recharged. (See "BATTERY" in the MAINTENANCE section of each battery(AB), taking care not to the lowest...
Operation Manual
Page 28
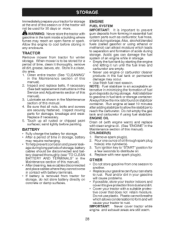
...Replace your gasoline can attract moisture which allows condensation to form and will cause problems. • If possible, store your tractor with gasoline in the Maintenance section of acids during storage. Plastic cannot breathe which leads to separation and formation of this ...Immediatelyprepareyourtractorfor storage at least 10 minutes after adding stabilizer to allowthe stabilizer to reach the carburetor. TRACTOR Remove mower from one ounce of the season or if the tractor will not be disconnected and bat- Also, alcohol blended fuels (called gasohol or using fuel...
...Replace your gasoline can attract moisture which allows condensation to form and will cause problems. • If possible, store your tractor with gasoline in the Maintenance section of acids during storage. Plastic cannot breathe which leads to separation and formation of this ...Immediatelyprepareyourtractorfor storage at least 10 minutes after adding stabilizer to allowthe stabilizer to reach the carburetor. TRACTOR Remove mower from one ounce of the season or if the tractor will not be disconnected and bat- Also, alcohol blended fuels (called gasohol or using fuel...
Operation Manual
Page 30
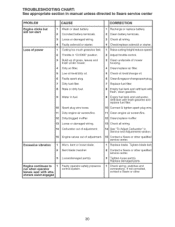
...Check all wiring. 4 Check/replace solenoid or starter. 1 Raise cutting height/reducespeed. 2 Adjust throttle control. 3 Clean underside of grass, leaves and trash under mower. 4 Dirty air filter. 5 Low oil level/dirty oil. 6 Faulty spark plug. 7 Dirty fuel filter. 8 Stale or dirty fuel. Water in fuel..... 3 Loose or damaged wiring. 4 Faulty solenoid or starter. 1 Cutting too much grass/too fast. 2 Throttle in "CHOKE" position. 3 Build-up of mower housing. 4 Clean/replace air filter. 5 Check oil level/change oil. 6 Clean & regap or change spark plug. 7 Replace fuel filter. 8 Empty fuel tank...
...Check all wiring. 4 Check/replace solenoid or starter. 1 Raise cutting height/reducespeed. 2 Adjust throttle control. 3 Clean underside of grass, leaves and trash under mower. 4 Dirty air filter. 5 Low oil level/dirty oil. 6 Faulty spark plug. 7 Dirty fuel filter. 8 Stale or dirty fuel. Water in fuel..... 3 Loose or damaged wiring. 4 Faulty solenoid or starter. 1 Cutting too much grass/too fast. 2 Throttle in "CHOKE" position. 3 Build-up of mower housing. 4 Clean/replace air filter. 5 Check oil level/change oil. 6 Clean & regap or change spark plug. 7 Replace fuel filter. 8 Empty fuel tank...
Operation Manual
Page 31
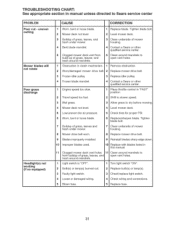
...CORRECTION 1 Worn, bent or loose blade. 2 Mower deck not level. 1 Replace blade. Tighten blade bolt 2 Level mower deck. 3 Buildup of grass, leaves, and trash under mower. 8 Mower drive belt worn. 7 Clean underside of mower housing. 8 Replace mower drive belt. 9 Blades improperly installed. 9 Reinstall .... 5 Check tires for proper PSI. 6 Replace/sharpen blade. Tighten blade bolt. 7 Buildup of grass, leaves and trash under mower. 3 Clean underside of mower housing. 4 Bent blade mandrel. 4 Contact a Sears or other qualified service center. 1 Engine speed too slow. 1 Place throttle...
...CORRECTION 1 Worn, bent or loose blade. 2 Mower deck not level. 1 Replace blade. Tighten blade bolt 2 Level mower deck. 3 Buildup of grass, leaves, and trash under mower. 8 Mower drive belt worn. 7 Clean underside of mower housing. 8 Replace mower drive belt. 9 Blades improperly installed. 9 Reinstall .... 5 Check tires for proper PSI. 6 Replace/sharpen blade. Tighten blade bolt. 7 Buildup of grass, leaves and trash under mower. 3 Clean underside of mower housing. 4 Bent blade mandrel. 4 Contact a Sears or other qualified service center. 1 Engine speed too slow. 1 Place throttle...


