Operation Manual
Page 2
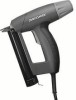
... IN THE UNITED STATES. SECTION Warranty Product Specifications Safety Instructions Accessories and Attachments Know Your Brad Nailer Operation Maintenance Troubleshooting Guide Parts PAGE 2 2 3 6 7 7 8 9 10 FULL ONE YEAR WARRANTY ON CRAFTSMAN PROFESSIONAL ELECTRIC NAILER If this Craftsman Nailer fails due to state. This warranty gives you specific legal rights, and you may also have other rights which vary from...
... IN THE UNITED STATES. SECTION Warranty Product Specifications Safety Instructions Accessories and Attachments Know Your Brad Nailer Operation Maintenance Troubleshooting Guide Parts PAGE 2 2 3 6 7 7 8 9 10 FULL ONE YEAR WARRANTY ON CRAFTSMAN PROFESSIONAL ELECTRIC NAILER If this Craftsman Nailer fails due to state. This warranty gives you specific legal rights, and you may also have other rights which vary from...
Operation Manual
Page 6
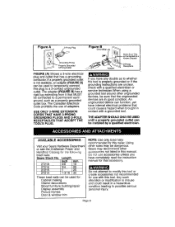
...Display assembly Picture frames Door & window trim NOTE: Use only brad nails recommended for this nailer. Sears may be dangerous. If a properly grounded outlet is... misuse and could cause a hazard when brought in contact with a grounded tool. AVAILABLE ACCESSORIES ' Visit your Sears Hardware Department or see the Craftsman... listed in this manual. Page 6 The Canadian Electrical Code prohibits the use with this tool. If you have internal electrical problems that could result in a hazardous condition leading...
...Display assembly Picture frames Door & window trim NOTE: Use only brad nails recommended for this nailer. Sears may be dangerous. If a properly grounded outlet is... misuse and could cause a hazard when brought in contact with a grounded tool. AVAILABLE ACCESSORIES ' Visit your Sears Hardware Department or see the Craftsman... listed in this manual. Page 6 The Canadian Electrical Code prohibits the use with this tool. If you have internal electrical problems that could result in a hazardous condition leading...
Operation Manual
Page 7
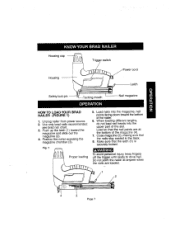
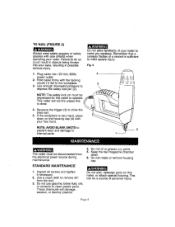
Use only brad nails recommended; see brad nail chart. 3. Position the nailer exposing the magazine chamber (3). Unplug nailer from power source. 2. Fig. 1 /_ Proper loading 5. Load se that the latch (1) is securely locked. Make sure that the nail points are at ... are loaded. 4 3 Page 7 Housing cap -Housing Safety lock pin Trigger switch cord t g mouth Latch Nail magazine HOW TO LOAD YOUR BRAD NAILER (FIGURE 1) 1. Do not point the nailer at the bottom of the magazine (4). 7. Push up the latch (1) toward the bottom of the slot. When loading different lengths, do not...
Use only brad nails recommended; see brad nail chart. 3. Position the nailer exposing the magazine chamber (3). Unplug nailer from power source. 2. Fig. 1 /_ Proper loading 5. Load se that the latch (1) is securely locked. Make sure that the nail points are at ... are loaded. 4 3 Page 7 Housing cap -Housing Safety lock pin Trigger switch cord t g mouth Latch Nail magazine HOW TO LOAD YOUR BRAD NAILER (FIGURE 1) 1. Do not point the nailer at the bottom of the magazine (4). 7. Push up the latch (1) toward the bottom of the slot. When loading different lengths, do not...
Operation Manual
Page 8
dUespereesnsoutghhe sdaofewtnywalorcdk priness(2u)r.e to Do not allow familiarity of your nailer. Do not rotate or remove housing cap. 1. Do not use gasoline, brake fluid, oils, or solvents to drive the brad nail. 5. These chemicals will not fire uniess this f/_ / /'_--._ ...dirt from the electrical power source during maintenance. STANDARD MAINTENANCE 4. This can be a source of a second is very hard, press down on this nailer to internal parts. /// k_ k _'_" _ J 1 _'_ 1 J I /J I/ 2 The nailer must be disconnected from the tool. 3. Hold nailer firmly with ...
dUespereesnsoutghhe sdaofewtnywalorcdk priness(2u)r.e to Do not allow familiarity of your nailer. Do not rotate or remove housing cap. 1. Do not use gasoline, brake fluid, oils, or solvents to drive the brad nail. 5. These chemicals will not fire uniess this f/_ / /'_--._ ...dirt from the electrical power source during maintenance. STANDARD MAINTENANCE 4. This can be a source of a second is very hard, press down on this nailer to internal parts. /// k_ k _'_" _ J 1 _'_ 1 J I /J I/ 2 The nailer must be disconnected from the tool. 3. Hold nailer firmly with ...
Operation Manual
Page 9
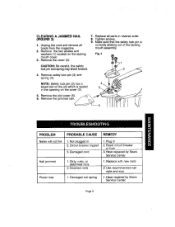
.... 9. ated 4_. 3_ 5. Incorrect nails Power loss 1. Remove the two screws and washers (1) located on the tacking mouth cover. 3. Replace all brads from the magazine. 2. j/ _'_ t_ 5 PROBLEM PROBABLE CAUSE Nailer will net fire 1. Damaged cord Nail jammed 1. Dirty, rusty, or deformed nails 2. Have repaired by Sears Service Center 1. Remove the slot cover...
.... 9. ated 4_. 3_ 5. Incorrect nails Power loss 1. Remove the two screws and washers (1) located on the tacking mouth cover. 3. Replace all brads from the magazine. 2. j/ _'_ t_ 5 PROBLEM PROBABLE CAUSE Nailer will net fire 1. Damaged cord Nail jammed 1. Dirty, rusty, or deformed nails 2. Have repaired by Sears Service Center 1. Remove the slot cover...
Operation Manual
Page 10
ELECTRIC BRAD NAILER MODEL NUMBER 836,27233 Key Number Order by PART NUMBER, not by key number Part Number Description 1 DCA0060030 Slot-cover (B) 2 DCAO050080 Slot-cover (A) 3 BMSO040010 Screw 4 DCA0790070 Safety cover 5 BMDO010000 Washer 6 DHBO040010 Housing screw 7 BMS0040361 Screw 8 BMS0040210 Screw 9 DHA0190010 Safety spring 10 DAA0320060 Safety lock pin (Guide bar) 1t 2723301 Screwdriver 12 2723302 Carry case 13 2723303 Owner's manual 14 2723304 Hex Key Page 10
ELECTRIC BRAD NAILER MODEL NUMBER 836,27233 Key Number Order by PART NUMBER, not by key number Part Number Description 1 DCA0060030 Slot-cover (B) 2 DCAO050080 Slot-cover (A) 3 BMSO040010 Screw 4 DCA0790070 Safety cover 5 BMDO010000 Washer 6 DHBO040010 Housing screw 7 BMS0040361 Screw 8 BMS0040210 Screw 9 DHA0190010 Safety spring 10 DAA0320060 Safety lock pin (Guide bar) 1t 2723301 Screwdriver 12 2723302 Carry case 13 2723303 Owner's manual 14 2723304 Hex Key Page 10


