
Operation Manual
Page 2
SERVICE AND SAFETY S LEHR ECO-TRIMMER IMPORTANT SAFETY INSTRUCTIONS DU 4-CYCLE PROPANE TRIMMER READ ALL INSTRUCTION BEFORE OPERATING • Ne For service call 1-866-941-LEHR in the United States, to in obtain a list of California, Maine, Oregon, and Washington. DO...be encouraged to bystanders from thrown objects. p WARNING: u WHEN SERVICING, USE ONLY IDENTICAL REPLACEMENTPARTS. le • Th Service on U.S. Replace parts that it returns automatically to the head, hands and w period should be constructed, equipped and maintained for fuel leaks. p • Clear the...
SERVICE AND SAFETY S LEHR ECO-TRIMMER IMPORTANT SAFETY INSTRUCTIONS DU 4-CYCLE PROPANE TRIMMER READ ALL INSTRUCTION BEFORE OPERATING • Ne For service call 1-866-941-LEHR in the United States, to in obtain a list of California, Maine, Oregon, and Washington. DO...be encouraged to bystanders from thrown objects. p WARNING: u WHEN SERVICING, USE ONLY IDENTICAL REPLACEMENTPARTS. le • Th Service on U.S. Replace parts that it returns automatically to the head, hands and w period should be constructed, equipped and maintained for fuel leaks. p • Clear the...
Operation Manual
Page 3
... position while starting . Do not run the unit inside a building where vapor may become entangled with propane canister attached inside a closed room or build - The cutting attachment remains stationary when the engine is ...these instructions. Do not oper ate unit without both handles or grips. These are marked as a trimmer. Keep the engine and muffler free from one cutting location to secure the unit while transporting... up high to cut, trim or edge. parts get extremely hot from all mov - SAVE THESE INSTRUCTIONS LEHR | ALL RIGHTS RESERVED 2008-2009 3
... position while starting . Do not run the unit inside a building where vapor may become entangled with propane canister attached inside a closed room or build - The cutting attachment remains stationary when the engine is ...these instructions. Do not oper ate unit without both handles or grips. These are marked as a trimmer. Keep the engine and muffler free from one cutting location to secure the unit while transporting... up high to cut, trim or edge. parts get extremely hot from all mov - SAVE THESE INSTRUCTIONS LEHR | ALL RIGHTS RESERVED 2008-2009 3
Operation Manual
Page 4
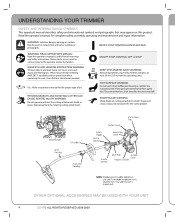
... meeting ANSI Z87.1 standards and ear protection when operating this product. Keep away from the operating area. These parts get burned. UNDERSTANDING YOUR TRIMMER SAFETY AND INTERNATIONAL SYMBOLS This operator's manual describes safety and international symbols and pictographs that may get extremely hot... on cutting attachment shield. SHARP BLADE WARNING Sharp blade on this unit. OTHER OPTIONAL ACCESSORIES MAY BE USED WITH YOUR UNIT 4 LEHR | ALL RIGHTS RESERVED 2008-2009 May be used in place. WARNING: READ OPERATOR'S MANUAL: Read the operator's manual(s) and ...
... meeting ANSI Z87.1 standards and ear protection when operating this product. Keep away from the operating area. These parts get burned. UNDERSTANDING YOUR TRIMMER SAFETY AND INTERNATIONAL SYMBOLS This operator's manual describes safety and international symbols and pictographs that may get extremely hot... on cutting attachment shield. SHARP BLADE WARNING Sharp blade on this unit. OTHER OPTIONAL ACCESSORIES MAY BE USED WITH YOUR UNIT 4 LEHR | ALL RIGHTS RESERVED 2008-2009 May be used in place. WARNING: READ OPERATOR'S MANUAL: Read the operator's manual(s) and ...
Operation Manual
Page 5
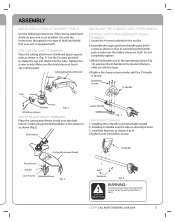
...prevent serious injury, never operate the trimmer without the cutting attachment in desired position. 3. LEHR | ALL RIGHTS RESERVED 2008-2009 5 Attaching Screws D-Handle Cap Washer Fig. 1 Attaching Screws FOR STRAIGHT SHAFT TRIMMERS Place the cutting attachment shield onto the shaft mount. Use the 2 screws .... 3.While holding the unit in the tool kit. 2.Assemble the upper and lower handle parts and 4 screws as shown (Fig.2). Shaft Mount Lower Handle Fig. 3 CURVED SHAFT TRIMMERS 1. Installing D-Handle over the rubber sleeve on your unit is not installed. Installing the ...
...prevent serious injury, never operate the trimmer without the cutting attachment in desired position. 3. LEHR | ALL RIGHTS RESERVED 2008-2009 5 Attaching Screws D-Handle Cap Washer Fig. 1 Attaching Screws FOR STRAIGHT SHAFT TRIMMERS Place the cutting attachment shield onto the shaft mount. Use the 2 screws .... 3.While holding the unit in the tool kit. 2.Assemble the upper and lower handle parts and 4 screws as shown (Fig.2). Shaft Mount Lower Handle Fig. 3 CURVED SHAFT TRIMMERS 1. Installing D-Handle over the rubber sleeve on your unit is not installed. Installing the ...
Operation Manual
Page 9
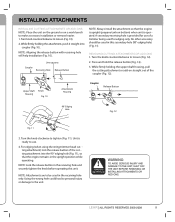
Line up parts Coupler Receiving Hole Release Button NOTE: Always install the ... receiving hole is oper ated. Turn the knob clockwise to the unit. For edging (when using the string trimmer head cut ting attachment) lock the release button of the cut ting attachment into coupler (Fig. 10). WARNING...Shaft Housing Knob Fig. 10 Attachment Housing Coupler Release Button 90° Edging Hole Fig. 12 Fig. 11 3. NOTE: Lock the release button in this unit. Unit is upright (propane tank on straight out of a trimmer being used in the upright position while operating. LEHR...
Line up parts Coupler Receiving Hole Release Button NOTE: Always install the ... receiving hole is oper ated. Turn the knob clockwise to the unit. For edging (when using the string trimmer head cut ting attachment) lock the release button of the cut ting attachment into coupler (Fig. 10). WARNING...Shaft Housing Knob Fig. 10 Attachment Housing Coupler Release Button 90° Edging Hole Fig. 12 Fig. 11 3. NOTE: Lock the release button in this unit. Unit is upright (propane tank on straight out of a trimmer being used in the upright position while operating. LEHR...

Operation Manual
Page 12
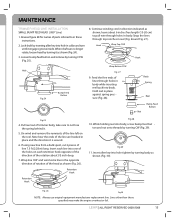
... ll the unit. If the level is in poor performance and/ or cause permanent damage to get a proper oil level reading. 3. USE OF ANY OTHER PARTS MAY CREATE A HAZARD OR CAUSE PRODUCT DAMAGE Oil Fill Plug/ Dipstick WARNING: TO PREVENT EXTENSIVE ENGINE WEAR AND DAMGE TO THE UNIT, ALWAYS MAINTAIN THE... ADJ USTMENT REFER TO PAGE 6 PAGE 13 PAGE 13 PAGE 13 PAGE 14 PAGE 17 Perform these pro cedures call 1-866-941-LEHR for the location of your trimmer NOTE: Some maintenance procedures may require special tools or skills. Check oil before removing it all the way back in the crankcase cannot...
... ll the unit. If the level is in poor performance and/ or cause permanent damage to get a proper oil level reading. 3. USE OF ANY OTHER PARTS MAY CREATE A HAZARD OR CAUSE PRODUCT DAMAGE Oil Fill Plug/ Dipstick WARNING: TO PREVENT EXTENSIVE ENGINE WEAR AND DAMGE TO THE UNIT, ALWAYS MAINTAIN THE... ADJ USTMENT REFER TO PAGE 6 PAGE 13 PAGE 13 PAGE 13 PAGE 14 PAGE 17 Perform these pro cedures call 1-866-941-LEHR for the location of your trimmer NOTE: Some maintenance procedures may require special tools or skills. Check oil before removing it all the way back in the crankcase cannot...
Operation Manual
Page 15
...Trimmer Head Body Spring Reel Bump Feed Button Nut Fig.25 4. Insert each line into one of the holes on each retention hook opposite of the direction of the line left on the reel. While holding reel into hole in these instructions. 2. Fig.29 11. Lock shaft... out of the head as shown (Fig. 30). Insert allen key into body. LEHR | ALL RIGHT RESERVED 2008-2009 15 Wrap line 180° and wind extra line...direction it . 5. Feed the free ends of parts referred to pull wire through holes in the opposite direction of rotation of trimmer body, take care to not lose the spring ...
...Trimmer Head Body Spring Reel Bump Feed Button Nut Fig.25 4. Insert each line into one of the holes on each retention hook opposite of the direction of the line left on the reel. While holding reel into hole in these instructions. 2. Fig.29 11. Lock shaft... out of the head as shown (Fig. 30). Insert allen key into body. LEHR | ALL RIGHT RESERVED 2008-2009 15 Wrap line 180° and wind extra line...direction it . 5. Feed the free ends of parts referred to pull wire through holes in the opposite direction of rotation of trimmer body, take care to not lose the spring ...
Operation Manual
Page 19
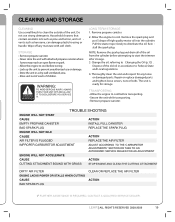
... to start the trimmer after storage. 3. TROUBLE SHOOTING ENGINE WILL NOT START CAUSE ACTION EMPTY PROPANE CANISTER INSTALL FULL CANISTER... AND CLEAN THE CUTTING ATTACHMENT DIRTY AIR FILTER ENGINE LACKS POWER OR STALLS WHEN CUTTING CAUSE BAD SPARK PLUG CLEAN OR ...parts and tighten loose screws, nuts or bolts. Household cleaners that contain aromatic oils such as pine and lemon, and sol vents such as kerosene, can damage plastic housing or handle. Allow the engine to Changing the Oil (p.13) . Remove propane canister. 2. Thoroughly clean the unit and inspect for storage. LEHR...
... to start the trimmer after storage. 3. TROUBLE SHOOTING ENGINE WILL NOT START CAUSE ACTION EMPTY PROPANE CANISTER INSTALL FULL CANISTER... AND CLEAN THE CUTTING ATTACHMENT DIRTY AIR FILTER ENGINE LACKS POWER OR STALLS WHEN CUTTING CAUSE BAD SPARK PLUG CLEAN OR ...parts and tighten loose screws, nuts or bolts. Household cleaners that contain aromatic oils such as pine and lemon, and sol vents such as kerosene, can damage plastic housing or handle. Allow the engine to Changing the Oil (p.13) . Remove propane canister. 2. Thoroughly clean the unit and inspect for storage. LEHR...


