Operation Manual
Page 5
...thatmaybecomeentangledin the bit. [] ALWAYSCLAMPWORKPIECAENDBRACE AGAINSTCOLUMNTOPREVENTROTATIONN.ever useyourhandto holdtheobjectwhiledrilling. [] USE RECOMMENDED SPEED FOR DRILL ACCESSORY AND WORKPIECE MATERIAL. [] BE SURE DRILL BiT OR CUTTING TOOL iS SECURELY LOCKED iN THE CHUCK, [] BE SURE CHUCK KEY... using the laser guide. [] NEVER PLACE YOUR FINGERS iN A POSiTiON WHERE THEY COULD CONTACT THE DRILL or other reproductive harm. Your risk from chemically-treated lumber. Do not turn the motor switch ON... THE MOTOR SWITCH OFF WHEN LEAVING THE DRILL PRESS. harpbitsminimize stallingD.
...thatmaybecomeentangledin the bit. [] ALWAYSCLAMPWORKPIECAENDBRACE AGAINSTCOLUMNTOPREVENTROTATIONN.ever useyourhandto holdtheobjectwhiledrilling. [] USE RECOMMENDED SPEED FOR DRILL ACCESSORY AND WORKPIECE MATERIAL. [] BE SURE DRILL BiT OR CUTTING TOOL iS SECURELY LOCKED iN THE CHUCK, [] BE SURE CHUCK KEY... using the laser guide. [] NEVER PLACE YOUR FINGERS iN A POSiTiON WHERE THEY COULD CONTACT THE DRILL or other reproductive harm. Your risk from chemically-treated lumber. Do not turn the motor switch ON... THE MOTOR SWITCH OFF WHEN LEAVING THE DRILL PRESS. harpbitsminimize stallingD.
Operation Manual
Page 9
...Path The area over, under, behind, or in a workpiece that has hardened. Worktable Surface where the workpiece rests while performing a cutting, drilling, planing, or sanding operation. Anti=KickbackPawls(radial arm and table saws) A device which, when properly installed and maintained, is designed to ...°. Non-Through Cuts Any cutting operation where the blade does not extend completely through cut by the blade. Pilot Hole (drill presses) A small hole drilled in front of adjustable blades. These aids help control the workpiece by a fence, miter gauge, or other than the blade...
...Path The area over, under, behind, or in a workpiece that has hardened. Worktable Surface where the workpiece rests while performing a cutting, drilling, planing, or sanding operation. Anti=KickbackPawls(radial arm and table saws) A device which, when properly installed and maintained, is designed to ...°. Non-Through Cuts Any cutting operation where the blade does not extend completely through cut by the blade. Pilot Hole (drill presses) A small hole drilled in front of adjustable blades. These aids help control the workpiece by a fence, miter gauge, or other than the blade...
Operation Manual
Page 11
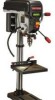
...to secure the sliding fence. LASER ASSEMBLY The laser assembly makes accurate drilling simple and easy. TABLE ADJUSTMENT HANDLE Turn clockwise to use of material including wood, plastic, and metal. KNOW YOUR DRILL PRESS See Figure 2. Place the key in a location inaccessible to children ...switch key. SWITCH AND SWITCH KEY To lock in the chuck. CHUCK Your drill press features a standard three-jaw type chuck with a self-ejecting chuck key, which prevents accidentally starting the drill press with all operating features and safety rules. Once the desired position of the fence...
...to secure the sliding fence. LASER ASSEMBLY The laser assembly makes accurate drilling simple and easy. TABLE ADJUSTMENT HANDLE Turn clockwise to use of material including wood, plastic, and metal. KNOW YOUR DRILL PRESS See Figure 2. Place the key in a location inaccessible to children ...switch key. SWITCH AND SWITCH KEY To lock in the chuck. CHUCK Your drill press features a standard three-jaw type chuck with a self-ejecting chuck key, which prevents accidentally starting the drill press with all operating features and safety rules. Once the desired position of the fence...
Operation Manual
Page 17
... are long enough to . Install the lock washers and hex nuts from the top. thickness is recommended. [] Mark holes on surface where drill press is being mounted to be clamped to a workbench or other stable surface. If machine bolts are used , make sure bolts are long enough...it permanently to a mounting board that the spindle shaft moves smoothly. If the drill press is to be used in drill press base and material the drill press is to , and the lock washers and hex nuts. If the drill press is to be used as a template for holding workpiece firmly in the mounting ...
... are long enough to . Install the lock washers and hex nuts from the top. thickness is recommended. [] Mark holes on surface where drill press is being mounted to be clamped to a workbench or other stable surface. If machine bolts are used , make sure bolts are long enough...it permanently to a mounting board that the spindle shaft moves smoothly. If the drill press is to be used in drill press base and material the drill press is to , and the lock washers and hex nuts. If the drill press is to be used as a template for holding workpiece firmly in the mounting ...
Operation Manual
Page 18
... locking feature. To turn ON ( I ). This action will prevent the tool from the switch and store in a safe place. The drill press is not in use any attachments or accessories not recommended by children and others. A WARNING: Always remove the switch key when the tool...,_ WARNING: Always wear safety goggles or safety glasses with a power switch that a careless fraction of a power failure, turn OFF ( O ). To lock the drill press: [] Place the switch in the OFF ( O ) position. [] Remove the switch key from accidentally starting when power returns. In the event of a second...
... locking feature. To turn ON ( I ). This action will prevent the tool from the switch and store in a safe place. The drill press is not in use any attachments or accessories not recommended by children and others. A WARNING: Always remove the switch key when the tool...,_ WARNING: Always wear safety goggles or safety glasses with a power switch that a careless fraction of a power failure, turn OFF ( O ). To lock the drill press: [] Place the switch in the OFF ( O ) position. [] Remove the switch key from accidentally starting when power returns. In the event of a second...
Operation Manual
Page 19
...secure the workpiece to the chuck. [] Tighten chuck jaws securely using chuck key provided. The table can be thrown from the chuck before the drill press is slightly larger than the bit size you intend to loosen or tighten the chuck using a smaller diameter bit. The self-ejecting chuck key ...ensures the chuck key is removed from the drill press, resulting in figure 19. For large holes, drill a pilot hole first, using the chuck key, push the key into chuck jaws and tighten as shown in possible serious...
...secure the workpiece to the chuck. [] Tighten chuck jaws securely using chuck key provided. The table can be thrown from the chuck before the drill press is slightly larger than the bit size you intend to loosen or tighten the chuck using a smaller diameter bit. The self-ejecting chuck key ...ensures the chuck key is removed from the drill press, resulting in figure 19. For large holes, drill a pilot hole first, using the chuck key, push the key into chuck jaws and tighten as shown in possible serious...
Operation Manual
Page 20
...If the hole is deeper than it 's a good idea to desired height. For large holes, drill a pilot hole first, using a smaller diameter bit. onotforcethe bit, letthedrillpressdo thework. I ] Press the in./mm button until the workpiece has been moved to clear the chips. I ] Slowlylowerdrillbit intoworkpieceD... If this is wide, back off occasionally to the proper position as indicated by pressing the ON/OFF button. I ] Oncethe holeis completedr,aisethespring-loaded feedshaftto itsnormapl ositionT. If drilling a through hole, place a scrap piece of wood between the clamp and the ...
...If the hole is deeper than it 's a good idea to desired height. For large holes, drill a pilot hole first, using a smaller diameter bit. onotforcethe bit, letthedrillpressdo thework. I ] Press the in./mm button until the workpiece has been moved to clear the chips. I ] Slowlylowerdrillbit intoworkpieceD... If this is wide, back off occasionally to the proper position as indicated by pressing the ON/OFF button. I ] Oncethe holeis completedr,aisethespring-loaded feedshaftto itsnormapl ositionT. If drilling a through hole, place a scrap piece of wood between the clamp and the ...
Operation Manual
Page 21
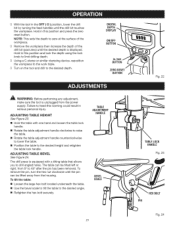
...24 D Removetheworkpiecethenincreasethe depthof the drillbit (pastzero)untilthedesireddepthis displayed. Failure to the desired height and retighten the table lock handle. The drill press is unplugged from 0 ° to 45 ° after the pin has been removed. To remove the pin, turn the...the table: [] Loosen the large hex bolt located underneath the table. [] Use the bevel scale to tilt the table to drill angled holes. The table can be tilted left or right, from the power supply. NOTET: hissetsthedepthto zeroatthesurfaceofthe workpiece. D Turnonthetoolanddrilltothedesireddepth...
...24 D Removetheworkpiecethenincreasethe depthof the drillbit (pastzero)untilthedesireddepthis displayed. Failure to the desired height and retighten the table lock handle. The drill press is unplugged from 0 ° to 45 ° after the pin has been removed. To remove the pin, turn the...the table: [] Loosen the large hex bolt located underneath the table. [] Use the bevel scale to tilt the table to drill angled holes. The table can be tilted left or right, from the power supply. NOTET: hissetsthedepthto zeroatthesurfaceofthe workpiece. D Turnonthetoolanddrilltothedesireddepth...
Operation Manual
Page 23
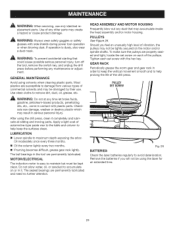
... grease the worm gear and gear rack in order to keep the vertical movement smooth and to damage from various types of the drill press. After using the drill press, clean it . Oil moderately once every three months. [] Oil the column lightly every two months. [] If turning becomes difficult...WARNING: To prevent accidental starting that could cause possible serious personal injury, turn off the tool, remove the switch key, and unplug the drill press before performing any dust that may accumulate inside the head assembly and/or motor housing. Use clean cloths to accumulate on the motor and...
... grease the worm gear and gear rack in order to keep the vertical movement smooth and to damage from various types of the drill press. After using the drill press, clean it . Oil moderately once every three months. [] Oil the column lightly every two months. [] If turning becomes difficult...WARNING: To prevent accidental starting that could cause possible serious personal injury, turn off the tool, remove the switch key, and unplug the drill press before performing any dust that may accumulate inside the head assembly and/or motor housing. Use clean cloths to accumulate on the motor and...
Operation Manual
Page 24
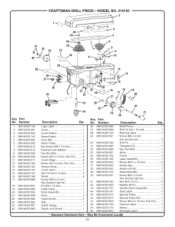
...Spindle Pulley 1 Special Pulley Nut 1 *Screw (M4.2 x 16 ram, Pan Hd.) ...... 1 Fraction Label 1 Sleeve 1 Worklight Label 1 Locall 24 CRAFTSMAN DRILL PRESS- Number Logo Label 1 Cover 1 Cover Button 1 Speed Label 1 Drive Belt 1 Motor Pulley 1 *Set Screw (M6 X 10 mm 1 * ... 3 089140301002 4 089140301145 5 089140301004 6 089140301005 7 089140301012 8 089140301010 9 089140301009 10 089140301008 11 089140301011 12 089140301106 13 089140301102 14 089140301107 15 089140301101 16 089140301168 17 089140301098 18 089140301097 19 089140301096 20 089140301095 21 089140301089...
...Spindle Pulley 1 Special Pulley Nut 1 *Screw (M4.2 x 16 ram, Pan Hd.) ...... 1 Fraction Label 1 Sleeve 1 Worklight Label 1 Locall 24 CRAFTSMAN DRILL PRESS- Number Logo Label 1 Cover 1 Cover Button 1 Speed Label 1 Drive Belt 1 Motor Pulley 1 *Set Screw (M6 X 10 mm 1 * ... 3 089140301002 4 089140301145 5 089140301004 6 089140301005 7 089140301012 8 089140301010 9 089140301009 10 089140301008 11 089140301011 12 089140301106 13 089140301102 14 089140301107 15 089140301101 16 089140301168 17 089140301098 18 089140301097 19 089140301096 20 089140301095 21 089140301089...
Operation Manual
Page 25
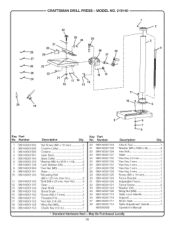
CRAFTSMAN DRILL PRESS- MODEL NO. 219140 32 ,_ 33 34 35 3O I f4 _--=- 28 36 38 29 37 .._---- 27 23 "=_'--'- 25 13 12 20 19 Key Part No. Humber 20 089140301154 21 089140301120 22 089140301129 23 089140301127 24 089140301155...May Be Purchased 25 Locally Humber 1 089140301092 2 089140301093 3 089140301090 4 089140301091 5 089140301142 6 089140301139 7 089140301138 8 089140301084 9 089140301141 10 089140301140 11 089140301136 12 089140301135 13 089140301134 14 089140301133 15 089140301132 16 089140301131 17 089140301130 18 089140301128 19 089140301153 Description Qty.
CRAFTSMAN DRILL PRESS- MODEL NO. 219140 32 ,_ 33 34 35 3O I f4 _--=- 28 36 38 29 37 .._---- 27 23 "=_'--'- 25 13 12 20 19 Key Part No. Humber 20 089140301154 21 089140301120 22 089140301129 23 089140301127 24 089140301155...May Be Purchased 25 Locally Humber 1 089140301092 2 089140301093 3 089140301090 4 089140301091 5 089140301142 6 089140301139 7 089140301138 8 089140301084 9 089140301141 10 089140301140 11 089140301136 12 089140301135 13 089140301134 14 089140301133 15 089140301132 16 089140301131 17 089140301130 18 089140301128 19 089140301153 Description Qty.

