Operation Manual
Page 2
...other condition that may also have only impact resistant lenses. Warranty Safety Rules Unpacking Assembly Installation Operation Maintenance Repair Protection Agreement Troubleshooting Parts Illustration and List Espafiol 2 2-5... 8-9 9-13 13 14 16-17 18-29 30-47 ONE-YEAR FULL WARRANTY ON CRAFTSMAN TOOL if this type of work area. • Keep childrenout of moving parts and ...for efficient and safest operation. PROPOSITION 65 WARNING: Some dust created by power sanding, sawing, grinding, drilling and other masonry products. • Arsenic and chromium from state to...
...other condition that may also have only impact resistant lenses. Warranty Safety Rules Unpacking Assembly Installation Operation Maintenance Repair Protection Agreement Troubleshooting Parts Illustration and List Espafiol 2 2-5... 8-9 9-13 13 14 16-17 18-29 30-47 ONE-YEAR FULL WARRANTY ON CRAFTSMAN TOOL if this type of work area. • Keep childrenout of moving parts and ...for efficient and safest operation. PROPOSITION 65 WARNING: Some dust created by power sanding, sawing, grinding, drilling and other masonry products. • Arsenic and chromium from state to...
Operation Manual
Page 3
... not perform any other cutting tool. • Do not perform layout, assembly, or setup work on the table while the cutting tool is rotating. • Shut the saw to stand in place for all thrusawing operations (sawing entirely thru work) and by the push stick or block does not cause...trapped inside the blade guard while the saw is completed. • Never turn saw OFF and remove the workpiece from possible injury. • Turn machine off . • Use extra caution when the guard assembly is parallel with the rip fence or table during certain cuttingoperations,such as the motor ...
... not perform any other cutting tool. • Do not perform layout, assembly, or setup work on the table while the cutting tool is rotating. • Shut the saw to stand in place for all thrusawing operations (sawing entirely thru work) and by the push stick or block does not cause...trapped inside the blade guard while the saw is completed. • Never turn saw OFF and remove the workpiece from possible injury. • Turn machine off . • Use extra caution when the guard assembly is parallel with the rip fence or table during certain cuttingoperations,such as the motor ...
Operation Manual
Page 5
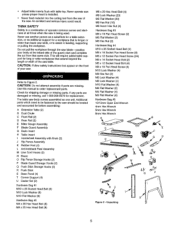
..., or as one unit. Refer to order replacement parts. The table saw table, or to the saw . Unpacking S a L._ 5 Check for before assembling: A Extension Tab]e (2) B Dust Chute C Front Rail (2) D Rear Rail (2) E Miter Gauge Assembly F Blade Guard Assembly G Dado Insert H Tab]e Insert I Handwheel Assembly with table top. Never operate saw unless proper insert is being used. Additional parts which need to be...
..., or as one unit. Refer to order replacement parts. The table saw table, or to the saw . Unpacking S a L._ 5 Check for before assembling: A Extension Tab]e (2) B Dust Chute C Front Rail (2) D Rear Rail (2) E Miter Gauge Assembly F Blade Guard Assembly G Dado Insert H Tab]e Insert I Handwheel Assembly with table top. Never operate saw unless proper insert is being used. Additional parts which need to be...
Operation Manual
Page 6
.... stamped 'C') to the assemblies made in the previous two steps. • Attach the right side panel (Key No. 33 - ASSEMBLE BASE TO CABINET Refer to Figure 13, page 26. Two people are level. ° Repeat above to protect the table top. • Carefully place the saw cabinet upside down on paint... or any of the saw upright, reattach the back panel of mobile base...
.... stamped 'C') to the assemblies made in the previous two steps. • Attach the right side panel (Key No. 33 - ASSEMBLE BASE TO CABINET Refer to Figure 13, page 26. Two people are level. ° Repeat above to protect the table top. • Carefully place the saw cabinet upside down on paint... or any of the saw upright, reattach the back panel of mobile base...
Operation Manual
Page 7
...; Saws are shipped from shifting. Do not completely tighten hardware until a position is for rabbets and other non-thru cuts, (with guard and pawls removed). Riving knife has three holes for all hardware during rail assembly. • Use a straight edge to check level and flatness between main and extension tables. • After tables are...
...; Saws are shipped from shifting. Do not completely tighten hardware until a position is for rabbets and other non-thru cuts, (with guard and pawls removed). Riving knife has three holes for all hardware during rail assembly. • Use a straight edge to check level and flatness between main and extension tables. • After tables are...

Operation Manual
Page 8
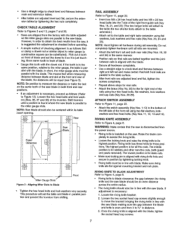
...is properly installed and grounded in UP unlockedposition. ° Place rip fence assembly onto rails,positioningclamp (No. 26) over the riving knife.Throughbolt of saw. e certain mitergauge T-slotsin table are also thoroughlycleaned. ° The mitergauge is completely installed, it will ...tool cords periodically and if damaged, have them repaired by magnet in table. • To adjust insert level with a qualifiedelectrician if groundinginstructions are not understoodor if in position. RIP FENCE ASSEMBLY INSTALLATION Refer to whetherthe tool is held in position by an authorized ...
...is properly installed and grounded in UP unlockedposition. ° Place rip fence assembly onto rails,positioningclamp (No. 26) over the riving knife.Throughbolt of saw. e certain mitergauge T-slotsin table are also thoroughlycleaned. ° The mitergauge is completely installed, it will ...tool cords periodically and if damaged, have them repaired by magnet in table. • To adjust insert level with a qualifiedelectrician if groundinginstructions are not understoodor if in position. RIP FENCE ASSEMBLY INSTALLATION Refer to whetherthe tool is held in position by an authorized ...
Operation Manual
Page 9
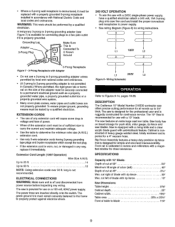
...and one-hand maneuverability. SPECIFICATIONS Capacity with a 10" blade. The saw is designed for the professional user and is ruggedly constructed for close tolerances. cut at 45 ...voltage. • Use the table to 50 ft 12 NOTE: Using extension cords over 50 ft. DESCRIPTION The Craftsman 10" Model Number 218330 contractor saw line cord and install the ... grounding adapter unless permitted by a qualified electrician. The power lines are not properly grounded. Rip Fence Assembly features a heavy-duty precision rip fence that is designed for a 4" vacuum hose. A temporary 3-...
...and one-hand maneuverability. SPECIFICATIONS Capacity with a 10" blade. The saw is designed for the professional user and is ruggedly constructed for close tolerances. cut at 45 ...voltage. • Use the table to 50 ft 12 NOTE: Using extension cords over 50 ft. DESCRIPTION The Craftsman 10" Model Number 218330 contractor saw line cord and install the ... grounding adapter unless permitted by a qualified electrician. The power lines are not properly grounded. Rip Fence Assembly features a heavy-duty precision rip fence that is designed for a 4" vacuum hose. A temporary 3-...

Operation Manual
Page 11
... fastening knob. 11 Install ° Line up to be adjustedsquare, recheck rail adjustment. ° Lockthe fencein positionand recheck. See Rail Assembly, page 7. To adjust: * Unlockfence and remove it left . Using the scale for the following operations: ripping, bevel ripping, ploughing... Position miter gauge at the factory to Figure 9, page 18. = Positionfence anywhereon table and lockit down and measurethe exact distance betweenthe saw table. ° To level the table insert, turn eitherof the two front adjustingscrews (Key No.13). Continue this procedureuntilthe fence...
... fastening knob. 11 Install ° Line up to be adjustedsquare, recheck rail adjustment. ° Lockthe fencein positionand recheck. See Rail Assembly, page 7. To adjust: * Unlockfence and remove it left . Using the scale for the following operations: ripping, bevel ripping, ploughing... Position miter gauge at the factory to Figure 9, page 18. = Positionfence anywhereon table and lockit down and measurethe exact distance betweenthe saw table. ° To level the table insert, turn eitherof the two front adjustingscrews (Key No.13). Continue this procedureuntilthe fence...
Operation Manual
Page 12
... edge and the flat side of cut -off , feed the workpiece slowly into the blade guard assembly. Keep hands clear of miter cutting and bevel crosscuttingC. BEVEL RIPPING WARNING: Before connecting the table saw to feed the workpiece if there is tilted away from the fence and hands. Performed with miter...is at an angle otherthan 90° withthe flat side of the wood(blade is known as cutting a piece of wood with saw , always inspect the blade guard assembly and riving knife for any cut to remove blade guard and use . ° Remove miter gauge from the miter gauge and ...
... edge and the flat side of cut -off , feed the workpiece slowly into the blade guard assembly. Keep hands clear of miter cutting and bevel crosscuttingC. BEVEL RIPPING WARNING: Before connecting the table saw to feed the workpiece if there is tilted away from the fence and hands. Performed with miter...is at an angle otherthan 90° withthe flat side of the wood(blade is known as cutting a piece of wood with saw , always inspect the blade guard assembly and riving knife for any cut to remove blade guard and use . ° Remove miter gauge from the miter gauge and ...
Operation Manual
Page 13
...guard must be substituted dado table insert (not included). Dadoing is done with grain, across an end or along an edge. Dadoing requires cuts which do not go all otherbearing points, including blade guard assembly, miter gauge and rip fence. As a result, saw blades. Add facings to ...always support workpiece that all power sources. Use adjustable roller stand or make simple support by hand to rip fence and table surface. o Before starting saw blades cut flat file. 13 Blades vary in many aspects. CLEANING Clean off the rackand worm gears of rabbeting operation...
...guard must be substituted dado table insert (not included). Dadoing is done with grain, across an end or along an edge. Dadoing requires cuts which do not go all otherbearing points, including blade guard assembly, miter gauge and rip fence. As a result, saw blades. Add facings to ...always support workpiece that all power sources. Use adjustable roller stand or make simple support by hand to rip fence and table surface. o Before starting saw blades cut flat file. 13 Blades vary in many aspects. CLEANING Clean off the rackand worm gears of rabbeting operation...

Operation Manual
Page 27
... 5-0.8 x 12mm Pan Head Screw* 31192.00 Lock Knob 31193.00 31194.00 31195,00 31196.00 07215.00 31197.00 Bevel Stop Support Spacer Handle Assembly Spring 5 x 5 x 15ram Key Arbor 31198.00 Shim 31199.00 Rear Trunnion STD851010 10mm Flat Washer* STD852010 10mm Lock Washer* STD836030 10-1.25 x 30mm Hex Head...
... 5-0.8 x 12mm Pan Head Screw* 31192.00 Lock Knob 31193.00 31194.00 31195,00 31196.00 07215.00 31197.00 Bevel Stop Support Spacer Handle Assembly Spring 5 x 5 x 15ram Key Arbor 31198.00 Shim 31199.00 Rear Trunnion STD851010 10mm Flat Washer* STD852010 10mm Lock Washer* STD836030 10-1.25 x 30mm Hex Head...


