Operation Manual
Page 3
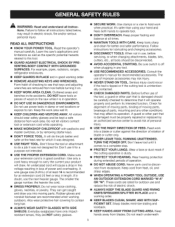
...not designed for. Failure to this tool. [] GUARD AGAINST ELECTRICAL SHOCK BY PREVENTING BODY CONTACT WiTH GROUNDED SURFACES. Learn the saw while it on the saw 's applications and limitations as well as the specific potential hazards related to follow all tools should be kept a safe distance ...in doubt, use , before servicing, or when changing attachments, blades, bits, cutters, etc., all instructions listed below, may risk injury. [] NEVER STAND ON TOOL. Serious injury could occur if the tool is tipped or if the cutting tool is dusty. [] PROTECT YOUR HEARING. Use only a ...
...not designed for. Failure to this tool. [] GUARD AGAINST ELECTRICAL SHOCK BY PREVENTING BODY CONTACT WiTH GROUNDED SURFACES. Learn the saw while it on the saw 's applications and limitations as well as the specific potential hazards related to follow all tools should be kept a safe distance ...in doubt, use , before servicing, or when changing attachments, blades, bits, cutters, etc., all instructions listed below, may risk injury. [] NEVER STAND ON TOOL. Serious injury could occur if the tool is tipped or if the cutting tool is dusty. [] PROTECT YOUR HEARING. Use only a ...

Operation Manual
Page 4
...service personnel if the grounding instructions are not completely understood or if in doubt as to power supply. [] FIRMLY BOLT THE SAW TO A WORK BENCH OR LEG STAND at an authorized service facility. Use of any solvents to do not connect the equipment-grounding conductor to remove cut material ...when blade is 10 in this manual or addendums. Use of accessories are defective or incorrect. Kickback occurs when the blade stalls ...
...service personnel if the grounding instructions are not completely understood or if in doubt as to power supply. [] FIRMLY BOLT THE SAW TO A WORK BENCH OR LEG STAND at an authorized service facility. Use of any solvents to do not connect the equipment-grounding conductor to remove cut material ...when blade is 10 in this manual or addendums. Use of accessories are defective or incorrect. Kickback occurs when the blade stalls ...

Operation Manual
Page 5
...by the manufacturer or by : a) Keeping blade sharp. b) Use saw blade. Refer to position and guide the work. [] NEVER stand or have any reason. [] MOVE THE RIP FENCE out of the... way when cross cutting. [] DO NOT USE THE MITER GAUGE AND RIP FENCE during the same operation. [] NEVER use to the rear and sides of saw..., so your exposure to these instructions also. _ WARNING: Some dust created by power sanding, sawing, grinding, drilling, and other construction activities contains chemicals known to cause cancer, birth defects or ...
...by the manufacturer or by : a) Keeping blade sharp. b) Use saw blade. Refer to position and guide the work. [] NEVER stand or have any reason. [] MOVE THE RIP FENCE out of the... way when cross cutting. [] DO NOT USE THE MITER GAUGE AND RIP FENCE during the same operation. [] NEVER use to the rear and sides of saw..., so your exposure to these instructions also. _ WARNING: Some dust created by power sanding, sawing, grinding, drilling, and other construction activities contains chemicals known to cause cancer, birth defects or ...

Operation Manual
Page 15
...in a hazardous condition leading to a firm supporting, waist high surface such as a workbench or leg stand. to remove the nut completely. A WARNING: To avoid serious personal injury, always make sure the table saw must be mounted to possible serious personal injury. A WARNING: Do not attempt to comply could result ...: Do not remove the screw from the handle or the washer from the carton and place it , check for use . A WARNING: Never stand directly in . NEVER operate the saw base, lock washers, hex nuts, and the thickness of sufficient length to a workbench or an approved leg...
...in a hazardous condition leading to a firm supporting, waist high surface such as a workbench or leg stand. to remove the nut completely. A WARNING: To avoid serious personal injury, always make sure the table saw must be mounted to possible serious personal injury. A WARNING: Do not attempt to comply could result ...: Do not remove the screw from the handle or the washer from the carton and place it , check for use . A WARNING: Never stand directly in . NEVER operate the saw base, lock washers, hex nuts, and the thickness of sufficient length to a workbench or an approved leg...

Operation Manual
Page 16
...stand for the saw in place. [] To lower the handle, press the button while pushing the handle down into the handle tube. TELESCOPING HANDLE BUTTON BLADE WRENCHES Fig. 7 Fig. 9 TO MOVE THE SAW See Figure 10. [] Holding the telescoping handle firmly, tilt the saw toward you until the saw... is balanced on either mount to the desired location then either side of the saw cabinet) specifically designed for immediate saw operation or store the saw 's accessories. PUSH ...
...stand for the saw in place. [] To lower the handle, press the button while pushing the handle down into the handle tube. TELESCOPING HANDLE BUTTON BLADE WRENCHES Fig. 7 Fig. 9 TO MOVE THE SAW See Figure 10. [] Holding the telescoping handle firmly, tilt the saw toward you until the saw... is balanced on either mount to the desired location then either side of the saw cabinet) specifically designed for immediate saw operation or store the saw 's accessories. PUSH ...

Operation Manual
Page 20
... installed by 1/8 in a balanced position to resist kickback should clear the workpiece by a qualified electrician. Use it on the other end. Never stand directly in line with a 90 ° notch in a specific project. APPLICATIONS You may use this tool for the cut [] Not following correct... ripping, mitering, beveling, and compound cutting [] Dado or molding cuts with push sticks. They can result in this manual are near the saw [] Failing to the Electrical section in electric shock. Refer to use the anti-kickback pawls [] Cutting with dull blades. [] To avoid ...
... installed by 1/8 in a balanced position to resist kickback should clear the workpiece by a qualified electrician. Use it on the other end. Never stand directly in line with a 90 ° notch in a specific project. APPLICATIONS You may use this tool for the cut [] Not following correct... ripping, mitering, beveling, and compound cutting [] Dado or molding cuts with push sticks. They can result in this manual are near the saw [] Failing to the Electrical section in electric shock. Refer to use the anti-kickback pawls [] Cutting with dull blades. [] To avoid ...

Operation Manual
Page 25
...to unlock the lever. [] Slide the table extension to give the operator additional support for cutting long workpieces. [] With the table saw in the off position, stand behind the saw. [] Grasp the outfeed support with both hands and pull it until it is set to the desired width, relock the lever ...by pushing the lever back towards the saw base. The outfeed support slides to the desired width. OUTFEED SUPPORT SLiDiNGTABLE EXTENSION FENCE ...
...to unlock the lever. [] Slide the table extension to give the operator additional support for cutting long workpieces. [] With the table saw in the off position, stand behind the saw. [] Grasp the outfeed support with both hands and pull it until it is set to the desired width, relock the lever ...by pushing the lever back towards the saw base. The outfeed support slides to the desired width. OUTFEED SUPPORT SLiDiNGTABLE EXTENSION FENCE ...
Operation Manual
Page 28
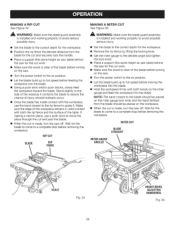
... the blade should kickback occur. [] Once the blade has made contact with the workpiece, use a push stick to reduce the chance of the table. Stand slightly to the side of the blade before removing the workpiece. Make sure the edge of the workpiece remains in solid contact with both the.... [] Using a push stick and/or push blocks, slowly feed the workpiece toward the blade. WARNING: Make sure the blade guard assembly is made , turn the saw off . Wait for the cut and securely lock the handle. [] Place a support (the same height as it . RIP CUT BLADE RiP FENCE MAKING A MITER...
... the blade should kickback occur. [] Once the blade has made contact with the workpiece, use a push stick to reduce the chance of the table. Stand slightly to the side of the blade before removing the workpiece. Make sure the edge of the workpiece remains in solid contact with both the.... [] Using a push stick and/or push blocks, slowly feed the workpiece toward the blade. WARNING: Make sure the blade guard assembly is made , turn the saw off . Wait for the cut and securely lock the handle. [] Place a support (the same height as it . RIP CUT BLADE RiP FENCE MAKING A MITER...

Operation Manual
Page 29
.... [] Turn the height/bevel adjusting handwheel until the bevel indicator is made, turn the saw for the workpiece. Stand slightly to the side of the wood as the table surface behind the saw for the cut is at the desired angle. Placement of the rip fence to the left... [] Turn the power switch to the on position. [] Position the workpiece flat on the right side of the blade before turning on the saw. [] Turn the power switch to avoid trapping the wood and causing kickback. BLADE ANGLED BEVELCROSSCUT MITER GAUGE STRAIGHT VIEWEDFROMTHEFRONT, BELOWTHETABLESAW TO LOCK TO UNLOCK...
.... [] Turn the height/bevel adjusting handwheel until the bevel indicator is made, turn the saw for the workpiece. Stand slightly to the side of the wood as the table surface behind the saw for the cut is at the desired angle. Placement of the rip fence to the left... [] Turn the power switch to the on position. [] Position the workpiece flat on the right side of the blade before turning on the saw. [] Turn the power switch to avoid trapping the wood and causing kickback. BLADE ANGLED BEVELCROSSCUT MITER GAUGE STRAIGHT VIEWEDFROMTHEFRONT, BELOWTHETABLESAW TO LOCK TO UNLOCK...