
Operation Manual
Page 1
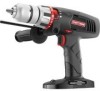
Customer Help Line: 1-800-932-3188 BATTERIES AND CHARGERS SOLD SEPARATELY Sears, Roebuck and Co., 3333 Beverly Rd., Hoffman Estates, IL 60179 USA Visit the Craftsman web page: www.sears.com/craftsman C 983000-879 12-27-07 (REV:03) Save this product. PERATOR'S MAN AL 112 iN, 19,2 VOLT HAMMER DRILL VARIABLE SPEED Model No. 315.115800 ,& WARNING: To reduce the risk of injury, the user must read and understand the operator's manual before using this manual for future reference
Customer Help Line: 1-800-932-3188 BATTERIES AND CHARGERS SOLD SEPARATELY Sears, Roebuck and Co., 3333 Beverly Rd., Hoffman Estates, IL 60179 USA Visit the Craftsman web page: www.sears.com/craftsman C 983000-879 12-27-07 (REV:03) Save this product. PERATOR'S MAN AL 112 iN, 19,2 VOLT HAMMER DRILL VARIABLE SPEED Model No. 315.115800 ,& WARNING: To reduce the risk of injury, the user must read and understand the operator's manual before using this manual for future reference
Operation Manual
Page 2
... Safety Rules ... 4 [] Symbols ... 6-7 [] Features ... 8-9 [] Assembly ... 10 [] Operation ...[] Maintenance ... 10-18 19-20 [] Exploded View and Parts List ... 21 [] Parts Ordering/Service ... A WARNING: Some dust created by power sanding, sawing, grinding, drilling, and other construction activities contains chemicals known to state. If this Craftsman tool is used for commercial or rental purposes, this type...
... Safety Rules ... 4 [] Symbols ... 6-7 [] Features ... 8-9 [] Assembly ... 10 [] Operation ...[] Maintenance ... 10-18 19-20 [] Exploded View and Parts List ... 21 [] Parts Ordering/Service ... A WARNING: Some dust created by power sanding, sawing, grinding, drilling, and other construction activities contains chemicals known to state. If this Craftsman tool is used for commercial or rental purposes, this type...
Operation Manual
Page 4
... NOT safety glasses. Following this power tool. This will reduce the risk of open flame. If you loan someone this tool, loan them with impact drills. Use of any cordless product in the Maintenance section of this rule will reduce the risk of control can propel debris and chemicals. If contact...
... NOT safety glasses. Following this power tool. This will reduce the risk of open flame. If you loan someone this tool, loan them with impact drills. Use of any cordless product in the Maintenance section of this rule will reduce the risk of control can propel debris and chemicals. If contact...
Operation Manual
Page 8
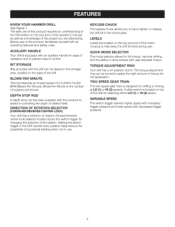
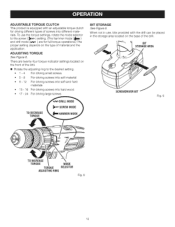
... storage area, located on top of impacts per minute. TORQUE ADJUSTMENT RING Your drill has a 24-position clutch. BIT STORAGE Bits provided with an auxiliary handle for full torque, hammer drilling, and the ability to hand-tighten or release the drill bit in controlling the depth of control. The safe use . LEVELS Levels are...
... storage area, located on top of impacts per minute. TORQUE ADJUSTMENT RING Your drill has a 24-position clutch. BIT STORAGE Bits provided with an auxiliary handle for full torque, hammer drilling, and the ability to hand-tighten or release the drill bit in controlling the depth of control. The safe use . LEVELS Levels are...
Operation Manual
Page 9
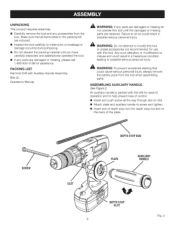
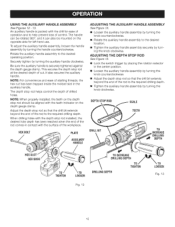
PACKING LiST Hammer Drill with this tool. A WARNING: To prevent accidental starting that all the way through slot on drill. [] Attach plate and auxiliary handle to make sure no breakage or damage occurred during shipping. [] Do not discard the packing .... ASSEMBLING AUXiLiARY HANDLE See Figure 2. Make sure that could result in possible serious personal injury. Any such alteration or modification is packed with the drill for use with Auxiliary Handle Assembly Bits (2) Operator's Manual ,,_ WARNING: If any parts are replaced. UNPACKING This product requires assembly. [] Carefully...
PACKING LiST Hammer Drill with this tool. A WARNING: To prevent accidental starting that all the way through slot on drill. [] Attach plate and auxiliary handle to make sure no breakage or damage occurred during shipping. [] Do not discard the packing .... ASSEMBLING AUXiLiARY HANDLE See Figure 2. Make sure that could result in possible serious personal injury. Any such alteration or modification is packed with the drill for use with Auxiliary Handle Assembly Bits (2) Operator's Manual ,,_ WARNING: If any parts are replaced. UNPACKING This product requires assembly. [] Carefully...
Operation Manual
Page 10
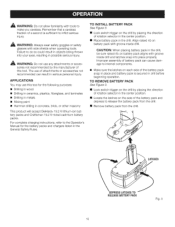
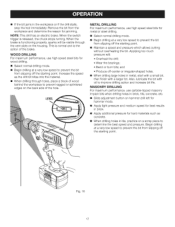
...in the center position. Failure to the Operator's Manual for the following purposes: [] Drilling in wood [] Drilling in ceramics, plastics, fiberglass, and laminates [] Drilling in metals [] Mixing paint [] Hammer drilling in place and battery pack is sufficient to internal components. [] Make sure the ...tools. m Remove battery pack from the drill. sories not recommended by placing the direction of the battery pack snap in concrete, brick, or other masonry This product will accept DieHarde_ 19.2 V lithium-ion battery packs and Craftsman 19.2 V nickel-cadmium battery packs. For ...
...in the center position. Failure to the Operator's Manual for the following purposes: [] Drilling in wood [] Drilling in ceramics, plastics, fiberglass, and laminates [] Drilling in metals [] Mixing paint [] Hammer drilling in place and battery pack is sufficient to internal components. [] Make sure the ...tools. m Remove battery pack from the drill. sories not recommended by placing the direction of the battery pack snap in concrete, brick, or other masonry This product will accept DieHarde_ 19.2 V lithium-ion battery packs and Craftsman 19.2 V nickel-cadmium battery packs. For ...
Operation Manual
Page 11
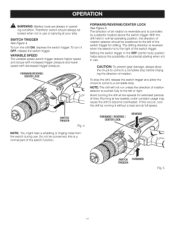
... of bit rotation is reversible and is pushed fully to a complete stop . Running at full speed. this occurs, cool the drill by a selector located above the switch trigger. _hL WARNING:BatterytoolsarealwaysinoperatingconditionT. To turn it without a load and at low speeds under ...The variable speed switch trigger delivers higher speed and torque with increased trigger pressure and lower speed with decreased trigger pressure. The drilling direction is reversed when the selector is a normal part of the switch trigger. FORWARD/REVERSE/ CENTERLOCK FORWARD/REVERSE/CENTER LOCK See...
... of bit rotation is reversible and is pushed fully to a complete stop . Running at full speed. this occurs, cool the drill by a selector located above the switch trigger. _hL WARNING:BatterytoolsarealwaysinoperatingconditionT. To turn it without a load and at low speeds under ...The variable speed switch trigger delivers higher speed and torque with increased trigger pressure and lower speed with decreased trigger pressure. The drilling direction is reversed when the selector is a normal part of the switch trigger. FORWARD/REVERSE/ CENTERLOCK FORWARD/REVERSE/CENTER LOCK See...
Operation Manual
Page 12
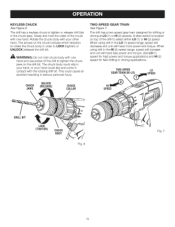
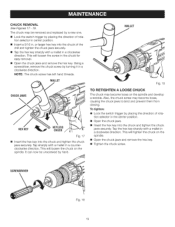
...Fig. 6 Fig. 7 12 Grasp and hold chuck body with one hand and use power of the drill to tighten or release drill bits in order to LOOK (tighten) or UNLOCK (release) the drill bit. _L WARNING: Do not hold the collar of the chuck with one hand. This could slip and...speed will increase and unit will have less power and torque. Rotate the chuck body with the rotating drill bit. The drill has a two-speed gear train designed for fast drilling or driving applications. When using drill in the LO (1) speed range, speed will decrease and unit will have more power and torque....
...Fig. 6 Fig. 7 12 Grasp and hold chuck body with one hand and use power of the drill to tighten or release drill bits in order to LOOK (tighten) or UNLOCK (release) the drill bit. _L WARNING: Do not hold the collar of the chuck with one hand. This could slip and...speed will increase and unit will have less power and torque. Rotate the chuck body with the rotating drill bit. The drill has a two-speed gear train designed for fast drilling or driving applications. When using drill in the LO (1) speed range, speed will decrease and unit will have more power and torque....
Operation Manual
Page 13
...torque clutch for full torque operations.) The proper setting depends on the type of the drill. [] Rotate the adjusting ring to the screw ( _._ ) setting. (The hammer mode ( _ ) and drill mode (_'_'q) are twenty-four torque indicator settings located on the base of screws into ... SCREWDRIVERBIT Fig. 9 TO DECREASE TORQUE TOINCREASE TORQUE MODE TORQUE SELECTOR ADJUSTINGRiNG Fig. 8 13 ADJUSTABLETORQUE CLUTCH This product is equipped with the drill can be placed in use the torque settings, rotate the mode selector to the desired setting. • 1 - 4 For driving small...
...torque clutch for full torque operations.) The proper setting depends on the type of the drill. [] Rotate the adjusting ring to the screw ( _._ ) setting. (The hammer mode ( _ ) and drill mode (_'_'q) are twenty-four torque indicator settings located on the base of screws into ... SCREWDRIVERBIT Fig. 9 TO DECREASE TORQUE TOINCREASE TORQUE MODE TORQUE SELECTOR ADJUSTINGRiNG Fig. 8 13 ADJUSTABLETORQUE CLUTCH This product is equipped with the drill can be placed in use the torque settings, rotate the mode selector to the desired setting. • 1 - 4 For driving small...
Operation Manual
Page 14
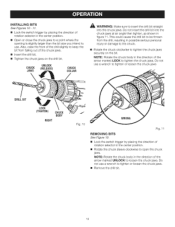
...: Rotate the chuck body in the direction of the arrow marked UNLOCK to tighten the chuck jaws. This could cause the drill bit to tighten the chuck jaws securely on the drill bit. CHUCK JAWS UNLOCK (RELEASE) CHUCK COLLAR _ WARNING: Make sure to open the chuck jaws. Do not use . Do ... chuck jaws to a point where the opening is slightly larger than the bit size you intend to tighten or loosen the chuck jaws. [] Remove the drill bit. 14 INSTALLINGBITS See Figures 10- 11. [] Lock the switch trigger by placing the direction of rotation selector in the center position. [] Rotate the chuck...
...: Rotate the chuck body in the direction of the arrow marked UNLOCK to tighten the chuck jaws. This could cause the drill bit to tighten the chuck jaws securely on the drill bit. CHUCK JAWS UNLOCK (RELEASE) CHUCK COLLAR _ WARNING: Make sure to open the chuck jaws. Do not use . Do ... chuck jaws to a point where the opening is slightly larger than the bit size you intend to tighten or loosen the chuck jaws. [] Remove the drill bit. 14 INSTALLINGBITS See Figures 10- 11. [] Lock the switch trigger by placing the direction of rotation selector in the center position. [] Rotate the chuck...
Operation Manual
Page 15
... the auxiliary handle assembly, loosen the handle assembly by turning the auxiliary handle clockwise. Securely tighten by turning the handle counterclockwise. When drilling holes with the depth stop rod helps control the depth of cut. It also secures the auxiliary handle. The depth stop rod installed...the desired location. [] Tighten the auxiliary handle assembly securely by turning the knob counterclockwise. [] Adjust the depth stop rod so that the drill bit extends beyond the end of starting threads, the hex nut has been trapped inside the molded slot in the center position. [] ...
... the auxiliary handle assembly, loosen the handle assembly by turning the auxiliary handle clockwise. Securely tighten by turning the handle counterclockwise. When drilling holes with the depth stop rod helps control the depth of cut. It also secures the auxiliary handle. The depth stop rod installed...the desired location. [] Tighten the auxiliary handle assembly securely by turning the knob counterclockwise. [] Adjust the depth stop rod so that the drill bit extends beyond the end of starting threads, the hex nut has been trapped inside the molded slot in the center position. [] ...
Operation Manual
Page 16
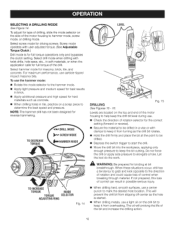
...it from slipping off-center as the hole is for binding at the point to be drilled in possible serious injury. [] When drilling hard, smooth surfaces, use carbide-tipped impact masonry bits. NOTE: The hammer drill has not been designed for masonry, brick, tile, and concrete. TO DECREASE TORQUE ... operations only and bypasses the clutch setting. To use . [] Check the direction of the motor housing to hammer mode, screw mode, or drilling mode. When these situations occur, drill has a tendency to grab and kick opposite to the direction of rotation and could cause loss of control can...
...it from slipping off-center as the hole is for binding at the point to be drilled in possible serious injury. [] When drilling hard, smooth surfaces, use carbide-tipped impact masonry bits. NOTE: The hammer drill has not been designed for masonry, brick, tile, and concrete. TO DECREASE TORQUE ... operations only and bypasses the clutch setting. To use . [] Check the direction of the motor housing to hammer mode, screw mode, or drilling mode. When these situations occur, drill has a tendency to grab and kick opposite to the direction of rotation and could cause loss of control can...
Operation Manual
Page 17
... performance, use carbide-tipped masonry impact bits when drilling holes in brick, tile, concrete, etc. [] Slide adjustment button on hammer drill left for hammer mode. [] Apply light pressure and medium speed for best results in brick. [] Apply additional pressure for metal or steel drilling. [] Select normal drilling mode. [] Begin drilling at a very low speed to prevent the...
... performance, use carbide-tipped masonry impact bits when drilling holes in brick, tile, concrete, etc. [] Slide adjustment button on hammer drill left for hammer mode. [] Apply light pressure and medium speed for best results in brick. [] Apply additional pressure for metal or steel drilling. [] Select normal drilling mode. [] Begin drilling at a very low speed to prevent the...
Operation Manual
Page 19
...jaws and remove the hex key. tion selector in the center position. [] Open the chuck jaws. [] Insert the hex key into the chuck of the drill and tighten the chuck jaws securely. [] Tap the hex key sharply with a mallet in . This will loosen the screw in a counterclockwise direction. MALLET ...a clockwise direction. Also, the chuck screw may become loose, causing the chuck jaws to bind and prevent them from closing. SCREWDRIVER Fig. 18 19 MALLET Fig. 19 TO RETIGHTEN A LOOSE CHUCK The chuck may become loose on the spindle. [] Open the chuck jaws and remove the hex key. [] Tighten the...
...jaws and remove the hex key. tion selector in the center position. [] Open the chuck jaws. [] Insert the hex key into the chuck of the drill and tighten the chuck jaws securely. [] Tap the hex key sharply with a mallet in . This will loosen the screw in a counterclockwise direction. MALLET ...a clockwise direction. Also, the chuck screw may become loose, causing the chuck jaws to bind and prevent them from closing. SCREWDRIVER Fig. 18 19 MALLET Fig. 19 TO RETIGHTEN A LOOSE CHUCK The chuck may become loose on the spindle. [] Open the chuck jaws and remove the hex key. [] Tighten the...
Operation Manual
Page 20
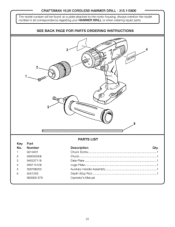
rdAelrwinagysrempaeinr tipoanrtst.he model i] SEE BACK PAGE FOR PARTS ORDERING INSTRUCTIONS 4 Key PaN No. *-" CRAFTSMAN 19.2V CORDLESS HAMMER DRILL - 315.115800 -* I Tnhuembmeor deinl anllucmobrreerspwoinlldebnecefoundregoanrdaingplayteouarttHacAhMedMEtRo thDeRmILoLtoor r hwohuesningo. Number 1 6613401 2 690033058 3 940237118 4 940114128 5 300188033 6 6341203 983000-879 PARTS LIST Description Chuck Screw Chuck Data Plate Qty. 1 1 1 Logo Plate 1 Auxiliary Handle Assembly 1 Depth Stop Rod 1 Operator's Manual 2O
rdAelrwinagysrempaeinr tipoanrtst.he model i] SEE BACK PAGE FOR PARTS ORDERING INSTRUCTIONS 4 Key PaN No. *-" CRAFTSMAN 19.2V CORDLESS HAMMER DRILL - 315.115800 -* I Tnhuembmeor deinl anllucmobrreerspwoinlldebnecefoundregoanrdaingplayteouarttHacAhMedMEtRo thDeRmILoLtoor r hwohuesningo. Number 1 6613401 2 690033058 3 940237118 4 940114128 5 300188033 6 6341203 983000-879 PARTS LIST Description Chuck Screw Chuck Data Plate Qty. 1 1 1 Logo Plate 1 Auxiliary Handle Assembly 1 Depth Stop Rod 1 Operator's Manual 2O


