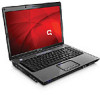
Compaq Presario V6000 Notebook PC Maintenance and Service Guide
Page 5
... 3.1 Serial Number Location 3-1 3.2 Computer Major Components 3-2 3.3 Display Assembly Components 3-21 3.4 Mass Storage Devices 3-23 3.5 Plastics Kit 3-25 3.6 Miscellaneous 3-27 3.7 Sequential Part Number Listing 3-30 4 Removal and Replacement Preliminaries 4.1 Tools Required 4-1 4.2 Service Considerations 4-2 Plastic Parts 4-2 Cables and Connectors 4-2 4.3 Preventing Damage to Removable Drives 4-3 4.4 Preventing Electrostatic Damage 4-4 4.5 Packaging and Transporting Precautions 4-5 4.6 Workstation Precautions 4-6 4.7 Grounding Equipment...
Compaq Presario V6000 Notebook PC Maintenance and Service Guide
Page 29
These conditions are affected by a temperature sensor and is designed to identify replacement parts, and Chapter 5, "Removal and Replacement Procedures," for ventilation. The computer uses an electric fan for disassembly steps. Exhaust air is controlled by high external temperatures, system power consumption, power management/...
Compaq Presario V6000 Notebook PC Maintenance and Service Guide
Page 48
N Power on ? Y Power on ? Done Maintenance and Service Guide 2-19 N Done Power on? Done N Check battery by recharging it, moving it . Y Replace power supply (if applicable). Y Go to another computer, or replacing it to "Flowchart 2.4-No Power, Part 3." Troubleshooting Flowchart 2.3-No Power, Part 2 Continued from "Flowchart 2.2-No Power, Part 1." Visually check for debris in battery socket and clean if necessary.
Compaq Presario V6000 Notebook PC Maintenance and Service Guide
Page 49
Y Power on ? N Done Done Try different outlet. Troubleshooting Flowchart 2.4-No Power, Part 3 Continued from "Flowchart 2.3-No Power, Part 2." N N Power outlet active? Y Power LED on ? Internal Go to "Flowchart 2.5-No Power, Part 4." Y Replace power cord. Y Done Done 2-20 Maintenance and Service Guide Plug directly into AC outlet. Y Power on ? Replace external AC adapter. External Internal or external AC adapter? N Power on ? N Reseat AC adapter in computer and at power source.
Compaq Presario V6000 Notebook PC Maintenance and Service Guide
Page 50
Internal AC adapter 3. Flowchart 2.5-No Power, Part 4 Continued from "Flowchart 2.4-No Power, Part 3." Y Loose or damaged parts? N Reseat loose components and boards and replace damaged items. Close computer and retest. Maintenance and Service Guide 2-21 N Power on? Y Done Replace the following items (if applicable). Check computer operation after each replacement: 1. Processor board* 4. Troubleshooting Open computer. Internal DC-DC converter* 2. System board* *NOTE: Replace these items as a set to prevent shorting out among components.
Compaq Presario V6000 Notebook PC Maintenance and Service Guide
Page 51
Go to "Flowchart 2.7-No Video, Part 2." *NOTE: To change from internal to ensure operation. Y Y Video OK? Done N Check for bent pins on cable. N Replace the following one at a time. Display 3. System board N Video OK? Done display*? Done Video...display (if applicable) 2. External Internal N Adjust brightness. Test after each replacement. 1. Docking Device Stand-alone or docking device? A Press lid switch to external display, use the hotkey combination. Y Replace system board. Stand-alone Y Internal or external Adjust brightness. Y Try...
Compaq Presario V6000 Notebook PC Maintenance and Service Guide
Page 56
...drive accessible? Y Computer booted? N Run FDISK. N N Boot from Done hard drive? Maintenance and Service Guide 2-27 Reseat hard drive. Replace hard drive. 2. Y Boot from diskette drive? Y Go to a bootable C:\ prompt. N Hard drive partitioned? N Disc or diskette in...Flowchart 2.13-No OS Loading, Diskette Drive." Y Done Go to bootable C:\ prompt. Replace system board. Y Create partition, and then format hard drive to "Flowchart 2.12-No OS Loading, Hard Drive, Part 3." Load OS using Operating System disc (if applicable). Y 1. Y Hard drive accessible...
Compaq Presario V6000 Notebook PC Maintenance and Service Guide
Page 57
.... Done 2-28 Maintenance and Service Guide Y Install OS and reboot. Y Virus on disc or diskette? N Replace hard drive. Boot from "Flowchart 2.11-No OS Loading, Hard Drive, Part 2." N Can bad sectors be fixed? N Fix bad sectors. Y Done Replace hard drive. N Y Diagnostics on hard drive? Run diagnostics and follow recommendations. Y OS loading from hard...
Compaq Presario V6000 Notebook PC Maintenance and Service Guide
Page 61
N Replace audio Y board and Audio? Connect to external speaker. Done in OS. Troubleshooting Flowchart 2.16-No Audio, Part 2 Continued from "Flowchart 2.15-No Audio, Part 1." Y Load drivers and set configuration in computer Y (if applicable). N Audio driver in OS configured? Y Reload audio drivers. speaker connections Audio? N Replace the following components individually, retesting after each replacement: ■ Internal speakers ■ Audio board (if applicable) 2-32 Maintenance and Service Guide N Correct drivers for application?
Compaq Presario V6000 Notebook PC Maintenance and Service Guide
Page 109
...computer. Handle flex cables with extreme care to avoid damage. these cables tear easily. 4-2 Maintenance and Service Guide Removal and Replacement Preliminaries 4.2 Service Considerations The following sections include some of the considerations that you should keep in mind during disassembly and assembly ...ensure that cables are routed in such a way that cables are placed in the maintenance instructions. Handle cables by parts being removed or replaced. Apply pressure only at the points designated in their proper locations during the reassembly process. Ensure that they cannot ...
Compaq Presario V6000 Notebook PC Maintenance and Service Guide
Page 112
... that mechanized equipment used for moving materials is not possible, use an ionizer to avoid static charging. Removal and Replacement Preliminaries 4.5 Packaging and Transporting Precautions Use the following grounding precautions when packaging and transporting equipment: ■ To avoid... containers. ■ Always be properly grounded when touching a sensitive component or assembly. ■ Store reusable electrostatic-sensitive parts from assemblies in protective packaging or nonconductive foam. ■ Use transporters and conveyors made of antistatic belts and roller bushings. ...
Compaq Presario V6000 Notebook PC Maintenance and Service Guide
Page 113
Removal and Replacement Preliminaries 4.6 Workstation Precautions Use the following grounding precautions at static-free workstations. ■ Avoid contact with approved static-shielding material (refer to Table 4-2, "Static-Shielding ... static-safe materials. ■ Keep the work area free of nonconductive materials, such as ordinary plastic assembly aids and Styrofoam. ■ Handle electrostatic-sensitive components, parts, and assemblies by the case or PCM laminate. Handle these items only at workstations: ■ Cover the workstation with pins, leads, or circuitry. ■ Turn...
Compaq Presario V6000 Notebook PC Maintenance and Service Guide
Page 117
Removal and Replacement Procedures 5.1 Serial Number Report the computer serial number to HP when requesting information or ordering spare parts. Serial Number Location 5-2 Maintenance and Service Guide The serial number is located on the bottom of the computer.
Compaq Presario V6000 Notebook PC Maintenance and Service Guide
Page 120
Remove the battery. Removing the Battery Reverse the above procedure to the left. (The front edge of the battery 2 and swing it back. Slide and hold the battery release latch 1 to install the battery. Remove the battery by following these steps: a. Maintenance and Service Guide 5-5 b. Turn the computer upside down with the front panel toward you. d. Lift the front edge of the battery disengages from the computer.) c. Removal and Replacement Procedures Battery Spare Part Number Information 12-cell, 8.8-Ahr 6-cell, 4.0-Ahr 432307-001 432306-001 4.
Compaq Presario V6000 Notebook PC Maintenance and Service Guide
Page 121
Removal and Replacement Procedures 5.4 Hard Drive Hard Drive Spare Part Number Information For use with all computer models 200-GB 160-GB 120-GB 100-GB 80-GB 60-GB 40-GB hard drive for use only with computer models using Intel processors 40-GB hard drive for use only with computer models using AMD processors Hard Drive Bracket Kit (includes hard drive bracket and screws used to secure the bracket to the hard drive) 441424-001 438485-001 431407-001 431406-001 431405-001 431404-001 434743-001 434415-001 436156-001 5-6 Maintenance and Service Guide
Compaq Presario V6000 Notebook PC Maintenance and Service Guide
Page 122
Prepare the computer for disassembly (refer to the computer. 3. Loosen the two Phillips PM2.0×5.0 screws 1 that secure the hard drive cover to Section 5.3). 2. Lift the right side of the cover 2 and swing it to the left. 4. Remove the hard drive cover. ✎ The hard drive cover is included in the Plastics Kit, spare part number 438669-001. Removing the Hard Drive Cover Maintenance and Service Guide 5-7 Removal and Replacement Procedures 1.
Compaq Presario V6000 Notebook PC Maintenance and Service Guide
Page 125
Computer Feet Locations 5-10 Maintenance and Service Guide The feet are adhesive-backed rubber pads. Removal and Replacement Procedures 5.5 Computer Feet The computer feet are included in the locations illustrated below. The feet attach to the base enclosure in the Rubber Feet Kit, spare part number 431431-001.
Compaq Presario V6000 Notebook PC Maintenance and Service Guide
Page 126
Maintenance and Service Guide 5-11 Removal and Replacement Procedures 5.6 Memory Module Memory Module Spare Part Number Information For use only with computer models using Intel processors 1024-MB 512-MB 256-MB For use only with computer models using AMD processors 1024-MB 512-MB 256-MB 434742-001 434741-001 434740-001 431403-001 431402-001 431401-001 1. Prepare the computer for disassembly (refer to Section 5.3).
Compaq Presario V6000 Notebook PC Maintenance and Service Guide
Page 127
Lift the left side of the memory module compartment cover 2, and then swing it to the computer. 3. Loosen the three Phillips PM2.0×5.0 screws 1 that secure the memory module compartment cover to the right. 4. Removing the Memory Module Compartment Cover 5-12 Maintenance and Service Guide Remove the memory module compartment cover. ✎ The memory module compartment cover is included in the Plastics Kit, spare part number 431429-001. Removal and Replacement Procedures 2.
Compaq Presario V6000 Notebook PC Maintenance and Service Guide
Page 129
... RTC battery. 5-14 Maintenance and Service Guide Removing the RTC Battery Reverse the above procedure to Section 5.3). 2. Remove the memory module compartment cover (Section 5.6). 3. All replacement RTC battery spare part kits include 2-sided tape. Remove the RTC battery 2. ✎ The RTC battery is secured to the computer by 2-sided tape. Removal and...