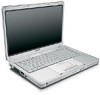
Wireless Setup Guide
Page 2
TIP: If you did not buy a wireless-enabled notebook, you with integrated 802.11 WLAN (wireless local area network) capability. See the "Comparison of hardware. Search for Microsoft Windows XP by visiting Microsoft Windows ... phrase. 2 Record pass phrase 3 Download the latest WPA update for "WPA." 2 Record encryption key. Your Internet service provider (ISP) will provide you can buy a wireless PC Card to set up your wireless router. The instructions in this booklet. During router configuration, use the table below to record router security level. No...
TIP: If you did not buy a wireless-enabled notebook, you with integrated 802.11 WLAN (wireless local area network) capability. See the "Comparison of hardware. Search for Microsoft Windows XP by visiting Microsoft Windows ... phrase. 2 Record pass phrase 3 Download the latest WPA update for "WPA." 2 Record encryption key. Your Internet service provider (ISP) will provide you can buy a wireless PC Card to set up your wireless router. The instructions in this booklet. During router configuration, use the table below to record router security level. No...

Wireless Setup Guide
Page 4
... "My Router Security Level" table on page 2.) 2 Retype the pass phrase in the Available wireless networks list. 3 Complete the following steps that correspond with wireless notebooks and wired desktop PROGRESS CHECK If you successfully complete step 6, all computers on your network can access a Web site. 4 6 Run the Network Setup Wizard on...
... "My Router Security Level" table on page 2.) 2 Retype the pass phrase in the Available wireless networks list. 3 Complete the following steps that correspond with wireless notebooks and wired desktop PROGRESS CHECK If you successfully complete step 6, all computers on your network can access a Web site. 4 6 Run the Network Setup Wizard on...

Using LightScribe (Select Models Only)
Page 2
Nothing herein should be liable for HP products and services are set forth in the express warranty statements accompanying such products and services. HP shall not be construed as constituting an additional warranty. Creating Disc Labels on Your Notebook Using LightScribe First Edition February 2005 Document Part Number: 383416-001 The only warranties for technical or editorial errors or omissions contained herein. The information contained herein is subject to change without notice. © Copyright 2005 Hewlett-Packard Development Company, L.P.
Nothing herein should be liable for HP products and services are set forth in the express warranty statements accompanying such products and services. HP shall not be construed as constituting an additional warranty. Creating Disc Labels on Your Notebook Using LightScribe First Edition February 2005 Document Part Number: 383416-001 The only warranties for technical or editorial errors or omissions contained herein. The information contained herein is subject to change without notice. © Copyright 2005 Hewlett-Packard Development Company, L.P.
Using LightScribe (Select Models Only)
Page 3
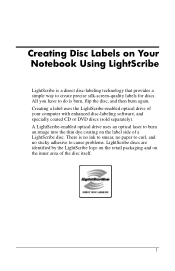
... discs (sold separately). A LightScribe-enabled optical drive uses an optical laser to create precise silk-screen-quality labels for discs. Creating Disc Labels on Your Notebook Using LightScribe LightScribe is burn, flip the disc, and then burn again.
... discs (sold separately). A LightScribe-enabled optical drive uses an optical laser to create precise silk-screen-quality labels for discs. Creating Disc Labels on Your Notebook Using LightScribe LightScribe is burn, flip the disc, and then burn again.
Using LightScribe (Select Models Only)
Page 4
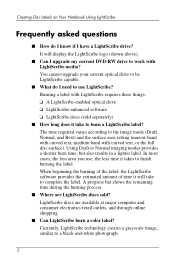
..., medium band with LightScribe requires three things: ❏ A LightScribe-enabled optical drive ❏ LightScribe-enhanced software ❏ LightScribe discs (sold ? Creating Disc Labels on Your Notebook Using LightScribe Frequently asked questions ■ How do I need to use , the less time it takes to finish burning the label. When beginning the burning...
..., medium band with LightScribe requires three things: ❏ A LightScribe-enabled optical drive ❏ LightScribe-enhanced software ❏ LightScribe discs (sold ? Creating Disc Labels on Your Notebook Using LightScribe Frequently asked questions ■ How do I need to use , the less time it takes to finish burning the label. When beginning the burning...
Using LightScribe (Select Models Only)
Page 5
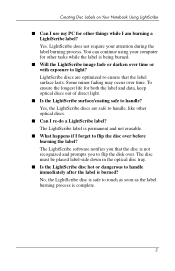
... is burned? To ensure the longest life for other optical discs. ■ Can I re-do a LightScribe label? Creating Disc Labels on Your Notebook Using LightScribe ■ Can I use my PC for other things while I forget to flip the disc over before burning the label? The disc must be placed label-side down...
... is burned? To ensure the longest life for other optical discs. ■ Can I re-do a LightScribe label? Creating Disc Labels on Your Notebook Using LightScribe ■ Can I use my PC for other things while I forget to flip the disc over before burning the label? The disc must be placed label-side down...
Using LightScribe (Select Models Only)
Page 6
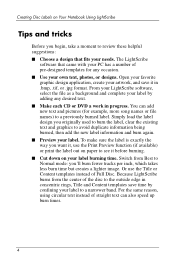
... label, clear the existing text and graphics to avoid duplicate information being burned, then add the new label information and burn again. ■ Preview your PC has a number of the disc to the outside edge in .bmp, .tif, or .jpg format. Or use the Print Preview function (if available) ...your label. Because LightScribe burns from Best to Normal mode: you begin, take a moment to see it before burning. ■ Cut down on Your Notebook Using LightScribe Tips and tricks Before you 'll burn fewer tracks per inch, which takes less burn time but creates a lighter image. Simply load the...
... label, clear the existing text and graphics to avoid duplicate information being burned, then add the new label information and burn again. ■ Preview your PC has a number of the disc to the outside edge in .bmp, .tif, or .jpg format. Or use the Print Preview function (if available) ...your label. Because LightScribe burns from Best to Normal mode: you begin, take a moment to see it before burning. ■ Cut down on Your Notebook Using LightScribe Tips and tricks Before you 'll burn fewer tracks per inch, which takes less burn time but creates a lighter image. Simply load the...
Using LightScribe (Select Models Only)
Page 7
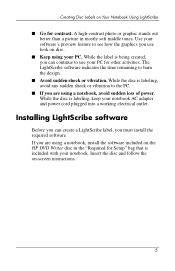
While the disc is being created, you use your PC for other activities. If you are using a notebook, install the software included on the HP DVD Writer disc in mostly soft middle tones. The LightScribe software indicates the time remaining to see how...software Before you can continue to the PC. ■ If you must install the required software. Insert the disc and follow the on-screen instructions. 5 Use your software's preview feature to burn the design. ■ Avoid sudden shock or vibration. Creating Disc Labels on Your Notebook Using LightScribe ■ Go for ...
While the disc is being created, you use your PC for other activities. If you are using a notebook, install the software included on the HP DVD Writer disc in mostly soft middle tones. The LightScribe software indicates the time remaining to see how...software Before you can continue to the PC. ■ If you must install the required software. Insert the disc and follow the on-screen instructions. 5 Use your software's preview feature to burn the design. ■ Avoid sudden shock or vibration. Creating Disc Labels on Your Notebook Using LightScribe ■ Go for ...

Using LightScribe (Select Models Only)
Page 8
...; With InterVideo DiscLabel. ■ With Sonic Express Labeler. ■ After burning a disc with iTunes (available with InterVideo DiscLabel or Sonic Express Labeler. Depending on Your Notebook Using LightScribe Creating a LightScribe label Burning a label with a contents list, or you must flip the disc over and place it label-side down in the...
...; With InterVideo DiscLabel. ■ With Sonic Express Labeler. ■ After burning a disc with iTunes (available with InterVideo DiscLabel or Sonic Express Labeler. Depending on Your Notebook Using LightScribe Creating a LightScribe label Burning a label with a contents list, or you must flip the disc over and place it label-side down in the...
Using LightScribe (Select Models Only)
Page 9
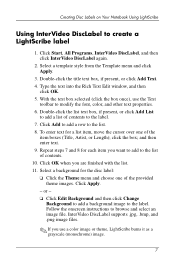
..., or Length); or - ❏ Click Edit Background and then click Change Background to add a background image to create a LightScribe label 1. Creating Disc Labels on Your Notebook Using LightScribe Using InterVideo DiscLabel to the label. Click Start, All Programs, InterVideo DiscLabel, and then click InterVideo DiscLabel again. 2. and then enter text. 9. With...
..., or Length); or - ❏ Click Edit Background and then click Change Background to add a background image to create a LightScribe label 1. Creating Disc Labels on Your Notebook Using LightScribe Using InterVideo DiscLabel to the label. Click Start, All Programs, InterVideo DiscLabel, and then click InterVideo DiscLabel again. 2. and then enter text. 9. With...
Using LightScribe (Select Models Only)
Page 10
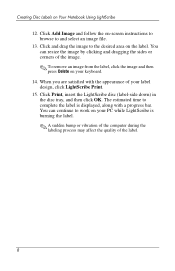
... your keyboard. 14. Click Print, insert the LightScribe disc (label-side down) in the disc tray, and then click OK. Creating Disc Labels on your PC while LightScribe is displayed, along with the appearance of the image. ✎ To remove an image from the label, click the image and then press.... You can continue to and select an image file. 13. Click Add Image and follow the on-screen instructions to browse to work on Your Notebook Using LightScribe 12.
... your keyboard. 14. Click Print, insert the LightScribe disc (label-side down) in the disc tray, and then click OK. Creating Disc Labels on your PC while LightScribe is displayed, along with the appearance of the image. ✎ To remove an image from the label, click the image and then press.... You can continue to and select an image file. 13. Click Add Image and follow the on-screen instructions to browse to work on Your Notebook Using LightScribe 12.
Using LightScribe (Select Models Only)
Page 11
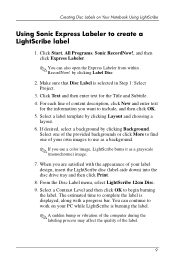
... label. 9 Click Start, All Programs, Sonic RecordNow!, and then click Express Labeler. ✎ You can continue to work on Your Notebook Using LightScribe Using Sonic Express Labeler to create a LightScribe label 1. You can also open the Express Labeler from within RecordNow! Select one ...of the provided backgrounds or click More to find one of your PC while LightScribe is selected in Step 1: Select Project. 3. Creating Disc Labels on your own images to use a color image, LightScribe burns ...
... label. 9 Click Start, All Programs, Sonic RecordNow!, and then click Express Labeler. ✎ You can continue to work on Your Notebook Using LightScribe Using Sonic Express Labeler to create a LightScribe label 1. You can also open the Express Labeler from within RecordNow! Select one ...of the provided backgrounds or click More to find one of your PC while LightScribe is selected in Step 1: Select Project. 3. Creating Disc Labels on your own images to use a color image, LightScribe burns ...
Using LightScribe (Select Models Only)
Page 12
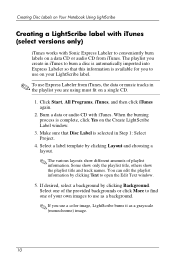
..., LightScribe burns it as a background. ✎ If you to use on your own images to find one of playlist information. Creating Disc Labels on Your Notebook Using LightScribe Creating a LightScribe label with iTunes (select versions only) iTunes works with iTunes. If desired, select a background by clicking Text to conveniently burn labels...
..., LightScribe burns it as a background. ✎ If you to use on your own images to find one of playlist information. Creating Disc Labels on Your Notebook Using LightScribe Creating a LightScribe label with iTunes (select versions only) iTunes works with iTunes. If desired, select a background by clicking Text to conveniently burn labels...
Using LightScribe (Select Models Only)
Page 13
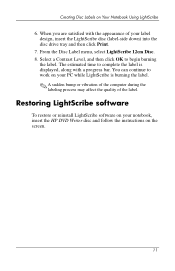
Restoring LightScribe software To restore or reinstall LightScribe software on your notebook, insert the HP DVD Writer disc and follow the instructions on Your Notebook Using LightScribe 6. Creating Disc Labels on the screen. 11 When you are satisfied with a progress bar. You can continue to begin ...the disc drive tray and then click Print. 7. The estimated time to complete the label is displayed, along with the appearance of your PC while LightScribe is burning the label. ✎ A sudden bump or vibration of the computer during the labeling process may affect the quality of...
Restoring LightScribe software To restore or reinstall LightScribe software on your notebook, insert the HP DVD Writer disc and follow the instructions on Your Notebook Using LightScribe 6. Creating Disc Labels on the screen. 11 When you are satisfied with a progress bar. You can continue to begin ...the disc drive tray and then click Print. 7. The estimated time to complete the label is displayed, along with the appearance of your PC while LightScribe is burning the label. ✎ A sudden bump or vibration of the computer during the labeling process may affect the quality of...
Hardware-Software Guide
Page 1
Modem information is not included in this guide. b Hardware and Software Guide Compaq Notebook Series Document Part Number: 383161-001 May 2005 This guide explains how to identify, access, and use most of the hardware and software features available on your notebook.
Modem information is not included in this guide. b Hardware and Software Guide Compaq Notebook Series Document Part Number: 383161-001 May 2005 This guide explains how to identify, access, and use most of the hardware and software features available on your notebook.
Hardware-Software Guide
Page 2
Hardware and Software Guide Compaq Notebook Series First Edition May 2005 Reference Number: V2000 Document Part Number: 383161-001 HP shall not be construed as constituting an additional warranty. The only warranties for technical or editorial errors or omissions ...
Hardware and Software Guide Compaq Notebook Series First Edition May 2005 Reference Number: V2000 Document Part Number: 383161-001 HP shall not be construed as constituting an additional warranty. The only warranties for technical or editorial errors or omissions ...

Hardware-Software Guide
Page 4
... Control and Light Locations 3-3 Standby, Hibernation and Shutdown Overviews 3-4 Standby 3-4 Hibernation 3-5 Leaving Your Work 3-6 Interference with Drive Media 3-6 Standby, Hibernation and Shutdown Procedures 3-7 Turning the Notebook On or Off 3-7 Initiating or Resuming from Standby 3-8 Initiating or Restoring from Hibernation 3-9 Using Emergency Shutdown Procedures 3-10 Power Preferences 3-11 Using Power Schemes 3-11...
... Control and Light Locations 3-3 Standby, Hibernation and Shutdown Overviews 3-4 Standby 3-4 Hibernation 3-5 Leaving Your Work 3-6 Interference with Drive Media 3-6 Standby, Hibernation and Shutdown Procedures 3-7 Turning the Notebook On or Off 3-7 Initiating or Resuming from Standby 3-8 Initiating or Restoring from Hibernation 3-9 Using Emergency Shutdown Procedures 3-10 Power Preferences 3-11 Using Power Schemes 3-11...

Hardware-Software Guide
Page 12
.... For information about changing the function of the display switch or power button, refer to turn on , initiates standby. 2 Power button* When the notebook is closed while on the notebook. ■ On, briefly press to initiate hibernation. ■ In standby, briefly press to resume from standby. ■ In hibernation, briefly press to...
.... For information about changing the function of the display switch or power button, refer to turn on , initiates standby. 2 Power button* When the notebook is closed while on the notebook. ■ On, briefly press to initiate hibernation. ■ In standby, briefly press to resume from standby. ■ In hibernation, briefly press to...

Hardware-Software Guide
Page 13
the other power/standby light is in standby. Blinking: Notebook is always visible on the front of the notebook. Both lights display the same information. Hardware and Software Guide 1-5 Off: Notebook is off. 4 Mute light On: Volume is muted. 5 Num lock light On: Num lock or the ...wireless connection, refer to Chapter 5, "Wireless (Select Models Only)." †There are turned on.* On: Notebook is turned on. The light on the power button is visible only when the notebook is open; Lights Component ID Component Description 1 Caps lock light On: Caps lock is on. 2 Wireless...
the other power/standby light is in standby. Blinking: Notebook is always visible on the front of the notebook. Both lights display the same information. Hardware and Software Guide 1-5 Off: Notebook is off. 4 Mute light On: Volume is muted. 5 Num lock light On: Num lock or the ...wireless connection, refer to Chapter 5, "Wireless (Select Models Only)." †There are turned on.* On: Notebook is turned on. The light on the power button is visible only when the notebook is open; Lights Component ID Component Description 1 Caps lock light On: Caps lock is on. 2 Wireless...

Hardware-Software Guide
Page 15
... on only select models. Nevertheless, the device should be used in such a manner that the potential for human contact during normal operation, including when the notebook display is closed. *The antennae are not visible from obstructions. Hardware and Software Guide 1-7 Antennae Component ID Component Description Antennae (2)* Send and receive wireless device... should be not less than 20 cm (8 inches) during normal operation is below the FCC radio frequency exposure limits. To avoid the possibility of the notebook.
... on only select models. Nevertheless, the device should be used in such a manner that the potential for human contact during normal operation, including when the notebook display is closed. *The antennae are not visible from obstructions. Hardware and Software Guide 1-7 Antennae Component ID Component Description Antennae (2)* Send and receive wireless device... should be not less than 20 cm (8 inches) during normal operation is below the FCC radio frequency exposure limits. To avoid the possibility of the notebook.


