Instruction Manual
Page 5
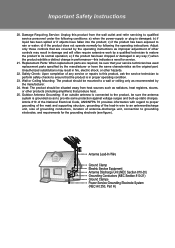
... product; d) if the product does not operate normally by following conditions: a) when the power-supply or plug is in damage and will often require extensive work by the manufacturer. 2222 Heat: The product should be situated away from the wall outlet and refer servicing to qualified service personnel under...
... product; d) if the product does not operate normally by following conditions: a) when the power-supply or plug is in damage and will often require extensive work by the manufacturer. 2222 Heat: The product should be situated away from the wall outlet and refer servicing to qualified service personnel under...
Instruction Manual
Page 10
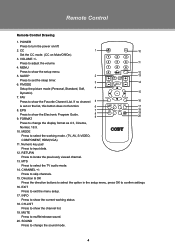
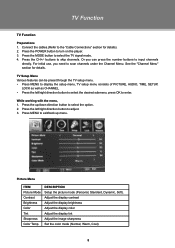
... 10 Set the CC mode. (CC on the list, this button does not function. 6 P-MODE 17 8. Press to show the current working mode. (TV, AV, S-VIDEO, COMPONENT, HDMI,VGA). 11. CH-LIST Press to skip channels. 15. EXIT Press to turn the power...exit the menu setup. 17. P.MODE Setup the picture mode (Personal, Standard, Soft, 4 Dynamic). 15 7. MUTE Press to select the working status. 18. MODE Press to muffle/release sound. 20. FORMAT 9 19 20 Press to change the display format as 4:3, Cinema, Normal, ...
... 10 Set the CC mode. (CC on the list, this button does not function. 6 P-MODE 17 8. Press to show the current working mode. (TV, AV, S-VIDEO, COMPONENT, HDMI,VGA). 11. CH-LIST Press to skip channels. 15. EXIT Press to turn the power...exit the menu setup. 17. P.MODE Setup the picture mode (Personal, Standard, Soft, 4 Dynamic). 15 7. MUTE Press to select the working status. 18. MODE Press to muffle/release sound. 20. FORMAT 9 19 20 Press to change the display format as 4:3, Cinema, Normal, ...
Instruction Manual
Page 11
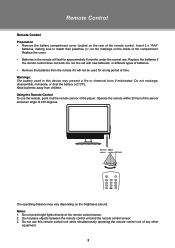
... Remote Control To use the remote, point it will last for a long period of the compartment. Replace the batteries if the remote control does not work. Do not recharge, disassemble, incinerate, or heat the battery (~212ºF). Notes: 111 Do not point bright lights directly at the remote sensor of any...
... Remote Control To use the remote, point it will last for a long period of the compartment. Replace the batteries if the remote control does not work. Do not recharge, disassemble, incinerate, or heat the battery (~212ºF). Notes: 111 Do not point bright lights directly at the remote sensor of any...
Instruction Manual
Page 14
.... See the "Channel Menu" section for details). 222 Press the POWER button to turn on the player. 333 Press the MODE button to enter. While working with the menu, 111 Press the up/down direction button to select the option. 222 Press the left /right direction button to select the desired...
.... See the "Channel Menu" section for details). 222 Press the POWER button to turn on the player. 333 Press the MODE button to enter. While working with the menu, 111 Press the up/down direction button to select the option. 222 Press the left /right direction button to select the desired...

Instruction Manual
Page 18
..., SETUP as well as LOCK. •• Press the left /right direction button to adjust. 333 Press MENU to exit/back up the menu. While working with the menu 111 Press the up/down direction buttons to select the desired item. 222 Press the left /right direction button to select the...
..., SETUP as well as LOCK. •• Press the left /right direction button to adjust. 333 Press MENU to exit/back up the menu. While working with the menu 111 Press the up/down direction buttons to select the desired item. 222 Press the left /right direction button to select the...

Instruction Manual
Page 19
... direction buttons to select the desired item. 222 Press the left /right direction button to select the desired sub-menu, press OK to enter. While working with the monitor after, adjust "H-Pos", "V-Pos", "Clock" as well as SETUP. •• Press the left /right direction button to adjust. 333 Press MENU...
... direction buttons to select the desired item. 222 Press the left /right direction button to select the desired sub-menu, press OK to enter. While working with the monitor after, adjust "H-Pos", "V-Pos", "Clock" as well as SETUP. •• Press the left /right direction button to adjust. 333 Press MENU...
Instruction Manual
Page 20
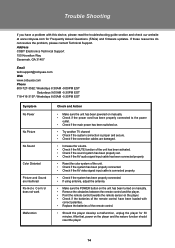
...remote control. •• Should the player develop a malfunction, unplug the player for Frequently Asked Questions (FAQs) and firmware updates. Address COBY Electronics Technical Support 150 Knowlton Way Savannah, GA 31407 Email [email protected] Web www.cobyusa.com Phone 800-727-3592: Weekdays 8:30AM -9:...3197: Weekdays 8:00AM -5:30PM EST Symptom No Power No Picture No Sound Color Distorted Picture and Sound are interfered Remote Control does not work Malfunction Check and Action •• Make sure the unit has been powered on manually. •• Check if the power ...
...remote control. •• Should the player develop a malfunction, unplug the player for Frequently Asked Questions (FAQs) and firmware updates. Address COBY Electronics Technical Support 150 Knowlton Way Savannah, GA 31407 Email [email protected] Web www.cobyusa.com Phone 800-727-3592: Weekdays 8:30AM -9:...3197: Weekdays 8:00AM -5:30PM EST Symptom No Power No Picture No Sound Color Distorted Picture and Sound are interfered Remote Control does not work Malfunction Check and Action •• Make sure the unit has been powered on manually. •• Check if the power ...
Instruction Manual
Page 21
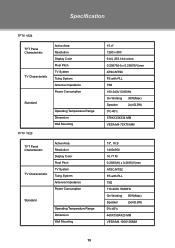
... Dimension Wall Mounting 15.4" 1280 x 800 6-bit, 262.144 colors 0.25875(H) x 0.25875(V)mm ATSC/NTSC FS with PLL 75Ω 100-240V 50/60Hz On Working 30W(Max) Speaker 2x(4Ω,5W) 0ºc-40ºc 378X133X334 MM VESA M4 75X75 MM 19", 16:9 1440x900 16.77 M 0.2835(H) x 0.2835(V)mm ATSC/NTSC...
... Dimension Wall Mounting 15.4" 1280 x 800 6-bit, 262.144 colors 0.25875(H) x 0.25875(V)mm ATSC/NTSC FS with PLL 75Ω 100-240V 50/60Hz On Working 30W(Max) Speaker 2x(4Ω,5W) 0ºc-40ºc 378X133X334 MM VESA M4 75X75 MM 19", 16:9 1440x900 16.77 M 0.2835(H) x 0.2835(V)mm ATSC/NTSC...
Instruction Manual
Page 23
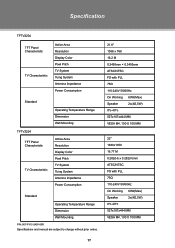
... to change without prior notice. 17 21.6" 1366 x 768 16.2 M 0.3495mm × 0.3495mm ATSC/NTSC FS with PLL 75Ω 110-240V 50/60Hz On Working 60W(Max) Speaker 2x(4Ω,5W) 0ºc-40ºc 527x167x444 MM VESA M4, 100 X 100 MM 22" 1680x1050 16.77 M 0.282(H) x 0.282(V)mm ATSC/NTSC... FS with PLL 75Ω 110-240V 50/60Hz On Working 60W(Max) Speaker 2x(4Ω,5W) 0ºc-40ºc 527x167x444 MM VESA M4, 100 X 100 MM
... to change without prior notice. 17 21.6" 1366 x 768 16.2 M 0.3495mm × 0.3495mm ATSC/NTSC FS with PLL 75Ω 110-240V 50/60Hz On Working 60W(Max) Speaker 2x(4Ω,5W) 0ºc-40ºc 527x167x444 MM VESA M4, 100 X 100 MM 22" 1680x1050 16.77 M 0.282(H) x 0.282(V)mm ATSC/NTSC... FS with PLL 75Ω 110-240V 50/60Hz On Working 60W(Max) Speaker 2x(4Ω,5W) 0ºc-40ºc 527x167x444 MM VESA M4, 100 X 100 MM


