Instruction Manual
Page 4
...product. 14. Water and Moisture: Do not use this product on the rating label. Do not defeat the safety purpose of other . Power-Cord Protection: Power supply cords should still fail to fit, contact an electrician to reset the protective device. This is a safety feature. pod, bracket, or ...outlet, try reversing the direction of the product and to protect it from battery power or other similar surface. If the plug should be routed so that they exit from the type of power supply to the operating instructions. 12. Read Instructions: All the safety and operating ...
...product. 14. Water and Moisture: Do not use this product on the rating label. Do not defeat the safety purpose of other . Power-Cord Protection: Power supply cords should still fail to fit, contact an electrician to reset the protective device. This is a safety feature. pod, bracket, or ...outlet, try reversing the direction of the product and to protect it from battery power or other similar surface. If the plug should be routed so that they exit from the type of power supply to the operating instructions. 12. Read Instructions: All the safety and operating ...
Instruction Manual
Page 5
...: For added protection for long periods of time. d) if the product does not operate normally by following conditions: a) when the power-supply or plug is left unattended and unused for this product, unplug it from the wall outlet and disconnect the antenna or cable system during...be taken to grounding electrodes, and requirements for service. 5 When installing an outside antenna is grounded so as this product from touching such power lines or circuits, as contact with regard to proper grounding of the mast and supporting structure, grounding of the lead-in wire to an ...
...: For added protection for long periods of time. d) if the product does not operate normally by following conditions: a) when the power-supply or plug is left unattended and unused for this product, unplug it from the wall outlet and disconnect the antenna or cable system during...be taken to grounding electrodes, and requirements for service. 5 When installing an outside antenna is grounded so as this product from touching such power lines or circuits, as contact with regard to proper grounding of the mast and supporting structure, grounding of the lead-in wire to an ...

Instruction Manual
Page 7
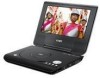
...getting started...16 Using the Remote Control...16 Power Supply...16 BASIC OPERATIONS...17 Basic Playback...17 Play/Pause/Stop...17 Next /Previous (Skip)...17 Forward/Reverse (Search)...17 Slow...17 Menu Navigation...17 Numeric Keypad...18 Adjusting the Volume...18 Disc Error Messages...18 Power Management...18 FUNCTION BUTTONS...19 Display / ... Front View...11 Right View...12 Left View...12 Bottom View...12 Remote Control...13 CONNECTIONS...14 Audio & Video Connections 14 Headphone Connection...14 Power Connection...15 Connecting to the wall outlet 15 Using the car plug...15 Using the Built-
...getting started...16 Using the Remote Control...16 Power Supply...16 BASIC OPERATIONS...17 Basic Playback...17 Play/Pause/Stop...17 Next /Previous (Skip)...17 Forward/Reverse (Search)...17 Slow...17 Menu Navigation...17 Numeric Keypad...18 Adjusting the Volume...18 Disc Error Messages...18 Power Management...18 FUNCTION BUTTONS...19 Display / ... Front View...11 Right View...12 Left View...12 Bottom View...12 Remote Control...13 CONNECTIONS...14 Audio & Video Connections 14 Headphone Connection...14 Power Connection...15 Connecting to the wall outlet 15 Using the car plug...15 Using the Built-
Instruction Manual
Page 12
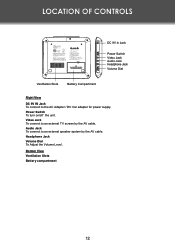
Headphone Jack Volume Dial To Adjust the Volume Level. Bottom View Ventilation Slots Battery compartment 12 Power Switch To turn on/off the unit. LOCATION OF CONTROLS DC 9V in Jack Power Switch Video Jack Audio Jack Headphone Jack Volume Dial Ventilation Slots Battery Compartment Right View DC 9V IN Jack To connect to an external TV screen by the AV cable. Audio Jack To connect to an external speaker system by the AV cable. Video Jack To connect to the AC Adapter / DC Car adapter for power supply.
Headphone Jack Volume Dial To Adjust the Volume Level. Bottom View Ventilation Slots Battery compartment 12 Power Switch To turn on/off the unit. LOCATION OF CONTROLS DC 9V in Jack Power Switch Video Jack Audio Jack Headphone Jack Volume Dial Ventilation Slots Battery Compartment Right View DC 9V IN Jack To connect to an external TV screen by the AV cable. Audio Jack To connect to an external speaker system by the AV cable. Video Jack To connect to the AC Adapter / DC Car adapter for power supply.
Instruction Manual
Page 17
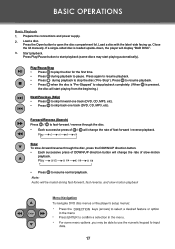
...slow-motion playback. • Press to stop playback completely. (When is loaded upside-down, the player will change the rate of DOWN/UP direction button will display "BAD DISC". 3. Prepare the connections and power supply. 2. Press to resume playback. • Press when the disc is "Pre-Stopped" to pause... start playback (some discs may start playing from the beginning.) Next/Previous (Skip) • Press to skip forward one track (DVD, CD, MP3, etc). • Press to skip back one track (DVD, CD, MP3, etc). Load a disc with the label-side facing up. Close the lid manually.
...slow-motion playback. • Press to stop playback completely. (When is loaded upside-down, the player will change the rate of DOWN/UP direction button will display "BAD DISC". 3. Prepare the connections and power supply. 2. Press to resume playback. • Press when the disc is "Pre-Stopped" to pause... start playback (some discs may start playing from the beginning.) Next/Previous (Skip) • Press to skip forward one track (DVD, CD, MP3, etc). • Press to skip back one track (DVD, CD, MP3, etc). Load a disc with the label-side facing up. Close the lid manually.


