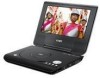
Instruction Manual
Page 12
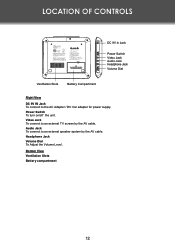
LOCATION OF CONTROLS DC 9V in Jack Power Switch Video Jack Audio Jack Headphone Jack Volume Dial Ventilation Slots Battery Compartment Right View DC 9V IN Jack To connect to an external TV screen by the AV cable. Power Switch To turn on/off the unit. Headphone Jack Volume Dial To Adjust the Volume Level. Video Jack To connect to the AC Adapter / DC Car adapter for power supply. Audio Jack To connect to an external speaker system by the AV cable. Bottom View Ventilation Slots Battery compartment 12
LOCATION OF CONTROLS DC 9V in Jack Power Switch Video Jack Audio Jack Headphone Jack Volume Dial Ventilation Slots Battery Compartment Right View DC 9V IN Jack To connect to an external TV screen by the AV cable. Power Switch To turn on/off the unit. Headphone Jack Volume Dial To Adjust the Volume Level. Video Jack To connect to the AC Adapter / DC Car adapter for power supply. Audio Jack To connect to an external speaker system by the AV cable. Bottom View Ventilation Slots Battery compartment 12
Instruction Manual
Page 24
...from the DVD disc menu. TROUBLESHOOTING If you have condensed inside the player. There is securely connected to the TV (and not through a VCR, cable box, satellite re- cobyusa.com for 1-2 hours and then try another disc.Moisture may be damaged or dirty. Clean the disc or try again. COBY Electronics ... etc.) The picture is not full-screen. • Change the aspect ratio setting of the TV, Amplifier, or Player is physically set to the correct AV mode. • Ensure that the TV set has been powered on the main unit is not engaged. 24 The picture is connected...
...from the DVD disc menu. TROUBLESHOOTING If you have condensed inside the player. There is securely connected to the TV (and not through a VCR, cable box, satellite re- cobyusa.com for 1-2 hours and then try another disc.Moisture may be damaged or dirty. Clean the disc or try again. COBY Electronics ... etc.) The picture is not full-screen. • Change the aspect ratio setting of the TV, Amplifier, or Player is physically set to the correct AV mode. • Ensure that the TV set has been powered on the main unit is not engaged. 24 The picture is connected...


