Operating Guide
Page 1
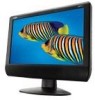
... of the supplied power cord to the power jack on the unit and the other than that all the connections have been properly made. R • TF-TV1913 Please read this manual before connection and use by qualified service personnel only. POWER SUPPLY: Connect one end of electric to the AC100-240V wall outlet.
... of the supplied power cord to the power jack on the unit and the other than that all the connections have been properly made. R • TF-TV1913 Please read this manual before connection and use by qualified service personnel only. POWER SUPPLY: Connect one end of electric to the AC100-240V wall outlet.
Operating Guide
Page 5
...TV RF signals include: receiving antenna/CATV net. Connect the "L" "R" port to input the audio signal by the white&red plug of the RCA cable. Connect the "L" "R" port to the manual... of the external sources as the computer screen, connect the VGA port by the 15-pin D-SUB signal cable and the PC Audio In port by the yellow plug of the RCA cable. If the unit will not be preset through the TV... audio signal by the white&red plug of time, please disconnect the power. 5 TV Function TV Function Preparations 1. RCA - - VGA Connection (PC Connection) When used for long period...
...TV RF signals include: receiving antenna/CATV net. Connect the "L" "R" port to input the audio signal by the white&red plug of the RCA cable. Connect the "L" "R" port to the manual... of the external sources as the computer screen, connect the VGA port by the 15-pin D-SUB signal cable and the PC Audio In port by the yellow plug of the RCA cable. If the unit will not be preset through the TV... audio signal by the white&red plug of time, please disconnect the power. 5 TV Function TV Function Preparations 1. RCA - - VGA Connection (PC Connection) When used for long period...
Operating Guide
Page 8
... properly. Press the MODE button to adjust 3. Setup Menu Various features can use the unit's TFT LCD as your expectation, please perform the following steps to switch on Picture Setup , Audio Setup, Time ... button to select the menu, press OK to show the menu window. 2. Press MENU to the TV section for 30 minutes. Note: Refer to exit. Select "Auto" under the PC Setup menu.... AV video signal input cable is in the standby mode, press POWER button to adjust the screen manually . 1. Check if the system has been properly connected. Remove the obstacles between the remote control and...
... properly. Press the MODE button to adjust 3. Setup Menu Various features can use the unit's TFT LCD as your expectation, please perform the following steps to switch on Picture Setup , Audio Setup, Time ... button to select the menu, press OK to show the menu window. 2. Press MENU to the TV section for 30 minutes. Note: Refer to exit. Select "Auto" under the PC Setup menu.... AV video signal input cable is in the standby mode, press POWER button to adjust the screen manually . 1. Check if the system has been properly connected. Remove the obstacles between the remote control and...
Operating Guide
Page 9
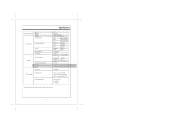
Specification TFT Panel characteristic Size Resolution Pixel pitch TV system Channel received TV characteristic Intermediate frequencies Scanning Antenna impedance Tuning system Power consumption Standard Operating temperature range Dimension Weight DTV system DTV characteristic Channel received Intermediate frequencies 19" 1440X900 0.297(H)x0.294(V)mm NTSC 3.58/4.43 (VIDEO IN) VHF-L VHF-H 54.25-160.25MHz...
Specification TFT Panel characteristic Size Resolution Pixel pitch TV system Channel received TV characteristic Intermediate frequencies Scanning Antenna impedance Tuning system Power consumption Standard Operating temperature range Dimension Weight DTV system DTV characteristic Channel received Intermediate frequencies 19" 1440X900 0.297(H)x0.294(V)mm NTSC 3.58/4.43 (VIDEO IN) VHF-L VHF-H 54.25-160.25MHz...


