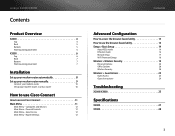
User Manual
Page 3
... X2000 4 Top 4 Back 5 Bottom 5 Wall-mounting placement 5 X3000 6 Top 6 Back 7 Bottom 7 Wall-mounting placement 7 Installation Set up your modem-router automatically 8 Set up your modem-router manually 9 Connect your modem-router 10 Set up your modem-router as only a router 10 How to access Cisco ...Configuration How to access the browser-based utility 13 How to use Cisco Connect How to use the browser-based utility 14 Setup > Basic Setup 14 Auto/ADSL mode 14 Ethernet mode 16 Manual setup 17 Wi-Fi Protected Setup 18 Wireless > Wireless Security 19...
... X2000 4 Top 4 Back 5 Bottom 5 Wall-mounting placement 5 X3000 6 Top 6 Back 7 Bottom 7 Wall-mounting placement 7 Installation Set up your modem-router automatically 8 Set up your modem-router manually 9 Connect your modem-router 10 Set up your modem-router as only a router 10 How to access Cisco ...Configuration How to access the browser-based utility 13 How to use Cisco Connect How to use the browser-based utility 14 Setup > Basic Setup 14 Auto/ADSL mode 14 Ethernet mode 16 Manual setup 17 Wi-Fi Protected Setup 18 Wireless > Wireless Security 19...

User Manual
Page 9
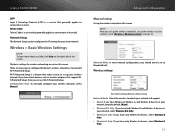
... chose Modem router in Step 4, you cannot run the Setup CD-ROM, refer to the steps below. If you are setting up your modem-router manually Note Run the Setup CD-ROM to install the modem-router. Connect the power cable, then turn on -screen instructions to finish the setup. All..., and static settings (if necessary). Note If you chose Router only in New Zealand, see "NOTE FOR USERS IN NEW ZEALAND" on page 11. 9 Linksys X2000/X3000 Or, if you are asked to enter your ISP information. b. Set up your modem-router in Step 4: a.
... chose Modem router in Step 4, you cannot run the Setup CD-ROM, refer to the steps below. If you are setting up your modem-router manually Note Run the Setup CD-ROM to install the modem-router. Connect the power cable, then turn on -screen instructions to finish the setup. All..., and static settings (if necessary). Note If you chose Router only in New Zealand, see "NOTE FOR USERS IN NEW ZEALAND" on page 11. 9 Linksys X2000/X3000 Or, if you are asked to enter your ISP information. b. Set up your modem-router in Step 4: a.
User Manual
Page 17
...devices, select Wireless-G Only. 17 Wi-Fi Protected Setup is a service that generally applies to connections in Israel. Configuration View To manually configure your local network. Network Mode In most network configurations, you can use Wi-Fi Protected Setup. The basic settings for your...wireless network(s), set up the wireless network on this screen. Note After you have both Wireless-B and Wireless-G devices in Australia. Linksys X2000/X3000 L2TP Layer 2 Tunneling Protocol (L2TP) is a feature that makes it set to Mixed (default). Network Setup The Network Setup...
...devices, select Wireless-G Only. 17 Wi-Fi Protected Setup is a service that generally applies to connections in Israel. Configuration View To manually configure your local network. Network Mode In most network configurations, you can use Wi-Fi Protected Setup. The basic settings for your...wireless network(s), set up the wireless network on this screen. Note After you have both Wireless-B and Wireless-G devices in Australia. Linksys X2000/X3000 L2TP Layer 2 Tunneling Protocol (L2TP) is a feature that makes it set to Mixed (default). Network Setup The Network Setup...
User Manual
Page 19
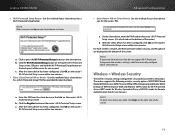
... Wi-Fi Protected Access. Note Make sure you have client devices that do not support Wi-Fi Protected Setup, note the wireless settings, and then manually configure those client devices. Linksys X2000/X3000 •• Wi-Fi Protected Setup Button Use this method if your client device asks for the router's PIN. a. c.
... Wi-Fi Protected Access. Note Make sure you have client devices that do not support Wi-Fi Protected Setup, note the wireless settings, and then manually configure those client devices. Linksys X2000/X3000 •• Wi-Fi Protected Setup Button Use this method if your client device asks for the router's PIN. a. c.
User Manual
Page 22
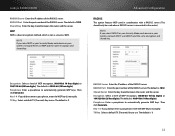
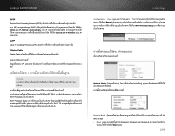
...passphrase to automatically generate WEP keys. The default is 1812. Then click Generate. Key 1-4 If you did not enter a passphrase, enter the WEP key(s) manually. TX Key Select a default TX (Transmit) Key to use . RADIUS Port Enter the port number of WEP encryption, (40/64-bit 10 hex digits)...is 1812. The default is 40/64-bit (10 hex digits). Encryption Select a level of the RADIUS server. The default is 1. 22 Linksys X2000/X3000 RADIUS Server Enter the IP address of WEP encryption, (40/64-bit 10 hex digits) or 104/128-bit (26 hex digits). Passphrase ...
...passphrase to automatically generate WEP keys. The default is 1812. Then click Generate. Key 1-4 If you did not enter a passphrase, enter the WEP key(s) manually. TX Key Select a default TX (Transmit) Key to use . RADIUS Port Enter the port number of WEP encryption, (40/64-bit 10 hex digits)...is 1812. The default is 40/64-bit (10 hex digits). Encryption Select a level of the RADIUS server. The default is 1. 22 Linksys X2000/X3000 RADIUS Server Enter the IP address of WEP encryption, (40/64-bit 10 hex digits) or 104/128-bit (26 hex digits). Passphrase ...
User Manual
Page 25
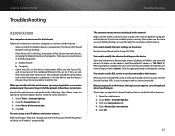
... a connection. 4. Select Never dial a connection. 5. Click OK. Refer to Windows Help and change the settings You cannot use the DSL service to connect manually to the Internet: •• Make sure that the Modem Router is 192.168.1.1). When you open the web browser, the login screen appears, even... can connect to the Internet. Click OK. 25 Computer •• Check the LEDs on the device. You need to the Internet. Linksys X2000/X3000 Troubleshooting X2000/X3000 Your computer cannot connect to log in. Launch the web browser and perform the following order: a.
... a connection. 4. Select Never dial a connection. 5. Click OK. Refer to Windows Help and change the settings You cannot use the DSL service to connect manually to the Internet: •• Make sure that the Modem Router is 192.168.1.1). When you open the web browser, the login screen appears, even... can connect to the Internet. Click OK. 25 Computer •• Check the LEDs on the device. You need to the Internet. Linksys X2000/X3000 Troubleshooting X2000/X3000 Your computer cannot connect to log in. Launch the web browser and perform the following order: a.
User Manual
Page 279
Linksys X2000/X3000 PPTP Point-to-Point Tunneling Protocol (PPTP ISP DHCP IP Obtain an IP Address Automatically (รบั IP IP Specify an IP Address IP L2TP Layer 2 Tunneling Protocol (L2TP Telstra Cable Telstra Cable IP Help Wi-Fi Protected Wi-Fi) Wi-Fi Protected Setup Wi-Fi Wi-Fi Wi-Fi Configuration View Manual Wi-Fi Wi-Fi Protected Setup Wi-Fi) Network Mode Mixed Network Mode 2.4 GHz Mixed Wireless-B, Wireless-G และ Wireless-N (2.4 GHz Mixed (ผสม) 279
Linksys X2000/X3000 PPTP Point-to-Point Tunneling Protocol (PPTP ISP DHCP IP Obtain an IP Address Automatically (รบั IP IP Specify an IP Address IP L2TP Layer 2 Tunneling Protocol (L2TP Telstra Cable Telstra Cable IP Help Wi-Fi Protected Wi-Fi) Wi-Fi Protected Setup Wi-Fi Wi-Fi Wi-Fi Configuration View Manual Wi-Fi Wi-Fi Protected Setup Wi-Fi) Network Mode Mixed Network Mode 2.4 GHz Mixed Wireless-B, Wireless-G และ Wireless-N (2.4 GHz Mixed (ผสม) 279


